|
3.11 Lens
Calibration
You may recall from section 2.6
that SLR cameras use a clever trick to determine exactly how much the
focusing element of a lens needs to be moved in order to achieve “perfect” focus (with some caveats, which
we won’t repeat here). In
order for this scheme to work properly, the camera needs to know some
things about the particular lens that’s currently attached—most
importantly, it needs to know the rate at which movements of the
focusing element translate into focal point movements of various
magnitudes. Given knowledge of this mathematical relationship, as
well as knowledge about the current position of the lens’ focusing
element, the camera can determine the precise electronic signal that it
needs to send to the lens to bring the lens into perfect focus (in
ideal conditions).
Unfortunately, lenses and cameras in the real world
aren’t perfect. There are manufacturing defects that occasionally
occur, and even when a lens or camera has been manufactured according
to engineering specifications, individual components in either system
can sometimes be “knocked out of alignment”, meaning that they no
longer satisfy engineering specifications (possibly due to being
dropped on the ground, etc.). In these cases, what the camera thinks it knows about the lens’
current state may not be 100% accurate (or, in engineering parlance, “not within operating tolerances”).
The result is often a camera/lens system that
doesn’t focus perfectly. You might, for example, notice that
most of your bird photos seem to be slightly out of focus, while
another object in the scene appears to be in better focus than the bird
(even though you didn’t point the AF sensor point at that
object). In this case, we’d say that the lens or camera is out of calibration, or out of collimation.
In order to fix this problem, you can either send
the camera/lens in to the manufacturer’s service center for
re-calibration, or (if the camera offers this feature) do the
re-calibration yourself. An increasing number of DSLR cameras
nowadays allow the user to calibrate either the camera or individual
lenses to be used with the camera. We’ll focus (no pun intended)
here on the latter problem (calibration of lenses), but the procedure
outlined below is equally applicable to calibration of the camera.
The method by which some cameras allow you to
calibrate lenses is by setting a microadjust
parameter for each lens. In the case of the Canon 1D Mark III
camera, the microadjust screen appears as shown in Figure 3.11.1,
below.
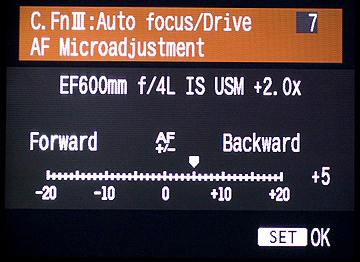
Fig. 3.11.1:
Microadjustment of focus.
This particular lens/TC combination (600mm lens
+ 2× TC) was
consistently front-focusing, so I set a
microadjust of +5 in the camera, and the focus is
now dead-on. Finding
the right setting was a
process of trial-and-error.
In the figure
above, I’m correcting a lens calibration error in which the camera
tends to front-focus. To compensate for this front-focusing
tendency, I’ve dialed in a microadjustment of +5, which will force the
camera to focus 5 units backward from where it normally would for this
lens/TC combination (in this example I’m calibrating a 600mm lens with
2× teleconverter attached).
Because teleconverters can impose
their own front/back focusing biases, some cameras allow you to
microadjust combinations of a lens and teleconverter, as in the
previous figure.
The real problem is determining precisely how much of a microadjustment is
necessary in order to produce optimal autofocus behavior. In
practice, this is almost always done via trial and error. That
is, you dial in a microadjust setting, see how that affects the photos
you subsequently take, and then progressively change the setting based
on the effect of previous settings. A popular way to do this is
by using a focus chart, as
shown below.
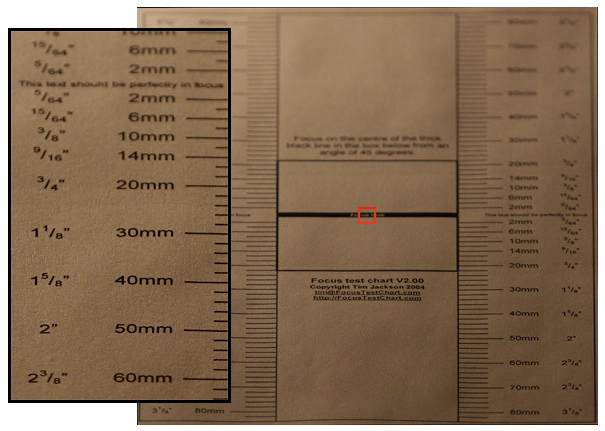
Fig. 3.11.2: A
sample focus chart.
Right: the full focus chart, printed on 8.5"×11" paper and
affixed to a 45-degree surface. The red square represents
the AF sensor point (center) used to autofocus the lens.
Left: a zoomed-in view of the left ruler portion of the chart.
The most in-focus region is around 40mm, indicating a
severe front-focusing condition.
Focus charts can be readily found on the internet. Once you find
one, you download it onto your computer, print it onto standard 8"×11"
paper, and then affix it to a surface positioned at a 45-degree angle
from the horizontal. (The actual angle isn’t that important, so
you can just estimate the angle by eye). Then set your camera up
on a tripod so that the lens is level with the focus chart.
Autofocus on the center of the chart, and take the photo.
For the particular chart used in the figure above,
the camera needs to be auto-focused on the black bar in the center of
the chart. Along either edge of the chart is a ruler which tells
you how far out of focus the resulting image is. What you need to
do is to estimate where, on that ruler, the most in-focus point
is. If your camara and lens are perfectly calibrated, then (in
ideal conditions) the reading on the ruler will tell you that the AF is
out by 0mm. As you can see in the figure above, the camera/lens
combination used for this particular test was out by about 40mm, since
that’s the reading on the ruler that (to my eyes) is the most
in-focus. I sent this particular camera (which was manufactured
by Canon) in to Sigma’s repair center (since I suspected the Sigma lens
was what was out of collimation), and they performed their own tests,
concluding that the camera was indeed mis-calibrated, and in their
words was “off the charts” in its degree of
mis-calibration. That
was a brand-new Canon camera. After sending it to Canon, they
agreed that it was mis-calibrated, attempted to re-calibrated it
themselves, and returned it to me, whereupon I found that it was still
mis-calibrated. Calibration of cameras and lenses can be a real
headache.
Now, there’s a potentially serious problem with the
approach described above for determining focus error in a
camera/lens. If you look closely at the zoomed-in ruler view in
the figure above, you’ll see that the paper itself has texture.
And that texture was captured by the camera’s imaging sensor (otherwise
you wouldn’t be able to see it in the image!). Whether the AF
sensors have enough resolution to “see” that detail is another
question, but if they can “see” that paper texture, then
interpreting
the results of focus experiments using focus charts like the one shown
above becomes more difficult. One useful suggestion from a
fellow photographer is to print the chart onto matte paper, to reduce
the amount of texture apparent on the surface of the paper.
Another suggestion is to focus on the sparser regions of the chart
where there are fewer printed lines that could conceivably distract the
AF sensor. The key is to be sure that the camera’s AF circuitry
has indeed focused on the part of the chart that you think it has
focused on. Any inferences about AF error must necessarily be
predicated on the assumption that the camera intended to focus on the
image features that you’ve isolated. Otherwise, conclusions based
on these types of tests are less than iron-clad. It’s also a good
idea to shoot with a shallow depth of field (i.e., a wide aperture), to
ease interpretation of the results, though obviously autofocus is
itself performed at the widest aperture possible with the lens
currently attached (i.e., stopping down to your selected aperture
doesn’t happen until after the camera has already achieved focus).
Note that in the figure above
we’ve superimposed the AF sensor box over the frame, to show that the
center AF sensor was used to focus on the black bar in the focus
chart. Unfortunately, the AF sensor boxes that you can see in the
viewfinder of your camera are only meant to indicate the relative
positions of the AF sensors, and may not accurately represent the
absolute sizes of the AF
sensor regions in the image. Thus, in the example above, the
center AF sensor point may have included quite a sizeable region around
the red square shown in the figure, and if the AF sensor can resolve
details as fine as the paper texture apparent in the figure, then it
may be difficult to be sure that the camera is in fact front-focusing.
For this reason, I determine my microadjust settings
in the field using birds instead of focus charts. After
photographing a bird perched on a branch that is not parallel to the
camera, I look at the branch (in the image replayed on the camera’s
LCD) to see how much the end of the branch closer to the camera, versus
how much the end further from the camera, is in focus. If the
bird appears to be out of focus while the portion of the branch closer
to the camera appears to be in focus, then I conclude that the camera
is front-focusing. In that case I change the microadjust setting
by a few clicks in the appropriate direction, and then take another
photo of the bird and see whether that has improved the focus. By
then the bird may have flown off, but in that case I just wait until I
can find another subject. Individual “clicks” on the microadjust
scale don’t seem to make an enormous difference in focus, so while
fine-tuning the microadjust setting it’s typically still possible to
get some usable images (i.e., usable for other things than just focus
calibration).
If your camera doesn’t provide a microadjust
feature, or if the focus error is so large that the microadjust setting
can’t provide a large enough correction, then you’ll need to send your
camera and/or lens in to the manufacturer for re-calibration.
Some
manufacturers recommend that you send in both the camera and the lens
(or even all of your lenses)
so that they can be jointly calibrated so as to provide optimal
performance when used together. I’ve never done this, but I’ve
heard that it can result in noticeable improvement in focus
accuracy. For units no longer under warranty, this may incur a
fee from the manufacturer.
Note that the use of third-party lenses may
complicate the calibration process if done by the manufacturer(s),
since you’ll be dealing with two different manufacturers (one for the
camera, and one for the lens). As mentioned earlier, I once tried
to resolve a focus
calibration issue for a Canon camera in combination with a Sigma
lens. Canon insisted that the Sigma lens was to blame, while
Sigma insisted that the Canon camera was to blame. In the end, I
decided to trade in both the camera and the lens for a camera/lens
combination from the same manufacturer, with the camera being a model
with an end-user microadjust feature. This has worked flawlessly
for me.
|
|
|
