|
6.7 Selecting AF Points
As we described in section 2.6,
the standard autofocus mechanism used by DSLRs (except when in live
view mode) is based on one or more tiny strips of pixels called autofocus sensors, or AF points. In many cameras,
you can see
a representation of the AF points by looking into your viewfinder:
they’ll appear as tiny squares or diamonds, usually arranged into a
regular pattern that spans much of the visual field. In some
cameras they’re only visible when the autofocus is actually engaged,
and may change from black to red when the camera believes it has
achieved perfect focus. Note that these squares or diamonds that
you see in the viewfinder only represent the general locations of the
individual AF sensors; in general, the actual AF sensor may be larger
or smaller than the glyph seen through the viewfinder.
There are a number of factors that need to be
considered when deciding which AF point(s) to use in a given
situation. Obviously, you’ll always want to make sure that the
selected AF point(s) are positioned on the bird in the viewfinder,
rather than on other features of the scene such as branches or leaves,
or even other birds besides the one you’re concentrating on capturing
most prominently in the image.
Perhaps the simplest strategy to begin with is to
use only the center AF point, and to always keep the bird positioned in
the center of the frame. When autofocus is engaged (by pressing
the shutter-release button halfway), the camera will focus on the bird,
since the center AF point should be positioned on it. If you’re
close enough (or using a lens with enough magnification), the bird may
be large enough in frame that you can position the center AF point on
just the bird’s face, or just on its eye. This is typically what
you want, since bird photos almost always look best when the bird’s eye
is perfectly in focus, even if some other parts of the bird are out of
focus.
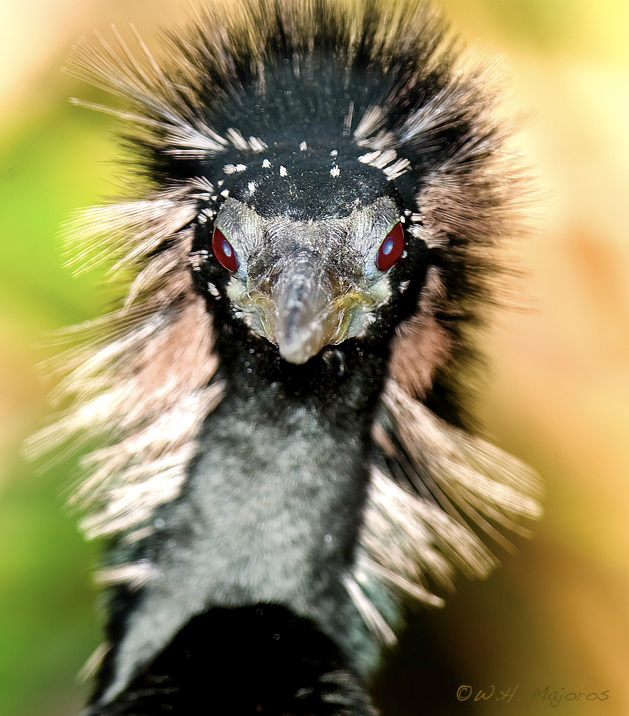
Fig. 6.7.1 :
Anhinga in shallow focus. In most cases the bird’s eye is what is
most
important to get in focus. At shallow DOF’s, ensuring that the
eye is perfectly focused
can be difficult. In this case I used center-point AF on the
forehead and then slightly
recomposed to put the head higher in the frame. (1/125 sec,
f/7.1, ISO 125, 600mm,
manual mode, TTL flash)
If the bird is very large in the frame, then you may
find that positioning the center AF point on the bird’s eye results in
some important part of the bird’s body being clipped (i.e., not visible
in the viewfinder—keeping in mind that your viewfinder might only
show you 95% or so of the actual frame seen by the camera’s imaging
sensor). There are two solutions to this problem (other than
using less magnification). The first is to simply use another AF
point. If your camera has lots of AF points, you can simply tell
the camera to use the one closest to the bird’s eye (precisely how to
select AF points differs from camera to camera, but usually involves
pressing a button and then turning a dial until the AF point that you
want is highlighted in red). If the bird is stationary and you’re
not worried about getting rapid follow-up shots as the bird takes to
flight, then selecting a non-center AF point closest to the bird’s eye
is generally ideal. If you think the bird may soon take to
flight, and you're hoping to track it during its flight (using servo AF
mode), then there may be some risk involved in using a single,
non-central AF point, since that point might not be ideally positioned
for AF tracking of the bird in flight.

Fig. 6.7.2 :
Using a non-central AF point. Because the bird was facing to the
left,
I decided to position my subject on the right, requiring a non-central
AF point.
Alternatively, I could either have used the center AF point and
recomposed, or
used the center AF point and then cropped the image to the desired
composition.
(1/640, f/5.6, ISO 400, 560mm, Av mode, TTL flash)
The other option for focusing on a part of the bird
that is not positioned in the center of the viewfinder is to use the focus-and-recompose method.
In this method, you first position
the central AF point on the bird’s eye, press the shutter release
halfway until the camera achieves focus (usually indicating the fact
via an audible beep, or by flashing the AF point in the viewfinder),
and then recompose—that is,
adjust the camera’s angle so the bird
is now positioned however you want it within the frame. As long
as you keep the
shutter release pressed halfway (and assuming you’re in one-shot AF
mode), the bird’s eye should stay more-or-less in focus even though the
enabled AF
point is no longer positioned on the eye. When you're ready you
can press the
shutter-release the rest of the way and take the shot.
The focus-and-recompose method is very popular, and
can be extremely effective. It’s important to be aware of a
potential problem with this method, however. The problem is best
understood by first viewing the situation geometrically, as in Figure
6.7.3, below:
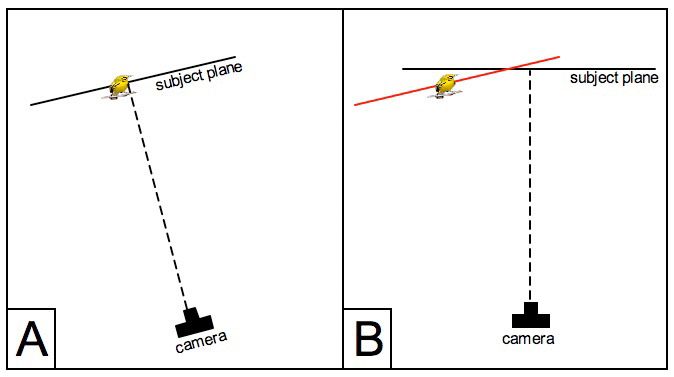
Fig. 6.7.3 :
One of the dangers of focus-and-recompose. Left: the camera is
(auto) focused on
the bird, defining a focus plane that contains the subject.
Right: after recomposing (rotating
the camera through a small angle), the focus plane no longer contains
the subject, so the
bird may be slightly out-of-focus. If the DOF is large enough,
relative to the angle of rotation,
the bird will still look sharp. Zooming in on the playback image
after taking a recomposed
shot can help you detect focus problems, as long as your camera’s
playback images are
of high enough resolution (some cameras show only low-res preview
images).
In the spirit of theoretical physics and its much-celebrated “perfectly
spherical cow”, let us assume a perfectly flat
bird, occupying a single
plane, as depicted in part A of the figure above. As shown in
part B, after recomposing, the plane occupied by the bird no longer
coincides with (though it does intersect) the plane the camera is
focused on. As a result, the bird may appear slightly out of
focus in the resulting image. Exactly how much out of focus
depends on the depth-of-field (DOF). Recall from section 3.13
that
DOF can vary, based on aperture and distance (as well as pixel
size—but we’ll ignore this fact, since for most DLSRs the pixel size
is effectively fixed). Thus, in the figure above we should in
practice replace the thin lines (representing planes) with thick, fuzzy
lines (representing plane-like volumes). If the thickness of the
resulting plane-like volumes is great enough, and the angle involved is
small enough, the act of recomposing may not result in any discernible
loss of sharpness in the final image. And this is indeed what is
often seen in many cases, which is why focus-and-recompose
continues to be a popular method. Just be aware that
focus-and-recompose has at least the potential
to result in
out-of-focus images, especially at wide apertures and short distances,
and check for this regularly when shooting in the field. Whenever
I use this method, I always zoom in on the bird’s eye on my camera’s
LCD screen (after taking the shot), to make sure the eye looks sharp.
One other issue to be aware of when using
focus-and-recompose, if you’re not using manual exposure, is that the
method can sometimes result in exposure problems. On some cameras
(and for some metering modes), the camera’s metering function is linked
to the selected AF point. If after acquiring focus you then
recompose, with the AF point now positioned elsewhere in the scene
(i.e., no longer on the bird), the
measured light level read by the camera’s meter may represent the
luminance of the background more than that of the bird. As a
result, the bird itself may
end up being over- or under-exposed. There are a number of
solutions to this problem. One is to simply use manual exposure
and find the proper exposure for the bird; then you can recompose all
you want and shouldn’t have to worry about confusing the camera’s
meter, since you’re not using it. If you prefer to use spot
metering, then the best solution would be to use your camera’s auto-exposure lock, or AEL,
feature. When metering is linked to
the selected AF point, you can use AEL to force the camera to take its
meter reading at the same time that it performs autofocus (or when you
press the AEL button)—i.e., when
the AF point is positioned on the bird, before recomposing. On
some cameras this can be a bit tricky, because you may have to press
and
hold an additional button (AEL) while still holding down the shutter
release halfway, all the while concentrating on the most aesthetically
pleasing angle for recomposition. Another option is to use a
different metering mode, such as evaluative metering, which should be
less affected by recomposition (on average).
Instead of using just one AF point, on most DSLRs
it’s possible to enable all points, or just a subset of all available
points. The subsets that can be selected are often arranged in
ring patterns, so that you can, for example, select just the centermost
cluster of points, or just a ring of points around this central
cluster, or perhaps a ring of points more toward the periphery of the
frame. When multiple AF points are selected, the camera assesses
the initial focus of the scene through all the selected AF sensors, and
then makes focusing decisions based on the information from those
selected sensors. Precisely what strategy is used for achieving
focus based on the set of active AF sensors differs between
cameras. Depending on the camera model, the AF system may try to
achieve perfect or near-perfect focus for the largest possible subset
of
selected AF sensors, or it may try to ascertain which AF point
is positioned over the closest part of the scene and then perform
focusing based on just that AF sensor. Regardless which strategy
your particular camera uses, it’s important to note which AF sensors
(among those that you’ve enabled) the camera has chosen to actually
use—these will typically be indicated via red flashing inside the
viewfinder. If, for example, you enable all AF points, you may
find that the camera chooses a subset of points corresponding to the
branch that the bird is perched on, rather than the bird itself.
In that case you’d obviously want to try enabling a different subset of
AF points, if possible, or to switch to single-point focusing. I
typically don’t use more than one AF point unless I’m trying to track
birds in flight, and even then I often use just one AF point.
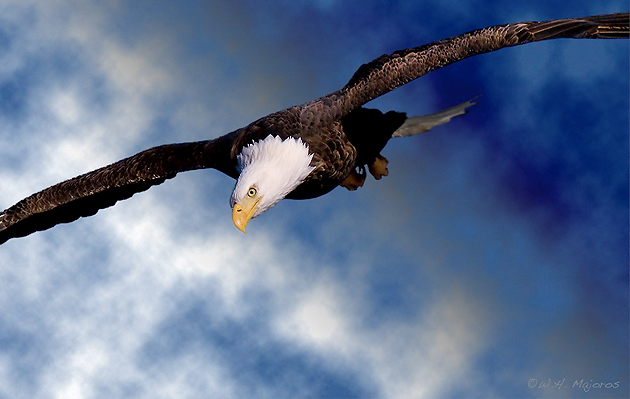
Fig. 6.7.4 :
Eagle head-on. When the subject is oriented head-on, the profile
visible
to the autofocus sensors can be relatively small. By using an
array of AF points
rather than just one, your camera may be better able to keep the bird
in focus
during the approach. Note that the background of this image was
processed
in Photoshop to make it more interesting; replacing the background of
an image
is discussed in Chapter 13. (1/6400 sec, f/8, ISO 800, 840mm, Av
mode with
-2/3 EC, no flash)
Note that on many high-end cameras there are “invisible” or “helper” AF sensors that you may not see
in the
viewfinder, or may not be able to explicitly select or enable/disable,
but that can influence the focusing strategy of the camera. These
can typically be globally
enabled or disabled via a “custom fuction”
setting deep within the camera’s menu system. As noted in section
2.6, features such as “AF point expansion” that intelligently modify
your selected set of AF points can sometimes help to keep a flying bird
in focus, especially if you’re having trouble keeping the AF sensor(s)
positioned on the bird in the viewfinder during its flight.
However, these features can sometimes be more of a hindrance than a
help, since they may, for example, result in the camera moving the
selected AF point from the bird you’re following to another bird in the
frame. These issues are very camera-specific, and will generally
require some research and experimentation in order to become adequately
familiar with how your camera behaves under different custom function
(CFn) settings. Some
camera companies publish “white papers”
giving advice for how to optimally set the various CFn’s on a given
model, based on the shooting situation.
On most cameras there are situations in
which you’ll be limited to using only the center AF point, such as when
using teleconverters or a lens with a maximum aperture of f/5.6 or f/8. I don’t
find this to be a severe limitation, since I
typically use only the center AF point, except when tracking
erratically-flying birds, in which case I may switch to enabling an
appropriate group of points (such as a ring-shaped array), with or
without automatic point expansion.
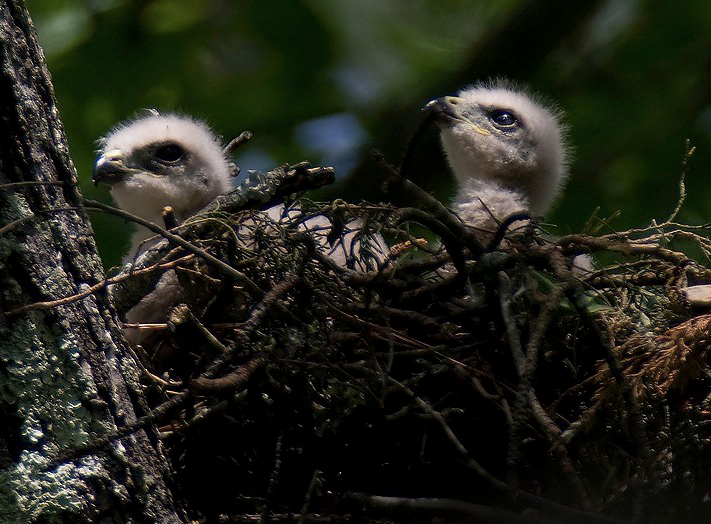
Fig. 6.7.5 :
Red-shouldered hawk chicks in the nest. Because a 2× TC was used in
combination
with an f/4 lens, the maximum aperture of f/8 limited me to using the
center AF point. This image
is heavily cropped from the RAW file. Since the distance was
great, DOF was large and focus-and-
recompose worked fine. (1/400 sec, f/10, ISO 200, 1200mm, manual
mode, TTL flash at +3 FEC)
Note that for birds that don’t fill the entire
frame, an alternative to focus-and-recompose is to simply keep the bird
positioned in the center of the frame during shooting, and then to
later crop the image on the computer. While cropping you can
choose a crop window that places the bird in the most pleasing position
in the resulting frame. Even though I only have a 10 megapixel
camera, I crop most of my photos to 50% or less of the original size,
and typically do my recomposing (i.e., positioning the bird outside the
center of the resulting frame) then rather than while actually shooting.
|
|
|