|
6.9 Exposure Bracketing and HDR
One method that can be very useful
to novices is exposure bracketing.
In exposure bracketing, the camera takes a series of photos in rapid
succession, automatically varying the
exposure between shots. The result is a group of photos that are
nearly identical except for their exposure. If the range of
exposures bracketed is great enough, and the number of shots taken is
adequate, you should (hopefully) find that at least one of the
shots is properly exposed. Most DLSRs allow bracketing via
sequences of three shots (one dark, one bright, and one in the middle),
while higher-end models may allow up to five or seven shots in the
sequence. Differences in the exposure level across the sequence
of shots are typically achieved by varying either the shutter speed or
the aperture. One problem with exposure bracketing is that you
end up taking far more photos than you normally would, and although
most of those can be deleted (since you’ll typically want to keep only
the best exposure from each sequence), bracketing can still fill your
memory cards quickly, and will require extra time later to sort through
the shots and select the best exposures.
One special application of exposure bracketing is
the use of so-called High Dynamic
Range, or HDR,
imaging. In HDR,
multiple exposures get merged together during postprocessing, in order
to increase the level of detail visible in both the lighter and darker
areas of the scene. Today’s DSLRs can capture detail only over a
limited range of brightnesses. If a scene has both very bright
and very dark areas, then you typically will have to choose whether you
want to capture the detail in the bright areas or the dark areas, since
your DSLR will likely be incapable of capturing details in both.
In HDR, you take multiple shots at different exposures, with the
brighter exposures capturing details in the dark portions of the scene,
and the darker exposures capturing details in the brighter portions of
the scene. You then merge the images together on the computer,
thereby retaining detail in all
parts of the scene, whether bright or
dark.
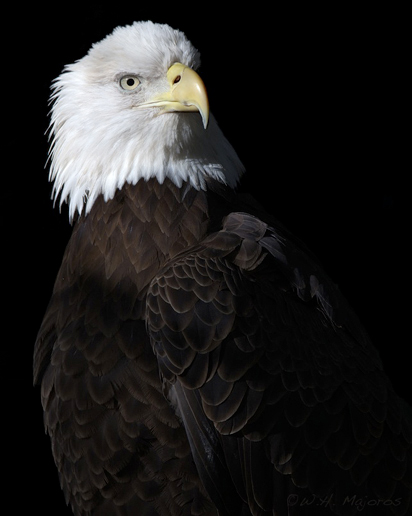
Fig. 6.9.1 :
High Dynamic Range (HDR) image of a
captive bald eagle. Because this bird was behind a mesh
fence, flash was impractical. By instead varying the shutter
speed over several exposures (1/160 sec, 1/400 sec, 1/1000 sec)
and merging the results, I was able to retain a fair amount of
detail in the dark feathers without losing detail in the head.
(f/10, ISO 800, 600mm, manual mode, no flash)
Although there
are software tools for performing HDR on the computer (including a
built-in function in some versions of Photoshop), effective use of the
technique often requires some manual effort during
postprocessing—i.e., selecting specific regions of the image and
applying specific tone mapping
curves tailored to those
regions. For bird photography, opportunities for HDR seem to be
rather limited, since most birds tend to move quite a bit (even if only
turning the head or slightly erecting the feathers, etc.), and the
automated software procedures for HDR require that the scene be
virtually identical between shots in order to accurately merge
them. However, if you’re willing to do the merging manually, the
integration of multiple exposures in an HDR-inspired way can be very
effective in challenging lighting situations. We will revisit
this possibility in Chapter 13.

Fig. 6.9.2 :
Another HDR image of a captive bald eagle. Since the bird was
moving
its beak, automated merging of the exposures wasn’t practical, so I
instead merged
them manually in Photoshop via layers and image masks (see Chapter
13). Three
shutter speeds were used for the exposures (1/80, 1/200, 1/500).
(f/7.1, ISO 800, 600mm, manual mode, no flash)
|
|
|
