|
7.7
Freezing Hummingbirds
A perennial question from
literally hordes of bird enthusiasts is how to “freeze” hummingbirds
via stop-action photography. The simple answer is that it doesn’t
require a fast shutter speed, but rather a short flash duration in conjunction
with a high flash ratio.
We’ll dissect this strategy in detail below.
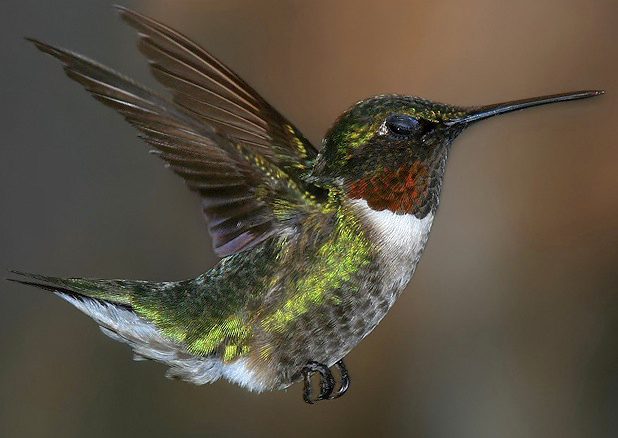
Fig.
7.7.1 :
Freezing hummingbirds is done using flash, not using fast shutter
speeds!
(1/250 sec, f/11, ISO 400, TTL flash at +0 FEC, 560mm)
First, recall
that shutter speeds on most cameras range up to about 1/8000 sec (even
on pro cameras). Flash durations, on the other hand, typically
bottom out at 1/35000 sec, which is indeed much faster than the fastest
shutter speeds. Although hummingbirds only flap their wings about
50 to 200 times per second, the criterion of stopping the motion as seen by the imaging
sensor’s photosites translates into required speeds in excess of
1/10000 sec. Although today’s mechanical DSLR shutters still
can’t satisfy that requirement, today’s flash durations can.
In order to use the flash’s pulse duration to “freeze” the image (as registered by the
imaging sensor and judged by
the human observer), the flash ratio needs to be high enough that the
contribution of ambient light to any perceived motion in the image is
negligible. Even if your flash duration is small enough to
effectively freeze the bird during the flash, ambient light can cause a
blur or “ghosting” of the wings in the resulting
image. Although
some ghosting in a hummingbird’s beating wings (or even in other birds)
is in many cases entirely acceptable (possibly even desirable)
artistically, for the sake of this discussion we’ll assume that the
goal is to minimize motion blur as much as possible.
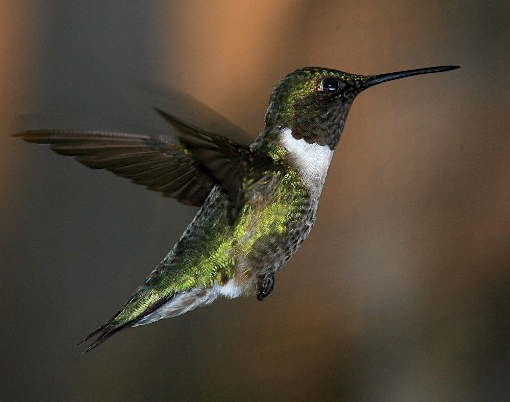
Fig. 7.7.2 :
If the flash ratio is too low, the ambient light can smear the wings,
producing a ghosting effect, as seen here.
Notice in the above photo that the
wings have “shadows”, or “ghosts” above them. Even though the
wings were largely frozen in place by the short flash duration, enough
ambient light was present to partially illuminate the wings during the
full period that the shutter was open. Because the wings were in
motion during this period, the contribution from the ambient light
consisted of a “smearing” of the wings across space.
This is what
is meant by “ghosting” in stop-motion flash photography
(an unrelated
use of the term “ghosting” refers to lens aberrations—see
section
3.2).
Elimination of ghosting in flash photography
requires reducing the amount of ambient light that is collected by the
sensor, relative to the amount of flash light that is collected (or,
alternatively, allowing the ghosting to occur and then removing it
later in postprocess—see Chapter 11). There are two ways to
reduce ambient light in this situation. The first is to actually
reduce the amount of light in the scene, either by waiting for a cloudy
day, or by shielding the bird from the sunlight via a blanket or other
object. If you’re photographing hummingbirds in your yard, you
can use a setup like the one shown below.
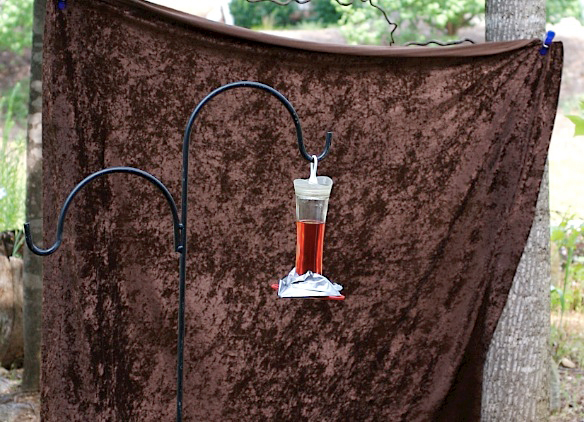
Fig. 7.7.3 :
Controlling background and ambient light for hummingbird photography.
The sheet is blocking direct sunlight from the back, while also
providing an interesting
color and texture for the image’s
background. The duct tape on
the feeder covers all
feeding ports but one, to force the bird to always use the same port;
that allowed me to
keep my camera pre-focused at the same position, so I didn’t have to
re-acquire focus
every time. Since this setup is right outside my window, I can
sit comfortably inside,
largely hidden from the bird. The window was left open, and the
screen removed.
In this case, by draping a large
cloth between two trees, I’ve blocked the direct sunlight from reaching
the feeding station where I hope to attract my subject. The cloth
itself also provides an interesting background for the photo.
Your local textile store should have an array of fabrics with
nonuniform textures, in an array of colors. Cloths with uniform
colors tend to make the image look unnatural. However, solid
colors such as white or black can be useful if you intend to replace
the background later in postprocess (see Chapter 13), because the
solid color will be easier to select with the mouse in Photoshop; the
best colors in this case are those that are most different from the
colors making up the bird’s plumage, so that “quick select” tools like
those in Photoshop can more easily see the difference between the bird
and its background.
The other way to reduce ambient exposure is
obviously via manipulation of the camera’s exposure parameters.
The first thing to try is setting the camera’s shutter speed to its
maximum sync speed (MSS). This will allow the full flash pulse to
be collected while minimizing ambient collection without engaging
high-speed sync; it’s important to leave high-speed sync turned off for this application, since you
want the flash to fire in a single pulse, rather than a continuous
series of mini-pulses as described earlier.
Fig. 7.7.4 :
Keeping the ambient light low doesn’t mean that the background has to
be dark.
Using a white bed sheet mounted close behind the feeder, I obtained a
light background via
direct flash illumination of the sheet. A uniform background is
easier to replace in Photoshop.
(1/300 sec, f/11, ISO 400, TTL flash at +0 FEC, 560mm)
Don’t confuse ambient exposure with background exposure. As
demonstrated by the image above, it’s possible to have a bright
background and still
freeze the wings. In this case, the background is a white bed
sheet hanging only about two feet behind the bird; the brightness of
the background in this case comes from reflection of the flash off the
sheet, not from a high ambient exposure. Note also in the above
image that freezing the wings doesn’t guarantee that they won’t be
blurry: in this case the shallow depth-of-field (DOF) resulted in the
bird’s body and the proximal portions of its wings being in sharp
focus, while the distal parts of its wings (toward the wingtips) appear
to be slightly out of focus (though a small amount of motion blur may
also be a contributing factor here—see below).
Finding the right setting for the flash “power” can
be difficult. Recall that on most DLSR flash units the “power”
setting actually controls the duration of the flash pulse (though
typically in a nonlinear
fashion, due to intensity
fall-off over the time-course of the pulse). To maximize your
chances of freezing the bird, you’d ideally like to use the shortest
flash duration that still illuminates the bird enough to get whatever
exposure level you desire. The photo below illustrates several
issues involved in doing this.
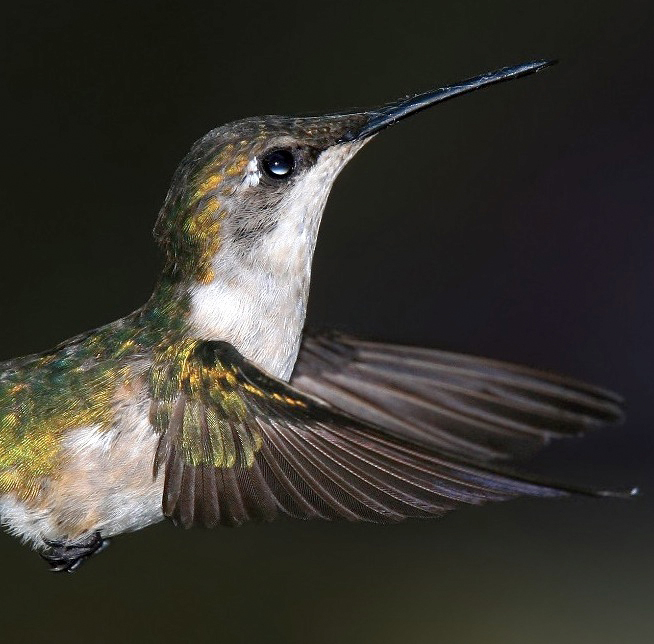
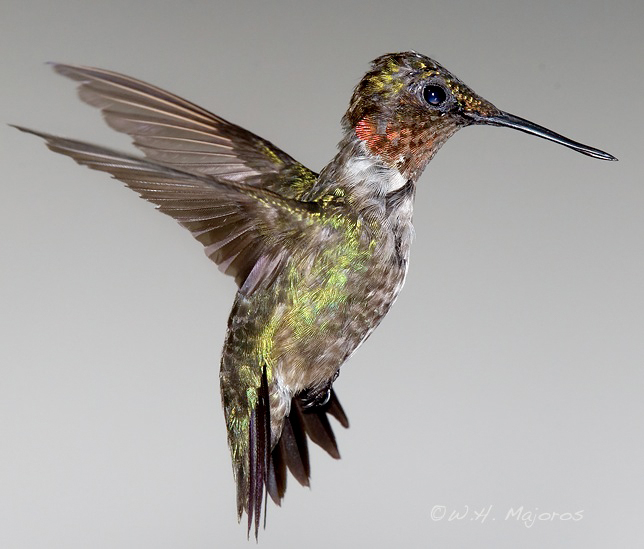
Fig. 7.7.5 :
Freezing the bird isn’t the only hard problem in hummingbird
photography.
Their irridescent plumages reflect light in a very biased manner, so
that with only a single
flash unit you’re likely to get vibrant colors only in restricted parts
of the bird’s plumage.
While this photo does show significant detail (notice especially the
spider web on the bird’s
beak and head, as well as the vertical features in the black wing
feathers), the bird’s irridescent
colors show in a narrow band running from the head down the bird’s
flank. The use of
multiple flash units would have helped in this case to reveal more
color in the dorsal feathers.
First, note that the bird has been just slightly
over-exposed: the bright white spot above the bird’s shoulder shows
evidence of blown highlights. This photo was taken before I
started using the highlight alerts
feature of my camera; I now
recommend using this feature at all times. Second, note that
while the flash has resulted in lots of fine detail due to the micro-contrast phenomenon (see
section 4.3)—note especially the
fine feather detail in the dark wing feathers—it has also resulted in
very bright reflections from the irridescent parts of the bird’s
plumage, which some people may like and others might not.
Irridescent plumages are very common in hummingbird species, so this
issue is intimately tied into the problem of photographing
hummingbirds.
Irridescence, by definition, results in different
colors being seen when viewed from different angles. A secondary
effect of this, however, is that irridescent feathers can reflect light
very strongly in some directions and only very weakly in others.
As a
result, with only a single flash attached to your camera, you may end
up with parts of the bird’s plumage which are brilliantly
illuminated
(sometimes even too
brilliantly), while other parts remain quite
dark. This often happens in the bright red gorget (throat
feathers) of the males (see the earlier photos in this section for
examples of partially-illuminated gorgets).
For this reason (and others, which we’ll get to
shortly), dedicated hummingbird photographers often utilize multiple
flash units set up at different angles around a feeding station, so
that more of the bird’s irridescent feathers will reflect light back in
the direction of the camera. This can result in both a greater
color range as well as a more uniform illumination of the bird.
Ambient light (not including direct sunlight) would, of course, provide
a similar uniformity of illumination, albeit likely at a lower
intensity, but the trick here is that the flash units can be
synchronized to fire simultaneously, so that the stop-motion effect of
a short flash duration (even if the light is coming from multiple flash
units during that short interval) can freeze the bird.
There’s another good reason to use the
multiple-flash-unit approach. With a single flash unit, in order
to freeze the bird completely (including the wingtips), you need to use
a very brief flash duration, as already discussed. Using such a
short duration will, however, also limit the flash intensity, since
flash “power” is effectively the same as
duration in most
consumer-grade flash units. Thus, for a bird at a particular
distance you may find that in order to freeze the bird you have to use
such a low flash “power” setting that the bird ends up
being
underexposed. Conversely, in order to achieve a good exposure of
the bird you may have to turn up the flash “power” (duration) to a
level at which you can no longer freeze the bird completely.
All of the hummingbird photos in this section were
taken with a single flash, and in all of them the wingtips appear
slightly blurred, due probably to a combination of shallow
depth-of-field and the use of a flash duration that was too long to
completely freeze the motion. With multiple flash units used in
synchrony, you can turn down the flash duration so as to better freeze
the motion, and still have enough light for a good exposure. If
you don’t want to invest in a set of four or five $400 flash units,
there are several things you can do to increase the effective flash
power at short durations. First, you can get closer to the
bird. Due to the inverse power
law for light intensity (section 7.2),
getting even just a
little bit closer can make a significant
difference in effective flash illumination. Try setting up your
hummingbird feeder just outside your window, and then shoot from inside
the house (with the window open and the screen removed). If you
set the feeder so close to the window that your lens can’t focus that
close, you can use extension tubes
(section 3.4) to reduce the minimum
focus distance of your lens. Another way to increase flash
intensity is via the use of a flash
extender (see section 7.9).
Finally, keep in mind that some amount of motion blur in the wings can
actually enhance the image, by making the bird appear more dynamic.
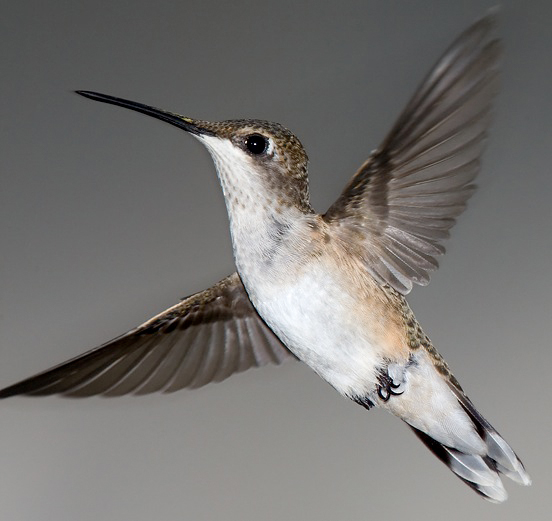 Fig.
7.7.6 :
A small amount of motion blur in the wings can help to emphasize the
Fig.
7.7.6 :
A small amount of motion blur in the wings can help to emphasize the
dynamic nature of the bird. If you insist on completely freezing
the wings, you’ll need
very short flash durations, which may result in underexposure.
Increasing flash intensity
at shorter durations can be achieved by getting closer to the bird, or
by using a
flash extender (see section 7.9), or by using
multiple, synchronized
flash units.
(1/300 sec,
f/11, ISO 400, TTL flash at +0 FEC, 560mm)
The best feeders for hummingbird photography (apart
from real flowers) are the horizontal saucer-shaped ones that lack any
vertical nectar tank. I often find that the nectar tank gets in
the way when the bird is using one of the feeding ports on the back
side of the feeder. Of course, you can control which feeding
ports
are used by the bird by taping over all the ports except the one you
want the bird to use. Also, if your feeder has a built-in perch,
you’ll likely find that the birds spend most of their time feeding from
a perched position. To force the bird to spend more time in
flight, you can remove the built-in perch. If you feel guilty
about making the bird work harder, you can put up a nearby perch so the
bird
has a place to rest between feeding forays; if you use a tree branch
for the perch, you can also get some nice-looking perched shots of the
bird.
Because keeping the bird in focus can be fairly
challenging (even with autofocus), I always keep the bird in the center
of my viewfinder, and then if necessary crop the image later in
postprocessing to move the bird out of the center of the frame (i.e.,
by cropping with unequal left/right top/bottom margins, so the center
of the original image is no longer the center in the cropped
image). Finally, in order to get the birds in a variety of poses,
keep an eye out for potential interactions with other birds, or even
with insects. Because hummingbirds often fight over feeding
rights at a feeder, interactions between two birds often results in a
variety of novel poses. Also, hummingbirds sometimes spar with
larger bees that come to the feeder for nectar, and this can again
provide opportunities for capturing something other than the typical
hover pose (which is why I don’t try to keep the bees away from my
hummingbird feeders).
|
|
|