|
11.3 Correcting
Exposure
Whereas the previous section
addressed the specific issue of blown highlights—i.e., bright regions
of an image that have been overexposed to the point that details are
lost—in this section we deal with the more general issue of adjusting
exposure for the entire image. This includes images that are both
over-exposed (too bright) and under-exposed (too dark). We’ll
also consider how to manipulate the lighting patterns in the scene so
as to achieve more even lighting, as well as exposing the bird
differently from the background.
11.3.1
Fixing
Underexposure
Underexposure is one of the most difficult problems to correct in
postprocess. If you follow the ETTR/BETTR protocol (section 6.2),
you’re much more likely to overexpose than underexpose, and in
general, that’s a good thing, because as long as you don’t clip the
highlights, your overexposed images can generally be corrected without
loss of information. Underexposure can, however, occur, even for
photographers adhering to the ETTR principle. One common example
is when you’ve been shooting a pure white bird in bright sunlight in
manual exposure mode
and you suddenly encounter a non-white bird in the shade nearby.
Unless you remember to readjust your exposure settings, this new bird
is likely to be massively underexposed. The figure below shows an
example of an extremely underexposed image.
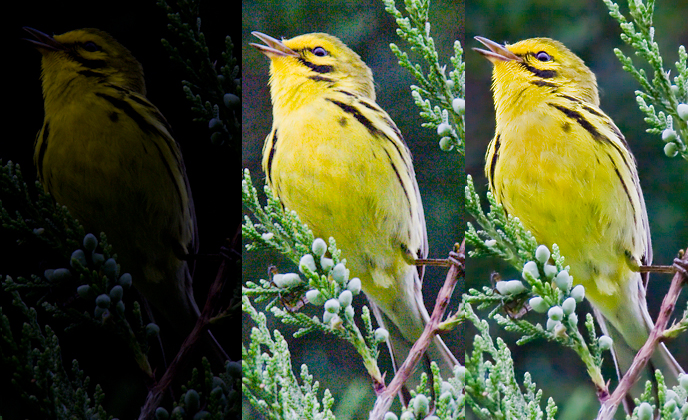
Fig. 11.3.1: An
extremely underexposed image, and attempts to correct it.
Left: the original image. Center: after increasing exposure
digitally in ACR.
Notice the background noise and the overall poor image quality.
Right:
after reducing noise and increasing sharpness in Photoshop.
Notice that
the colors are quite poor. There’s a limit to what you can do
with images
this massively underexposed; shooting in RAW definitely helps.
In the leftmost pane of the above figure is
the original RAW image. The middle pane shows the image in Adobe Camera Raw (ACR) after
increasing the Exposure
slider in ACR to its highest setting. Notice the enormous amount
of noise in the background. The rightmost pane shows the final
image in Photoshop proper, after sharpening and noise reduction.
Though it’s impressive that so much information was able to be pulled
out of such a massively underexposed photo, the resulting image doesn’t
look great. The overall color has suffered from the underexposure
and the measures that were taken to correct the exposure.
Nevertheless, this example does illustrate the advantage of shooting in
RAW: if the original image had instead been a JPG, the degree of
information recovery illustrated here would have been utterly
impossible.
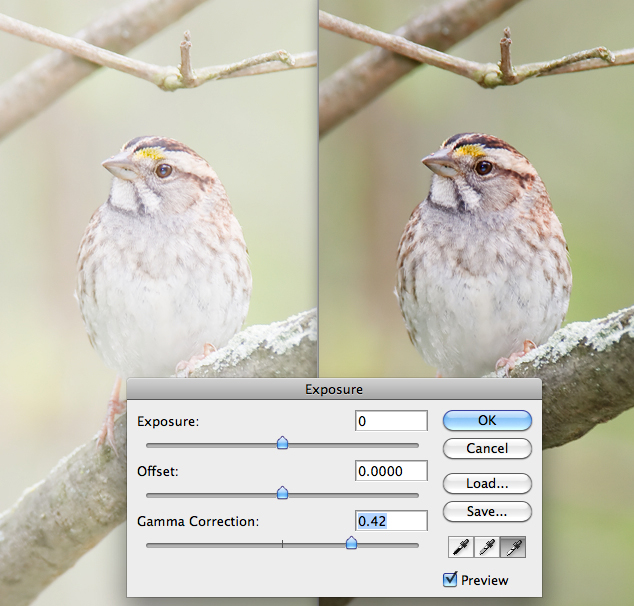
The example below shows a more tractible case, in
which the image is only slightly underexposed. In this case we’ve
again increased the brightness of the image via the Exposure slider in
ACR (note that the Fill Light
slider is often useful for this purpose as well, though we didn’t use
it here). Doing so created some blown highlight regions, so we’ve
also adjusted the Recovery slider to protect those areas. The Brightness slider (not shown here)
can often be just as useful as the Exposure
slider, and sometimes even more so. The exposure shown here is
far from perfect, but is at least brighter than before, and can now be
fine-tuned in Photoshop proper.
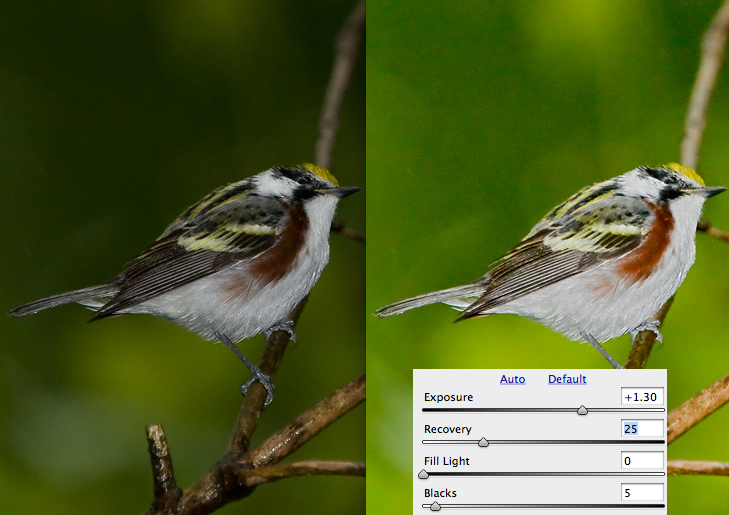
Fig. 11.3.2:
Increasing brightness via the Exposure slider in ACR. Be careful
to check how the defaults are set for the other sliders, since this can
work against
you if you don’t change them.
Correcting exposure in ACR is typically the most effective option,
since it’s the option that has the most information available to
it. Once the photo case been converted from RAW to the internal
representation used by Photoshop proper, certain information will have
been discarded and can’t be reclaimed without going back to the
original RAW file. The next example (below) shows the effect of
adjusting exposure via the Exposure tool in Photoshop proper. As
you can see, in order to achieve an overall brightness level similar to
that for the previous example we’ve had to blow the highlights in the
bird’s cheek and throat. Whereas in ACR we could guard against
this by adjusting the Recovery
slider at the same time, once the image is in Photoshop proper (i.e.,
after it’s been converted from RAW), that’s not possible. By and
large, highlights that you’ve blown via adjustments made in Photoshop
proper aren’t directly recoverable.
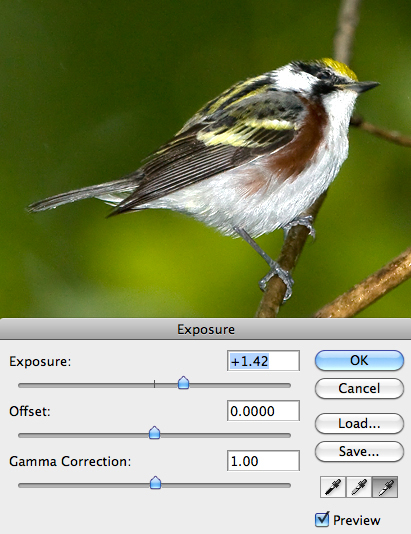
Fig. 11.3.3:
Increasing brightness via the Exposure slider in
Photoshop proper (rather than ACR). This method often results
in blown highlights, so I don’t recommend it.
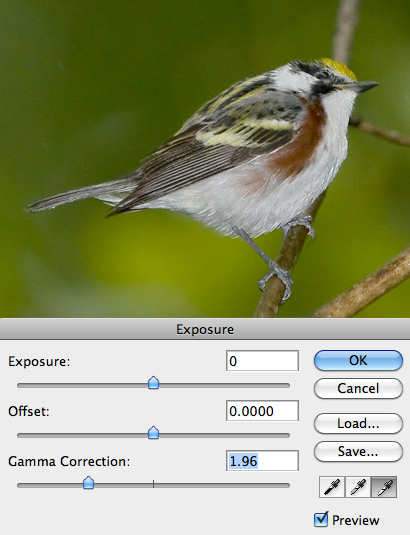
Note that in the Exposure tool there is a slider called Gamma Correction. While the Exposure slider in Photoshop proper
tends to be unwieldy for images having bright white regions, the Gamma Correction slider can be very
useful, both for increasing brightness and for decreasing it. In
the example below we’ve gone back to the original image and increased
brightness by adjusting the Gamma slider in the Exposure tool.
Increasing brightness this way often results in a decrease in the
overall contrast of the image, but this can be corrected subsequently
via the Brightness/Contrast
tool or the Levels tool (we’ll get to those tools in just a minute).
Fig. 11.3.4:
Increasing brightness via the Gamma slider in
the Exposure tool. Reducing gamma increases brightness,
but it can also reduce contrast; you can compensate by
increasing contrast later via the Brightness/Contrast tool
or the Levels or Curves tools.
Note that in all of these examples we’ve made sure that the Preview button is checked.
This allows you to see the effect of your changes immediately. To
compare the new settings to the original image, you can simply toggle
the Preview button on and off
repeatedly. This is an extremely useful feature, because it
provides context and allows you to judge the effect of a tool relative
to the unmodified image.
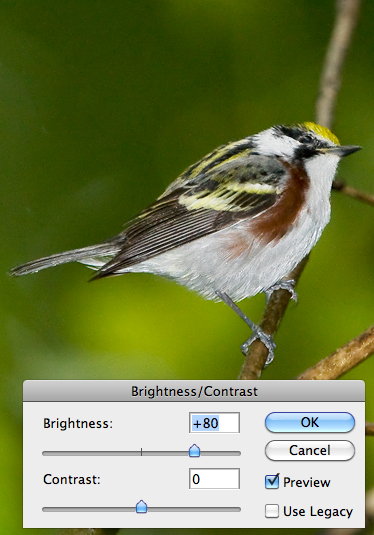
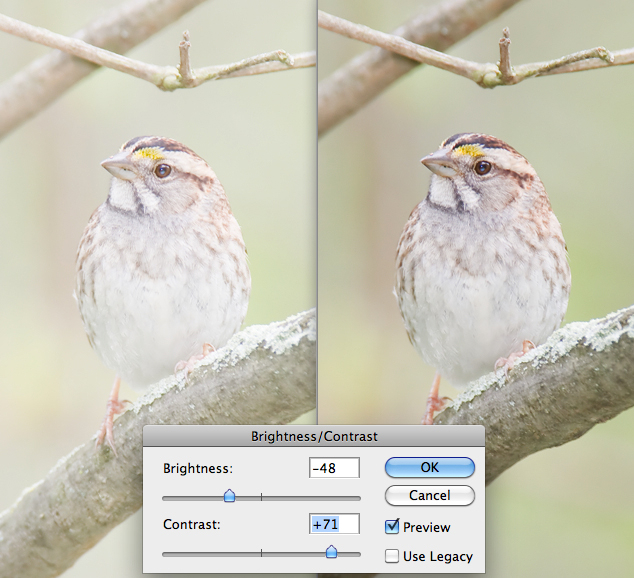
In the next example we again return to the original
image and correct the exposure using the Brightness / Contrast tool.
Here we’ve increased the Brightness
slider substantially, and you can see that it has increased the overall
image brightness without blowing the highlights. We’ll see in the
next section that the Contrast
slider can be useful for restoring contrast in overexposed images,
though there are more flexible ways to adjust contrast, as we’ll see.
Fig. 11.3.5:
Increasing brightness via the Brightness/
Contrast tool.
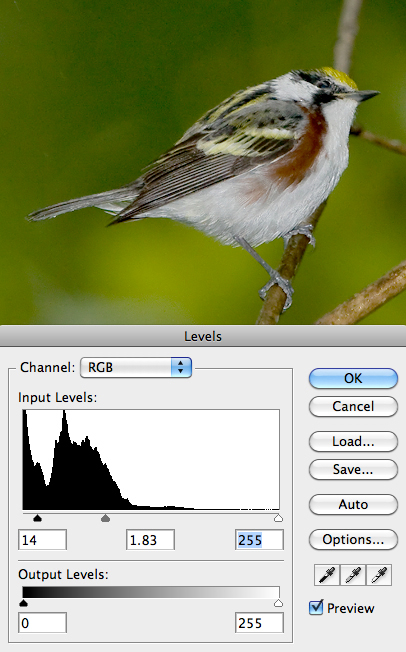
The next tool is one of the most
useful tools in Photoshop for adjusting brightness and contrast.
It can also be used as an alternative to the Highlights tool to recover
blown highlights. This is the Levels
tool (see below), which shows you the image’s current histogram and
allows you to set sliders that reshape that histogram. The
sliders in this case are the small triangles (actually pentagons) below
the histogram and below the Output
Levels track. In the current example, we’ve moved the
leftmost (black) and middle (gray) sliders below the histogram.
Fig. 11.3.6:
Simultaneously increasing brightness and contrast
via the Levels tool. The triangles/hexagons under the histogram
are the sliders. The black slider increases blacks, the white
slider
increases whites, and the gray slider can increase or decrease
overall brightness, depending on which way you slide it.
The middle (gray) slider adjusts
the overall brightness; in the example above we’ve moved it toward the
left, which increases brightness. In order to restore some
contrast, we’ve moved the leftmost (black) slider a bit to the right,
which darkens darker colors toward black. Another way to increase
brightness is to move the rightmost (white) slider for the histogram to
the left; this increases lighter hues toward pure white. If you
slide that white slider too far left (i.e., into the region of the
histogram having nonzero height), you’ll induce clipping of highlights,
so be careful. This slider is mainly useful for making sure that
the brightest point in the image is true white (rather than gray),
which helps to foster the impression of high dynamic range. The
sliders beneath the Output Levels
track are less often useful, because they have a fairly drastic effect
on the image. We’ll see later that sliding the white slider all
the way to the left is useful for fixing eye-shine, by making the
selected region (the eyes) pure black. We’ll see that there are
many uses for the Levels tool; this tool is very simple to use, fast,
and often highly effective for adjusting brightness or contrast either
in the entire image or in selected regions (as per the D-PIE technique: Differential Processing of Image Elements).
The next tool is one that I find to be too unweildy
for most tasks, though it is a popular tool among avid
Photoshoppers. This is the Curves
tool, which allows you to superimpose a curve onto the histogram to
indicate how you’d like to transform the brightness profile of the
image. In the example below, we’ve increased the overall
brightness of the image by applying a convex curve that concentrates
the increase in the middle tones, with progressively less change toward
the extremes. This type of nonlinear transformation is useful for
increasing overall brightness without blowing the highlights or
softening the blacks.
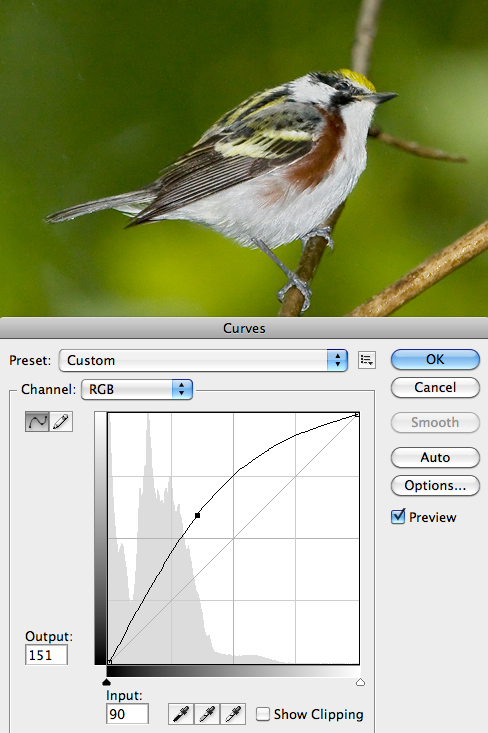
Fig. 11.3.7:
Increasing brightness via the Curves tool. I find this
tool very unwieldy, and rarely use it, but others swear by it.
In this particular case the Curves tool has done a very decent
job of improving this image, and it took only two seconds to
accomplish. Notice the tiny black square on the curve. The
way we drew this curve was by clicking the mouse on the diagonal line
(the one that runs from the lower left corner to the upper right
corner) and dragging this point upward until the curve assumed the
shape you see above. Because the Preview box is checked, we were
able to see the effect of this transformation on the image in
real-time. Simple adjustments like this can be performed in no
time flat using the Curves
tool. Note that you can now refine this curve by clicking
anywhere on the curve and dragging that point up or down. By
repeating this process you can create a whole set of anchor points that
define an arbitrarily complex curve. In theory, this is an
extremely flexible means of adjusting an image’s histogram. In
practice, it becomes very tedious and frustrating, because the effect
of moving each point is tempered by the positions of all the other
points you’ve already set. Also, the working space in the Curves window is limited and it’s
hard to make tiny changes at the finest levels. As a result, the
transformation tends to be very sensitive to small mouse movements,
making it difficult to achieve subtle changes. For that reason, I
personally tend to use the other tools much more often, particularly
Levels, Shadows/Highlights,
and the Gamma slider in the Exposure tool.
11.3.2
Fixing Overexposure
For photographers committed to the ETTR technique (Exposing To The Right—section 6.2),
it’s much more common to have overexposed than underexposed
images. While the highlight alerts on your camera’s LCD can help
you to avoid blowing the highlights, for some photos you’ll find that
the resulting image appears too bright, or “washed out”. This can be corrected
using any of the tools mentioned in the previous section (as we’ll
illustrate shortly). The advantage of reducing brightness for
overexposed (but non-clipped) images over increasing brightness for
underexposed images it that the brighter images use larger numbers of
bits to encode their pixels, so no information has been lost, unlike
the case with underexposure, in which fewer bits are used and numerical
precision often suffers as a result. Also, brighter images tend
to be less noisy (as long as they were produced via large apertures or
slow shutter speeds, rather than high ISO settings) than underexposed
images.
Reducing brightness in Adobe Camera Raw can be
accomplished via the Exposure
slider. In the example below, we’ve decreased the Exposure by
-0.45, while also using the Recovery
slider to reclaim highlights. We’ve also increased the Blacks
setting and then increased the Brightness to improve contrast; the Contrast slider was also adjusted a
bit. Although the resulting image is far from perfect, these
adjustments are appropriately conservative for the RAW conversion
phase, which applies to the full resolution image. Finer
adjustments to the exposure can be performed when the image has been
reduced to its target resolution prior to distribution (i.e., posting
on a web page or printing to photographic paper). Ideal
brightness and contrast, like sharpness and saturation, are very
medium-dependent.
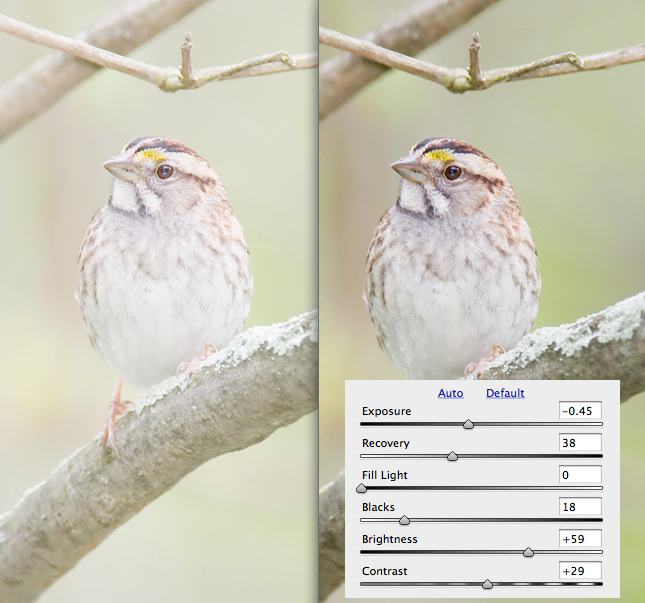
Fig. 11.3.8:
Fixing overexposure in ACR can be done by decreasing the
Exposure setting. Though this will certainly reduce overall
brightness,
you may still need to increase the contrast of the image, since many
overexposed photos appear washed out. Here we’ve increased
contrast
both via the Contrast slider and also by increasing the Blacks and then
compensating by increasing the Brightness.
In the example below we’ve returned to the original RAW image and
adjusted the brightness in Photoshop proper using the Gamma slider in the Exposure tool. Increasing
gamma generally increases contrast and saturation while decreasing
brightness. Like the Curves
tool in its most basic use (see below), Gamma Correction applies a
nonlinear function that leaves pure white and pure black values
unmodified while adjusting mid-tone values (the gamma function is described in more
detail in section 16.2).
Fig. 11.3.9:
Overexposure can also be adjusted in Photoshop proper,
via the Exposure tool. Here, we’ve ignored the Exposure slider and
instead increased the Gamma, which simultaneously decreases
brightness while increasing contrast.
In the next example we instead use
the Levels tool to decrease brightness and increase contrast. By
moving the gray slider to the right, we’ve deformed the histogram so as
to darken the mid-tones, while moving the black slider to the right has
increased the dark presence and enhanced the overall contrast.
Note that we have, in effect, adjusted the three sliders so that the
black slider is close to the leftmost end of the nonempty part of the
histogram, the white slider is close to the rightmost end of the
nonempty part of the histogram, and the gray slider is closer to the
main mass of the histogram. Though not infallible, this procedure
provides a very general set of guidelines for using the Levels tool. Just keep in
mind that moving the black and white sliders into the interior of the
histogram mass will cause clipping of blacks and whites, respectively,
in the image. This is why it’s preferable to keep them at or near
the ends of the visible histogram mass.
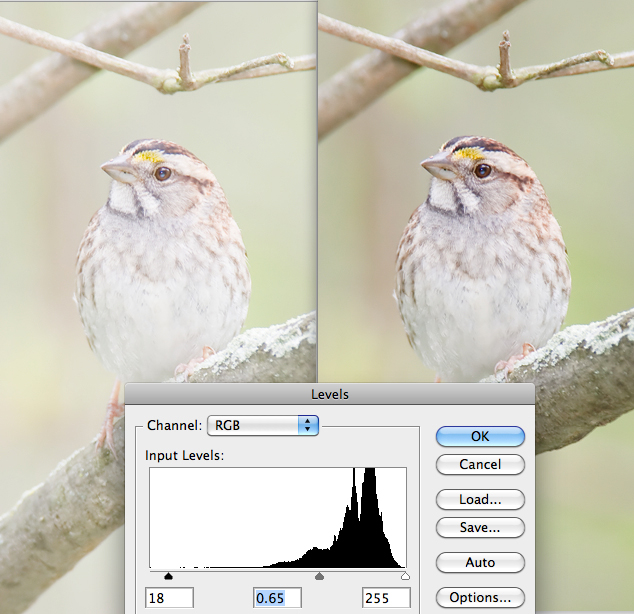
Fig. 11.3.10:
The Levels tool is another favorite method for fixing
overexposure. Here we’ve moved the midtone slider (gray triangle
below the histogram) to the right, to decrease overall brightness,
and then moved the black slider to the right a bit to beef up the
blacks in the image.
For the next example we’ve
achieved roughly the same effect using the Brightness / Contrast tool instead
of Levels. In this case
we’ve descreased the brightness and increased the contrast directly via
their respective sliders. Though this appears to be a simpler and
more direct means of adjusting these image qualities, the Levels tool with its visual
representation of the histogram provides more information to guide you
when setting the sliders.
Fig.
11.3.11: The Brightness / Contrast tool can also be
useful for decreasing brightness while also adjusting
contrast, which is commonly required for overexposed
photos.
In the next example we apply the Curves tool. Whereas in the
previous section we dragged the curve above the diagonal to increase
brightness, for this overexposed image we instead drag the curve
downward so as to decrease brightness. Though we’ve again used
only a single point, we could have introduced any number of points to
arbitrarily shape the curve to our liking. Note that a silhouette
of the image’s histogram is faintly depicted in the background of the
curve pane, providing some guidance as to which parts of the brightness
spectrum need attention. The black and white triangles below the
curve act as sliders just as in the Levels
tool, allowing you to set the white/black points and possibly to clip
the histogram at either end. Thus, the curves tool provides all
the information present in the Levels
tool, with the added capability to deform the histogram (via the curve)
in any arbitrary way.
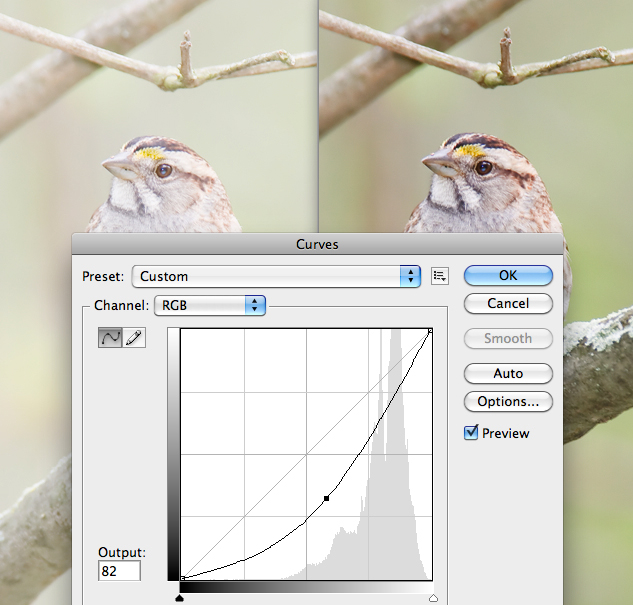
Fig. 11.3.12:
The Curves tool is arguably the most flexible tool
in Photoshop for fixing exposure problems, though I rarely use
it, because I find it unweildy. In this simple example, we’ve
adjusted
the exposure by dragging a point on the diagonal downward, creating
a curve. Overexposure has been substantially reduced, though the
image now exhibits saturation problems.
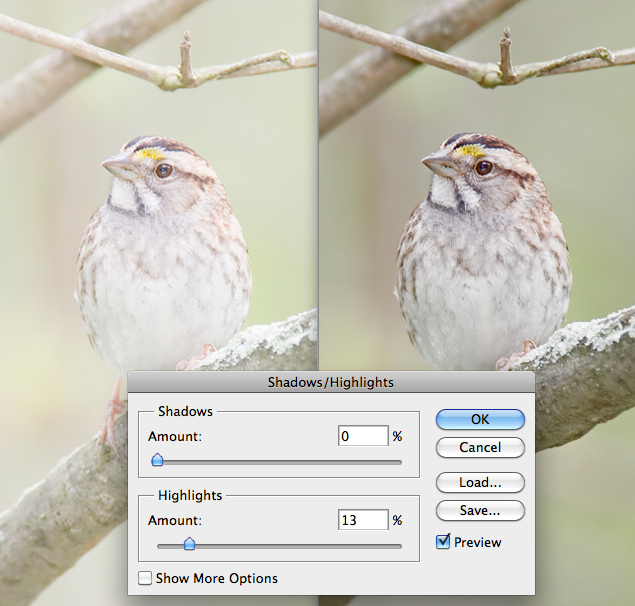
Finally, we consider the use of
the Shadows / Highlights tool
for decreasing brightness. By increasing the Highlights slider we’ve decreased
the overall brightness of the image.
Fig. 11.3.13:
The Shadows / Highlights tool is typically not the
best one for fixing overexposure, but in some cases it works. It
is, however, extremely useful for fixing the blown highlights (not
shown here) that often accompany overexposure.
It should be clear by now that
Photoshop (and Adobe Camera Raw)
provide numerous, redundant methods for correcting overexposure and
underexposure. Though some methods are more flexible than others,
additional flexibility (via more parameters to be adjusted) is
sometimes more of a hindrance than a help. A good strategy, when
deciding which tool to use for a given image, is to try the simpler
tools first; because of their simpler interface, it should become
quickly apparent whether the simpler tools are sufficient to achieve
the desired effect. However, in order to gain familiarity and
proficience with all the tools, it’s a good idea to vary your routine
and do some exploration before adopting a single favorite tool.
Remember that when all you have is a hammer, everything starts to look
like a nail.
11.3.3
Fixing Uneven
Lighting
When shooting on sunny days, the patterns of sun and shade can work for
you or against you. Unless the sun is directly behind you, a bird
in direct sunlight will generally have at least some part of its body
shaded, and this may or may not look good. As we described in
section 7.6, the use of flash to fill in the
shadows is a powerful
field technique that, unfortunately, is not always as effective as you
may like (due, for example, to distance or exposure constraints).
Fortunately, for many images you can fill in the shadows digitally in
Photoshop, using the Shadows /
Highlights tool introduced earlier. In the example below,
we’ve used the Shadows sliders to lighten the shadows of both the bird
and its environment. Notice how the deep shadows under the bird’s
tail and wings have been lightened to reveal significant detail that
was previously hidden. The shadow on the bird’s face has also
been lightened, and much of the bird’s underside is now lit up as if
fill flash had been used to light the bird from the front.
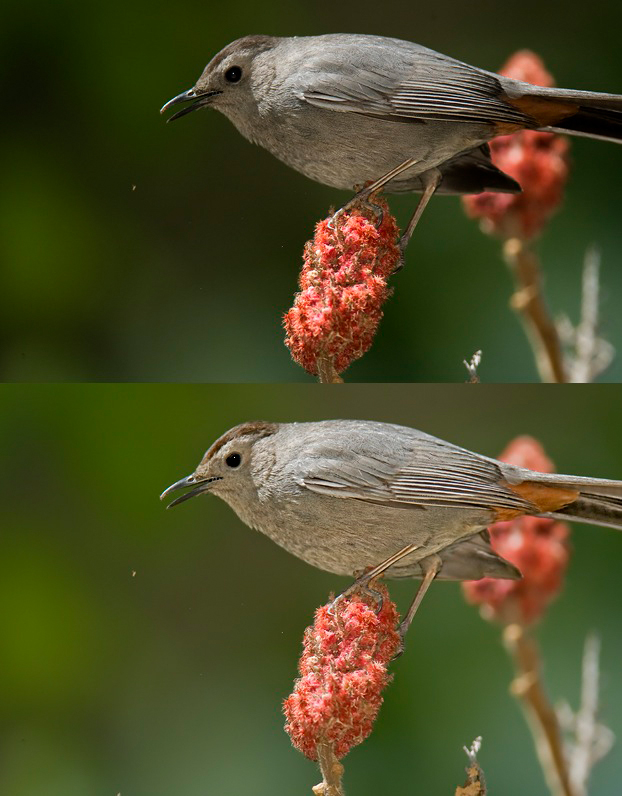
Fig. 11.3.14:
The Shadows / Highlights tool in Photoshop can be used to re-shape
the lighting patterns in the scene. The top image conveys the
impression of a strong
light coming from above. The bottom image, after strong
manipulation of shadows,
lessens the effect by creating the impression that light is also
shining onto the
bird from other angles as well. Notice the effect on the mood of
the image.
Obviously, the use of fill flash
and digital lightening via the Shadows
tool aren’t mutually exclusive; indeed, the Shadows tool can be highly
effective at enhancing the effect of fill flash in situations where
your flash unit isn’t powerful enough to provide enough fill at the
given distance. The use of the Highlights
tool can also help to reduce the harsh effect of direct sunlight by
mitigating the difference between the sunlit and shadowed regions of an
image. Simultaneously dampening the highlights and lightening the
shadows can make an overly-contrasty image appear more uniform, though
if taken to the extreme it can result in images that appear flat and
dull. Finding the right balance is a matter of intuition,
experience, patience, and luck.
As
with all methods that increase brightness in underexposed regions, the
ability to pull out detail is typically vastly improved by shooting in
RAW and processing your images in 16-bit mode in Photoshop.
11.3.4
Differential
Exposure of Bird and Background
All of the methods described in the preceding two sections can be taken
one step further by applying them differently to different parts of the
image. That is, rather than applying any of the foregoing tools
to the entire image, you can use your favorite selection tool to select
one region of the image (such as just the bird, or just the bird’s
wing, or just its head, etc.) and then apply an appropriate exposure
tool to just that region. You can then repeat this for all the
different parts of the image. This obviously takes more effort,
but potentially offers greater gain, since you can fine-tune the
exposure parameters for each part of the image. Such fine-tuning,
if done well, can in some cases result in images appearing to have
higher dynamic range than
would normally be possible with today’s DLSR’s, because you can pull
the maximal amount of detail out of all parts of the image—including
both the shadows and the highlights. Normally, with today’s
DSLR’s you have to choose between maximizing detail in the bright
regions of the scene (by exposing darker) or maximizing detail in the
dark regions of the scene (by exposing brighter). We’ll see in
Chapter 13 that via the merging of multiple photos having different
exposure settings we can achieve a High
Dynamic Range (HDR) image having more striking color and tonal
ranges and more details in extreme areas of the histogram. When
working with only a single photo, the HDR technique is inapplicable,
but by applying different exposure adjustments to different parts of
the image, you can sometimes achieve an effect similar to HDR.
This is what I call the D-PIE
technique, or Differential
Processing of Image Elements.
The figure below serves as a very rudimentary
example. The top pane shows the original image and the bottom
shows the image after the bird had been separated from the background
(via separate layers) and the twain processed separately using the
Shadows / Highlights tool. As you can see, the background has
been slightly darkened while the bird has been significantly brightened.

Fig. 11.3.15:
By first selecting the bird and moving it to a separate layer,
you’re then free to manipulate the foreground and background separately.
In this case we’ve lightened the bird while darkening the background, to
make the bird stand out more. In this particular case it’s
probably been
a bit over-done. Try to be more subtle when you apply this
technique.
In this case the effect is a bit
exaggerated for the sake of illustration, but it should suffice to
demonstrate the potential of this technique to drastically alter the
relative appearance of the bird versus its background. The
background was slightly darkened by dampening the highlights via the Highlights tool—a subtle technique
I often use to make the background slightly less distracting. For
the bird, the shadows were lifted via the Shadows tool, while the highlights
were very slightly supressed using the Highlights sliders.
There are several things to note about the above
image. First, the effect achieved here is again very similar to
what could be achieved in the field using stronger flash: recall that
flash falls off rapidly with distance, so often the bird is
substantially more affected by the flash than the background. In
the case of true flash, the effect is sometimes too strong, and can be
moderated by applying the above transformation in reverse (slightly
darkening the bird and lightening the background). Second, note
that the changes to the exposure have affected the colors of the
bird. You’ll often find that after modifying the exposure of an
image you’ll want to use the Saturation tool to slightly de-saturate
the subject; this is especially true when you’ve used any of the
exposure tools to darken the bird. Third, keep in mind that all
of the techniques described here have the potential to make the image
appear artificial. Because changes to exposure in postprocess can
alter the perception of the lighting patterns in the image, they can
confuse the viewer by implying lighting patterns that differ between
foreground and background. For example, if you modify the subject
so as to appear to be lit from below, while the rest of the scene is
clearly lit from above, you run the risk of making the image appear
artificial, as if the bird had been pasted into the scene from a
different photo. This might be the effect you want—or it might
not.
Another example of the above technique is shown
below. In this case, the background was brightened using the
Levels tool, to create the perception of a bright sunrise behind the
bird. The bird was processed separately from the background, and
indeed individual parts of the bird were processed separately from each
other to create the impression of greater dynamic range. Some of
the whites were exaggerated to make the bird seem to glow. The
red pupil was desaturated and the yellow iris was brightened to make
the eye look more alive. The bird was also sharpened using the Unsharp Mask (section 11.4).
All of the exposure changes in this example were achieved using the
Levels tool.
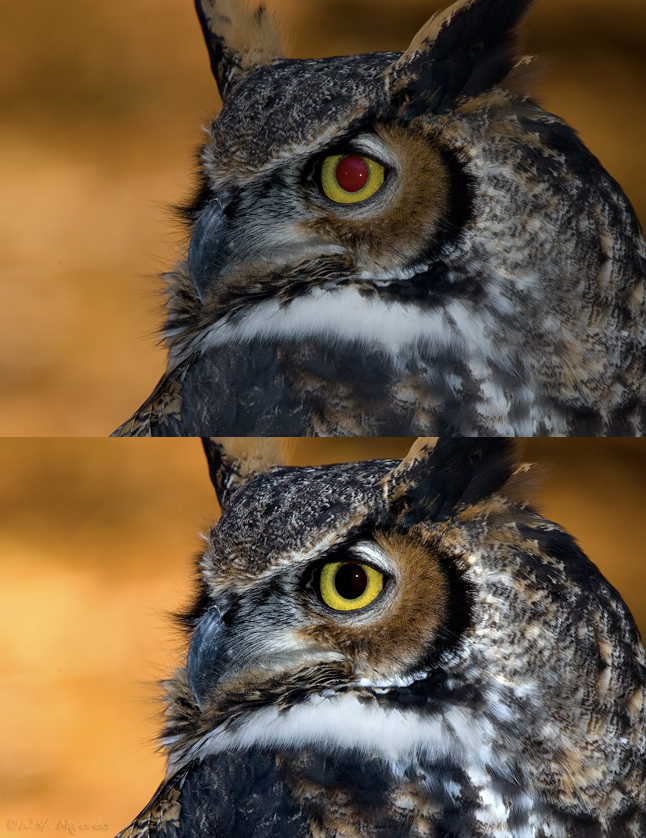
Fig. 11.3.16:
Differential processing of image elements. In this image
the foreground and background were adjusted differentially via the
Levels tool. In addition, parts of the bird’s plumage were
individually
selected and brightened or darkened to give the impression of greater
dynamic range. This is an extremely powerful technique, though it
requires some care and experience to use it most effectively.
I often find that exposure changes that seem to look
good to me during
postprocessing don’t look as good when I come back later after taking a
break from the computer. It’s a good idea to create several
versions
of an image during postprocessing and then come back later with a
refreshed perspective (i.e., fresh eyes) and see which version looks
best. This is easy
to do using the Save As...
menu option; simply save the file using a
new file name each time by affixing a version number to the end (e.g.,
warbler-6.jpg, warbler-7.jpg, etc.).
|
|
|