|
Table 12.4.1:
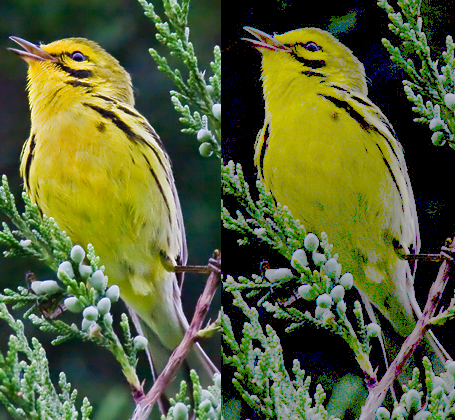
Image attributes and the parameters that
As a general
rule, I apply only conservative adjustments in ACR, and only when an
obvious need for adjustment is present; this is primariliy true for
color issues, which I prefer to fine-tune in Photoshop proper.
The exceptions to this general rule are sharpening, noise reduction,
the reclaiming of blown highlights; I almost always deal with these
issues aggressively in ACR and then apply more subtle follow-up
processing in Photoshop proper if necessary. affect them, in Adobe Camera Raw (ACR) and Photoshop. One limitation of some versions of ACR is that you can’t select part of the image and apply postprocessing filters to just that portion of the image (I believe this capability is present in the most recent versions of ACR, however). Another limitation is that some adjustments in ACR (such as sharpening and noise reduction) can only be previewed when zoomed in at 100%. Also, when working in ACR you’ll typically be working with the full image—i.e., prior to having cropped it or having reduced the resolution (such as for web distribution). A common workflow strategy is to convert the entire RAW file (without applying any cropping in ACR) and save the resulting image as a PSD file; from here you can then generate alternate versions for, e.g., web distribution, small medium print, large medium print, etc. In many cases, this is more convenient than re-processing these different versions from scratch (i.e., going back to the RAW file and performing the conversion anew each time). It is nonetheless worthwhile in some cases to consider going back to the original RAW file and re-converting it from scratch in ACR, exploring different parameter settings each time to find the optimal setting for each use of an image. This may seem to be a hassle, but if your computer isn’t too sluggish it’s generally not too difficult to simply double-click the RAW file in your file manager (to bring up ACR), make some quick adjustments to the sliders in ACR, and then press the Enter key to proceed with the conversion and open the converted file in Photoshop proper. Finding appropriate sharpening and noise reduction settings may require several iterations of this process, since you really need to see how these adjustments affect the converted file in Photoshop before you can be sure you have the right settings. However, you should be able to get away with going through this whole process only once (albeit via several iterations) and then storing the settings as defaults in ACR, since the ideal sharpening and noise reduction levels will be largely determined by the properites of your particular camera (and the range of ISO values you tend to use in the field). Once you’ve set these default values in ACR, you shouldn’t need to adjust them very often; an occasional tweak for images that are exceptionally noisy or in need of extra sharpening would be the exception. In my own workflow, the only parameters in ACR that I routinely adjust on a per-image basis are the Recovery slider (to fix blown highlights) and a few of the brightness and contrast parameters. As you develop your own workflow, you may find others that are more frequently useful for you, given your particular preferences and artistic tastes (or the idiosyncrasies of your camera, and particularly the capabilities of its imaging sensor). And remember that your workflow may change over time, and that for different types of birds you may have a different workflow that you prefer to apply. This will obviously affect how you go about deciding which adjustments to perform pre-RAW-conversion versus post-conversion. |
|