|
2.8 Cleaning
your DSLR
Although this chapter is primarily
about choosing a camera for bird photography, it’s worth taking a
moment to comment on a few important issues related to camera
maintenance. For the most part, DSLR’s require little day-to-day
maintenance, though there is one thing I make a point of doing at least
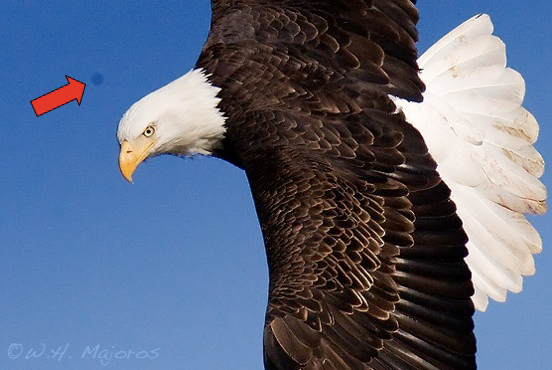
once a week: cleaning the dust off of my sensor. As you can
readily
see by glancing at the photo below, one tiny dust particle on your
imaging sensor can create quite a distraction in the resulting image.
Fig. 2.8.1:
Footprint of dust spot on sensor.
("That's no space-station...it's a dust spot!").
Spots like this can be easily removed from the
image in Photoshop.
Although blemishes like this can be trivially removed in Photoshop (or
similar software), if your sensor accumulates enough of
them, it becomes quite a chore to manually remove them all from each
and every image. And while the dust particle shown in the image
above occurred in the blue background, if enough of them were
to be concentrated in the bird’s face or other critical parts of the
image,
the photo might be rendered unusable, even with diligent
post-processing efforts. Although some cameras provide special
functions for “mapping” dust spots and removing them via
special,
proprietary software, it’s arguably much, much easier to just clean
your sensor periodically so that the number of visible blemishes
remains manageable between cleanings. Many DSLR’s today come with
a built-in sensor-cleaning mechanism, which vibrates the sensor
periodically to shake off
dust; although not fool-proof, this can help to keep the dust level
manageable.
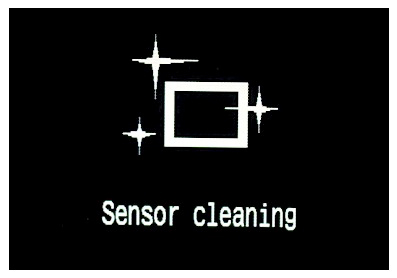
Fig. 2.8.2: The
sensor-cleaning screen of the Canon 40D.
Whenever the camera is turned on or off, the sensor is
vibrated for a short time, to shake off any dust from the
antialiasing filter that covers the sensor. These
automatic methods are not fool-proof, but do help.
As the image
below amply demonstrates, a small number of dust footprints (visible artifacts
created by particles of dirt on the imaging sensor) are often quite
tolerable. When they occur in smooth backgrounds (as illustrated
above) they can be painted out in Photoshop; when they occur in complex
backgrounds like the one shown below, they can often be ignored
entirely. (Do you think you would notice the dark speck in the
image below, if the red circle wasn’t there to highlight it?).
Also, dust particles tend to be most visible at small apertures like f/16 or f/22. Since most bird
photographers shoot at much wider
apertures like f/5.6 or f/8, dust specks are often less
visible and
typically result in more of a darkening of the affected pixels rather
than a solid black spot.
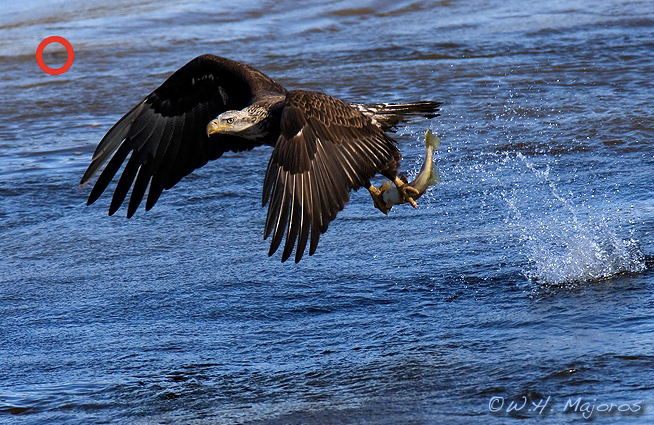
Fig. 2.8.3:
Another dust spot. Without the red circle,
would you even notice the spot? Maybe.
To the extent that small numbers of dust particles can be fairly
conveniently dealt with in post-process (or perhaps ignored altogether
in some cases), a method for cleaning your sensor which isn’t 100%
effective, but is very easy to perform and tends to remove most dust, may be a reasonable one
to adopt for day-to-day maintenance. For longer-term maintenance,
I recommend sending
your camera in to the manufacturer yearly for a thorough cleaning; this
may take a week or more and will typically result in a small
surcharge.
For day-to-day cleaning of the imaging sensor, I
recommend using a high-quality air blower, such as the Rocket Blower by Giottos. The
idea is to use a low-pressure gust of air to dislodge
any particles loosely adhering to the imaging sensor.
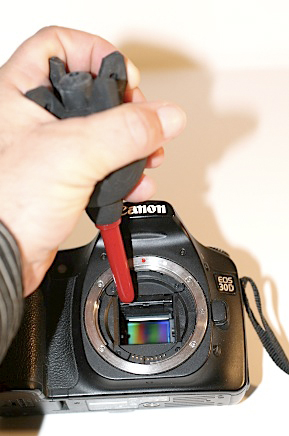
Fig. 2.8.4:
Blowing dust off of the sensor with a
Rocket Blower. After raising the mirror via a
menu option, just blow some air on the sensor
(preferably with the camera aimed downward).
Be careful not to touch the sensor!
Be careful when doing this not to insert the blower’s nozzle into the
mirror box, because if you accidentally make contact between the blower
and the sensor, you could damage the sensor’s outer filter. Also,
be sure to use a quality blower rather than a simple rubber air blower
meant for cleaning lenses. A quality blower like Giottos’ Rocket Blower will have a built-in
filter to keep the blower from blowing particles onto the sensor (which could make
the sensor dirtier than it was in the first place). Also, avoid
using cans of pressurized air, since these may emit chemicals or vapors
which can collect on the sensor’s surface and possibly degrade image
quality or even permanently damage your sensor.
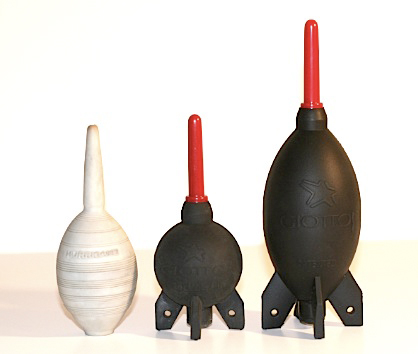
Fig. 2.8.5: All
blowers are not created equal.
At left is a Hurricane Blower, which does not have a built-in
dust filter, and may end up blowing more dust onto your sensor
than it blows off of it. Middle: a pocket-sized Rocket Blower (by
Giottos), which has a built-in filter to prevent blowing dust into
your camera. Right: a bigger, more powerful Rocket Blower.
For particles that refuse to budge when blasted with
low-pressure air, a wet or dry contact method may be necessary.
The materials needed for these types of cleaning are readily available
for purchase over the internet. Be aware, however, that
performing
these types of cleaning yourself may void the warranty on your camera,
and may possibly even cause irreparable damage to your imaging sensor
or mirror. If you don’t feel comfortable assuming these
responsibilities, I highly recommend that you let a professional
service your equipment instead of trying to do so yourself. In
the latter case, it’s always best to deal with the original
manufacturer of your camera; I’ve paid substantial sums of money to
third parties to clean my cameras, only to find that the imaging sensor
came back as dirty as (or possibly dirtier than) before the service was
performed.
If you decide to clean the sensor yourself,
you’ll need to buy a specialized sensor cleaning kit. I bought
the one shown below for about $25 (US).
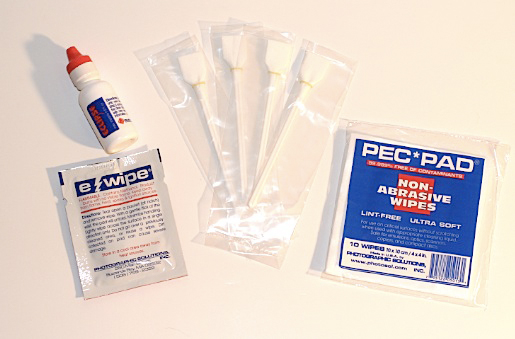
Fig. 2.8.6: A
popular DSLR cleaning kit. The swabs and bottled fluid
are for cleaning the sensor, the e-wipe is for cleaning the mirror (and
some
types of imaging sensors), and the Pec-Pads are for cleaning lenses.
(Use only as directed, and at your own risk).
The kit shown above includes
cleaning elements for the sensor as well as for the rest of the camera
and also for lenses; be careful not to use anything intended for lenses
or other camera parts on your sensor. In this particular kit, the
swabs shown in the center and the bottle of cleaning fluid on the left
are intended for use on the sensor. The swabs and even the
cleaning fluid come in different sizes and formulations, and you need
to use the right ones for your particular camera model. If you
use a brush intended for a larger sensor size than what’s in your
camera, you can end up inadvertently wiping lubricants or other filth
that collects around the sensor’s periphery onto the sensor itself, and
these can be very difficult to remove once they’re on the sensor.
Be sure to follow the directions in the cleaning kit
very carefully. Some makers of cleaning kits will guarantee that
their kit won’t damage your sensor, as long as it’s used
properly. Some even offer a warranty involving reimbursement for
certain types of damage resulting from the use of their product.
Keep in mind that what you’re actually cleaning isn’t really the
imaging sensor, but the glass filter (sometimes called an IR filter or
an antialiasing filter) that
covers the sensor. If you damage the
filter, it can typically be replaced by the manufacturer without having
to replace the (much more expensive) imaging sensor itself. In
any event, it’s a good idea to read the fine print on any guarantee
from makers of cleaning kits, to see exactly what type of damage they
cover.
In addition to wet-cleaning kits, which use a liquid
solvent to wash the sensor, there are also dry-cleaning kits, which
provide fine-tipped brushes to collect the dust via a static charge on
the
brush. If you’re traveling on a commercial airline, you may want
to investigate these dry-cleaning methods, since the wet-cleaning
methods generally involve the use of a flammable solvent that currently
is not
permitted onboard commercial aircrafts in the U.S.
While you’re cleaning the sensor (or just blowing
off the dust with a Rocket Blower), you may be tempted to also clean
the front surface of the main mirror. Note that the mirror in a
DSLR can be very, very fragile. The mirror itself is coated on
the front (not on the back, as in household mirrors) with a delicate
reflective coating, which can be scratched even more easily that the
filter on an imaging sensor. Also, applying too much pressure to
the mirror can damage the mechanism which flips up the mirror during
normal DSLR operation. Nevertheless, a clean mirror is important:
although the light path for exposure does not pass through the mirror,
the light paths for autofocus and metering do pass through the mirror,
and could conceivably be affected by any dirt that’s in the way.
Some cleaning
kits for imaging sensors can also be used (gently) to clean the mirror,
but you should only do so after reading the directions and verifying
that the kit is recommended for cleaning mirrors. As with sensor
cleaning, I recommend letting a professional clean your mirror; the
original manufacturer of your camera should be able to do this for a
reasonable fee.
Finally, it goes without saying that it’s best to
try to keep dust out of the mirror box so that the sensor (and mirror)
don’t get dirty in the first place. When changing lenses, point
the camera downward, and don’t allow the mirror box to remain open for
long periods of time. Avoid changing lenses in dusty and/or windy
environments, if possible. Also, be sure to remove any dust from
the mount area on the lens before mounting the lens, since this dust
can then find its way onto the imaging sensor. Likewise, if you
keep
your lens caps (the ones that cover the lens mount, either on the lens
or on the camera body) in your pocket, make sure they don’t get dusty
or covered with pocket lint, because this too can travel, directly or
indirectly, into the mirror box and onto the sensor. With a
self-cleaning sensor, a Rocket Blower, and some common sense, you
should be able to get by with no more than a yearly wet-cleaning of the
sensor, preferably performed by the camera’s manufacturer.
|
|
|