|
3.13 Other
Considerations
A few additional aspects of lens
design warrant a very brief mention here. The importance of these
features is arguably negligible compared to the various issues already
discussed in this chapter, such as magnification
(focal length), brightness
(maximum aperture), image quality
(due to glass type, lens coatings, lens design, and precision of
manufacturing/QA), and image
stabilization. The features discussed below are
nevertheless good to be aware of when shopping for a lens, since some
of them can be red herrings.
3.13.1 Lens
Balance
For hand-held lenses, reviewers
will sometimes comment on a lens’ overall balance, with the implication being
that a poorly-balanced lens (i.e., front-heavy
or back-heavy) will make
extended use of that lens in the field especially tiring. The
best way to hand-hold a long lens in the field—especially a lens
lacking IS—is to keep one hand on the camera (so you can operate the
shutter release) and the other hand at the far end of the lens, on the
lens hood, supporting it from the bottom. This allows the
greatest stability, and helps counteract the effects of optical leveraging (section 3.5) by
moving the “fulcrum” of the system further out from
the camera. A poorly-balanced lens may thus cause more fatigue in
one arm than the other during extended use. However, I think the
overall weight of the lens can, in practice, contribute more to fatigue
than issues
of balance. To some degree, these can both be mitigated by trying
(if possible) to anchor your upper arm and/or elbow against your body
while holding the far end of the lens, so that your body provides some
support to your arm, improving stability and reducing the strain on
your
arm.
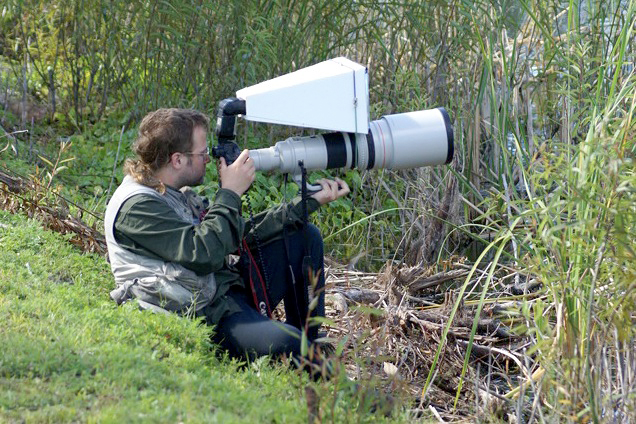
Fig. 3.13.1:
The Art of Lens Balance.
A big lens like this 600mm f/4 typically would be tripod-mounted,
but in the field you sometimes have to improvise to get the right
angle. Image stabilization helps enormously, no matter which lens
you’re trying to balance, but it also helps if you can anchor your
supporting arm against your body to reduce muscle strain.
(Photo by Linda Huber; used with permission)
3.13.2 Depth
of Field
We’ve already encountered the
concept of depth of field
(DOF) in section 3.7. The only
aspect of lens design which
significantly affects DOF is the maximum
aperture of the lens. This determines the narrowest
DOF that you can achieve with that lens, without artificially
decreasing DOF in post-processing (which can be done—see section
13.2). Increasing DOF
can always be accomplished by closing the lens’ iris (i.e., reducing
the aperture setting on the camera), though there are costs to doing so
(such as reduced brightness, and possibly diffraction effects at small
apertures like f/22 or
smaller).
Most importantly, always remember the Golden Rule of Depth-of-field—that
DOF increases with distance to subject. Thus, if you’re planning
to buy an expensive, large-aperture lens in hopes of getting lots of
bird photos with paper-thin DOF in each one, keep in mind that you’ll
also need to be close to your subjects in order to do so. For
subjects at a distance, even wide apertures like f/4 can give surprisingly deep
DOF. In the photo below, for example, I was using a 200mm f/2.8 lens stopped down to f/4. The bird was extremely
close to me (as it would have to be for such a small bird to appear so
large in frame at 200mm without any cropping, as in this image), and
that allowed the depth-of-field to be shallow enough that the bird’s
head and beak ended up in focus while the tail is obviously quite out
of focus. You can see just how shallow the DOF was by looking at
the rock to the left of the bird; the DOF appears to be about an inch
or so in this case, which is indeed quite shallow.
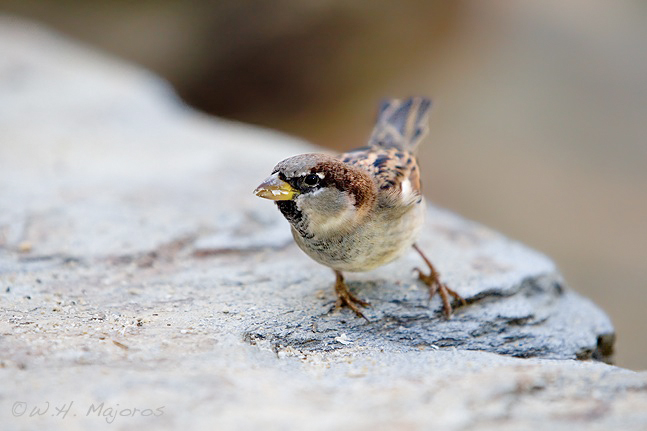
Fig. 3.13.2:
House Sparrow (Passer domesticus) at f/4.
For a given lens, the depth-of-field can be increased from
its minimal setting, but not decreased. Remember also that
DOF increases with distance to subject, so obtaining a
shallow DOF requires a close subject as well as a
large aperture.
3.13.3 Field
of View
The field of view (FOV) of a lens is
the width of the scene that you can see through the lens at a given
distance. As with most photography jargon, however, the term is
sometimes used to mean different things. Most commonly, the term “field of view” is used to mean angle of view, or what can also be
called the angular field of view.
The angle of view (AOV) measures the angular width of the cone of
visibility extending from the lens, as depicted in Figure 3.13.3.
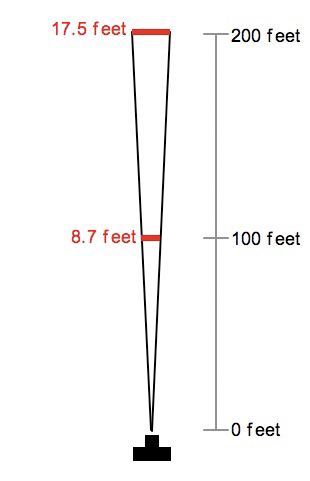
Fig. 3.13.3:
Angular vs. Linear Field of View.
For a lens with a 5 degree angle of view, the red
numbers give the linear FOV at the specified
distances to the subject.
As suggested by the figure, one angle of view (in this case, 5 degrees)
gives rise to a multitude of field-of-view values. At at distance
of 100 feet, the field of view is 8.7 feet wide, whereas at a distance
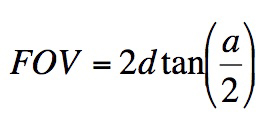
of 200 feet, the field of view grows to 17.5 feet in width. For
an angular FOV of a, the linear FOV (actual width of the
scene, in feet) at a distance of d
feet can be computed by simple trigonometry:
Keep in mind, however, that the viewfinder typically doesn’t show you
the full field of view. The viewfinder coverage in most DSLRs is
around 95%, so the image that is captured will show a bit more of the
scene around the edges than what you see in the viewfinder. Also,
since crop sensors (i.e.,
non-full-frame sensors) crop the image delivered by the lens, the
actual linear
FOV captured by the sensor at a given distance will obviously be less
than for a full-frame camera.
The main determinant of angle of view is the focal
length, with competing lenses of the same focal length having roughly
the same AOV. The table below shows the published AOV values for
Canon’s super-telephoto lens line. Canon gives these as diagonal
AOV values, so the angle is measured from one corner of the frame to
the opposite corner.
focal
length
|
angle
of view
|
300mm
|
8.3
deg
|
400mm
|
6.2
deg
|
500mm
|
5.0
deg
|
600mm
|
4.2
deg
|
800mm
|
3.1
deg
|
Table. 3.13.1:
Angle of view for some common
birding focal lengths. Angles are measured
diagonally across the imaging frame.
As far as choosing a lens, FOV and AOV are essentially useless when
comparing units of the same focal length. In the field, the above
information can be useful, however, in that it tells you that in order
to double your field of view you need to back up to twice your current
distance to the bird (or vice-versa).
3.13.4 Unit
Variation
It’s an unfortunate fact of the
economics of lens manufacturing that most manufacturers don’t put much
effort into testing the units coming off the assembly line for defects
before they’re packaged and shipped off to retailers. Camera and
lens companies have discovered that it’s cheaper to just ship all
products directly from the assembly line without any testing, and to
allow consumers to do the testing for them. Companies rely on the
fact that many consumers aren’t discerning enough to notice defects
anyway, so by effectively paying for QA (quality assurance) activities only
for those units returned by the few discerning consumers in the
population, they can save many thousands of dollars per annum. In
other words, they're hoping you're too
stupid to notice any defects in their product.
Though I’ve purchased a relatively small number of
cameras and lenses during my very brief photography career, I’ve
encountered a disproportionate number of brand-new items that turned
out to
be defective—including items that the manufacturer agreed were
defective after I sent them in for repairs. These include both
name-brand and third-party items. As just a few examples, I
bought two pro-sumer Canon cameras that front/back-focused, a Canon
teleconverter that back-focused, and a Sigma 800mm lens that fell apart
and had to be held together with rubber bands during the peak of the
spring birding season. In all cases, the manufacturers honored
their warranties by servicing the units free-of-charge.
The moral of this story is that any brand-new lens
or camera, no matter who manufactured it, can turn out to be
defective. Unfortunately, defects in optical equipment can be
very subtle, so that you may not know for sure whether the issues in
image quality that you’re noticing are due to manufacturing defects or
to your technique. Issues affecting sharpness are especially
difficult to diagnose, since there’s typically no standard to compare
against: you may think the images produced by the lens lack sharpness,
but whether that’s due to poor lens design (in which case all units of
that model will perform poorly) or due to individual unit variation
(i.e., random manufacturing defects) is generally hard to determine
without significant effort.
The issue is confounded by the fact that what may
appear to be a lens issue may
actually turn out to be an issue with the camera that the
lens is attached to. This is especially true of
sharpness and focusing isues. Sharpness, or resolution, can be
limited by the pixel size of the camera’s sensor as well as by the
precision of the lens’ manufacture. Focusing problems can
likewise arise from either component, with the assignment of blame
being even more difficult when the camera and lens were manufactured by
two different companies (i.e., when using a third-party lens with a
name-brand camera). In the latter case, the lens manufacturer
will have had to reverse-engineer
the AF communication protocol used by the camera, so as to render their
lens compatible with the name-brand camera. Sometimes this
reverse-engineering process works as planned, and sometimes it
doesn’t. When it doesn’t work entirely as planned, the name-brand
camera coupled with the third-party lens may occasionally behave
erratically, producing out-of-focus images or even refusing to focus at
all in particular circumstances. In these cases it may be very
difficult to decide whether to send the camera or the lens in for
servicing, when a defect is suspected.
3.13.5 MTF
Charts
Manufacturers of lenses sometimes
like to publish graphs called MTF
charts to try to convince consumers
that their lenses are sharper (or “contrastier”) than those of
competitors. MTF is another one of those acronyms for which,
fortunately, you really don’t need to know what it stands for.
The short version of the MTF story is that (1) it’s a good idea, in
theory, to compare lenses based on their MTF charts, but (2) in
practice the MTF charts published by different manufacturers aren’t
comparable because either (a) they’re scaled differently, or (b) one or
both of the manufacturers have fudged their MTF charts.
Canon is one of the culprits of MTF fudging.
As the fine print on their web site will tell you, their MTF charts are
typically theoretical MTF
charts, meaning that a published chart doesn’t show you the actual
measured optical performance of a given lens, or even an averaging
across a number of empirically tested lenses, but rather is a
prediction based on details of the lens design. In essence, their
MTF charts can be ignored. And because different manufacturers
follow different protocols for constructing their published MTF charts,
the other companies’ MTF charts can be ignored as well. In
summary, then, I don’t recommend even looking at the MTF charts when
choosing a birding lens. What’s more relevant is whether you can
find a number of example images taken through a given lens showing you
that the lens can deliver the image quality that you want.
3.13.6 Build
Quality
In the field, lenses can receive
quite a beating. When on long hikes, it’s very hard to ensure
that your lens doesn’t bump into a few tree branches here and
there. Even through normal, responsible use of a lens, some parts
will receive a fair amount of stress over time, such as the lens
mount. For hand-held lenses, the weight of the lens itself can
exert a lot of torque on the lens mount, particularly if you hold the
camera horizontally without fully supporting the weight of the
lens. For tripod-mounted lenses, the lens mount can still receive
a lot of stress during operation of the camera, for example when you
rotate the camera to level the image. Over time, these forces can
cause parts to become loose, especially in less solidly-constructed
lenses.
During my first season birding with the Sigma 800mm f/5.6, the lens mount became loose,
allowing the camera (and therefore the sensor plane) to wobble around
quite a bit. Even a small amount of wobbling of the sensor plane
could result in (partially or completely) out-of-focus images.
Because it was the peak of the warbler migration, I was loathe to send
in the lens for service, so I temporarily fixed the problem with a
system of hefty rubber bands, which worked fine. After the
migration was over, I sent in the lens to Sigma and they fixed it at no
cost since it was under warranty. It’s worth noting that I’ve
never had a problem like that with a name-brand lens—only with
third-party units.
As a further testament to the build quality of
name-brand lenses, I once dropped my Canon 400mm f/5.6 prime lens on a boulder from
a height of 3 feet. The lens body—not the lens hood—soundly
struck the boulder, but the lens continued to work fine after that,
producing images fully as sharp as before.
It’s worth noting here that mirror lenses typically
can’t take the same kind of abuse that “real” camera lenses (i.e., refractors) can take.
Mirror lenses using a Schmidt-Cassegrain
design in particular tend to
be very delicate, and may require re-collimation from time-to-time to
maintain sharpness, since the angle of the main mirror can shift over
time, simply through normal use.
|
|
|