|
Chapter
11
Common
Tasks
In the previous chapter we gave a
brief overview of the core concepts involved in processing digital
images in software, as well as a practical introduction to methods for
selecting regions of an image. In this chapter we continue in the
more practical vein by surveying the most common tasks needing to be
performed in the correction of digital bird photos. In the next
chapter (Chapter 12) we’ll place these tasks into the context of a workflow, to further improve your
efficiency when digitally processing large numbers of photos. The
succeeding chapter (Chapter 13) will in turn cover some more advanced
techniques than those considered here.
11.1
Reducing
Noise
One of the most important
differences between camera models (and especially between more and less
expensive models) is their ability to create low-noise images in
challenging lighting conditions. Recall from section 2.5 that
noise can limit your effective detail level, since the further you zoom
in to an image (so as to enlarge fine details), the more likely it is
that any noise present in the image will be amplified to an
unacceptable level. Fortunately, the noise-reduction capabilities
in Photoshop—in the hands of a competent user—can in many cases
overcome the noise limitations imposed by a cheaper camera model.
Indeed, one might go so far as to say that if you have a choice between
buying a more expensive camera together with some cheap (or free) photo
processing software, versus buying a slightly cheaper camera plus a
copy of Photoshop, you might be better off opting for the latter.
(The case is made even stronger if by buying the cheaper camera you can
then purchase a more expensive lens to go with it).
Reducing noise in Photoshop is simple—though as
we’ll see shortly, reducing noise without also obliterating detail in
the bird requires some more effort. The figure below shows the Reduce Noise window in
Photoshop. At right are several sliders: Strength, Preserve Details, Reduce Color Noise, and Sharpen Details. I generally
only use the first and second sliders. As you can see here, I’m
applying full strength (Strength=10) while preserving details at a
level of 30% and then applying a post-noise-reduction sharpening pass
at 30%.
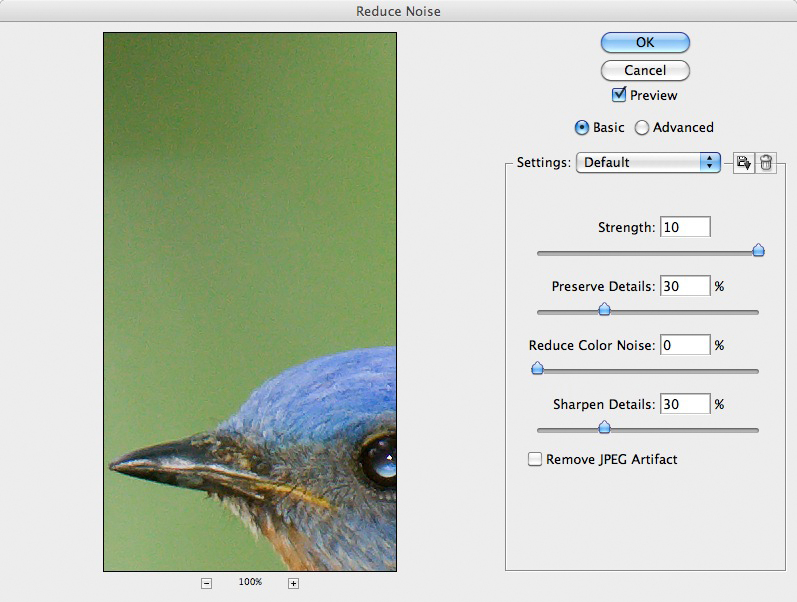
Fig.
11.1.1:
Reducing noise in Photoshop. The four sliders at right dictate
how aggressively
noise is reduced, and how much detail is lost as a result. I
typically set Strength to 10 and
Preserve Details to 30%. The other slides I typically leave at
0. Note that for RAW files
you can also reduce noise during RAW conversion, and this is often more
effective than
reducing it directly in Photoshop.
The figure
below illustrates the relative effects of these sliders. The
leftmost pane shows the raw image, with no noise reduction
applied. In the middle pane I’ve applied full-strength noise
reduction with 0% detail preservation and no sharpening. As you
can see, the noise in the background has been considerably reduced, but
so has the detail in the bird; the bird now appears very watery and
blurred. In the rightmost pane I’ve set the detail preservation
to 30% and sharpening to 30%. Now the bird retains most of its
detail, but you can see that the noise in the background has not been
reduced as much as in the middle pane.
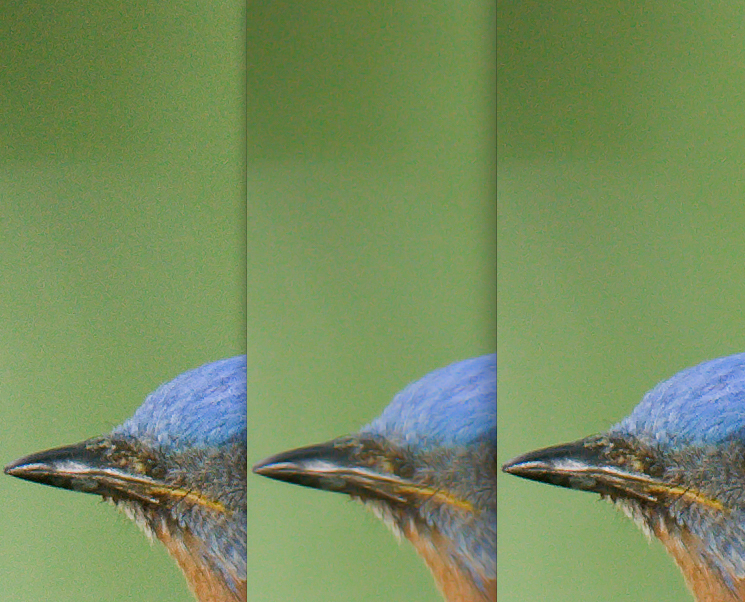
Fig.
11.1.2: The effect of noise reduction strength and detail
retention. Left pane: the original
image. Middle pane: after noise reduction at strength 10, with 0%
detail retention. Right pane:
after noise reduction at strength 10, with 30% detail retention and 30%
sharpening. Global
noise reduction always involves a tradeoff between reduction of noise
and loss of detail.
For this reason, non-global methods can be far more effective.
This is the problem with virtually all automatic
noise-reduction filters: because they can’t tell the difference between
the subject and the background, they end up reducing noise at the
expense of subject detail. Fortunately, in Photoshop it’s
possible to apply any filter to just specific portions of the image, as
desired. As described in section 10.6,
this is one of the most
powerful features of Photoshop (and similar software). The
practice of separately processing different parts of an image with
different filters—what I like to call Differential
Processing of Image Elements, or D-PIE—is a technique we’ll revisit
several times in the next several chapters.
In the specific case of noise reduction, the D-PIE
technique is fairly straightforward. You first select the bird
(as well as its perch and any other foreground objects that you’d like
to avoid blurring) using the Quick Selection tool described in section
10.6. Next, invert the
selection via the menu option Select
> Inverse (I have this
set to the key combination Cmd-Shift-I
on my computer) so that the background is now selected rather than the
foreground. Now press Ctrl-J
(Cmd-J on a Mac) to copy the
selected region to a new layer. Finally, invoke the noise
reduction filter (set to key combination Cmd-N on my computer).
Because you’ll now be reducing noise only in the background regions of
the image, you can be as aggressive as you like, setting Strength to 10 and Preserve Details to 0%. The
figure below speaks for itself.
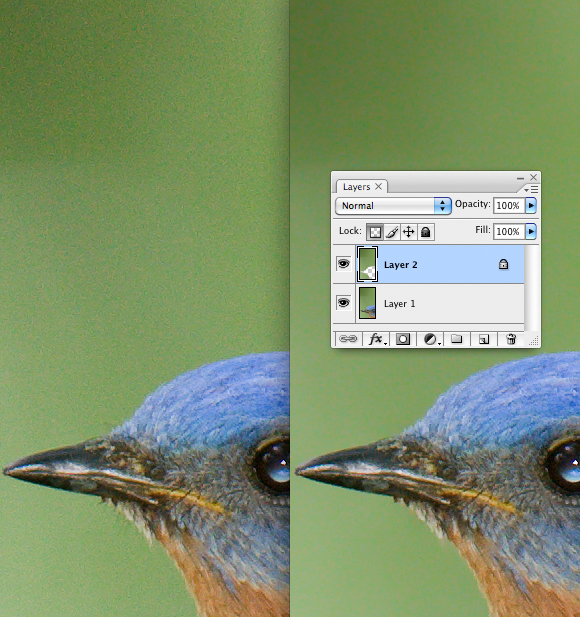
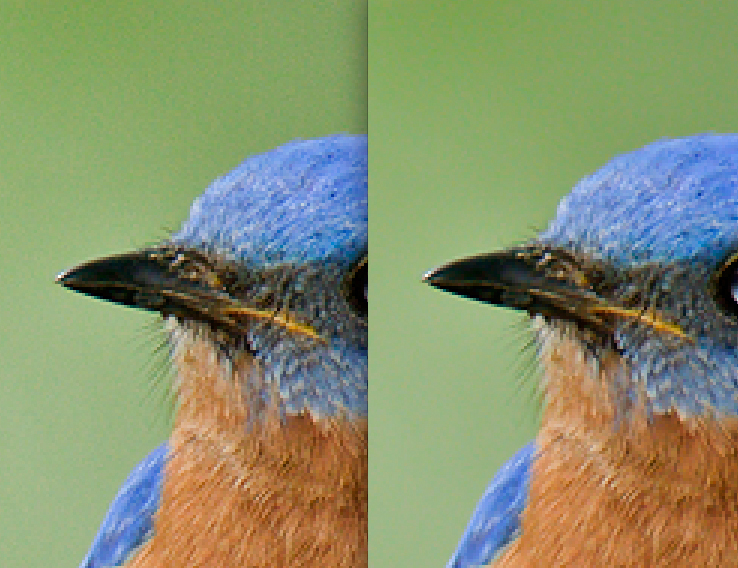
Fig.
11.1.3:
Local noise reduction via the use of layers. Left pane: the
original
image. Right pane: after splitting the image into two layers
(foreground and
background) and applying three iterations of aggressive noise reduction
only
to the background layer.
As you can see in the figure
above, the result of applying this technique can be rather
striking. In the left pane of the figure is the original image,
while the right pane shows the result of noise reduction applied only
to the background layer (Layer 2). In this case I’ve actually
applied the noise reduction filter three times in succession, resulting
in a perfectly smooth background gradient with virtually no noise
whatsoever. Because the bird is on a different layer, its details
were completely unaffected by the noise filter.
Now there are a few subtle details that need to be
mentioned. In the right pane of the figure above, you can see the
Layers palette,
which shows that Layer 2 is currently selected. Before applying
the noise filter, it’s a good idea to lock
the transparent pixels in the layer. This is accomplished
by clicking the tiny checkerboard icon next to “Lock” near the top of the Layers palette. If you apply
aggressive noise reduction without first locking the transparent
pixels, a slight haze can be induced around the boundaries of the
opaque regions in the layer, and this can affect the apparent sharpness
of your foreground layer.
Another subtle detail is that in the above example I
expanded the selection of the bird by 1 pixel before inverting the
selection and creating the background layer. This creates a small
buffer zone around the bird that can help to reduce the effect of
imperfections in your selection, and can help preserve fine details in
the contour of the bird. Expanding the selection is as simple as
selecting the menu option Select
> Modify > Expand and entering the expansion radius, as
shown below.
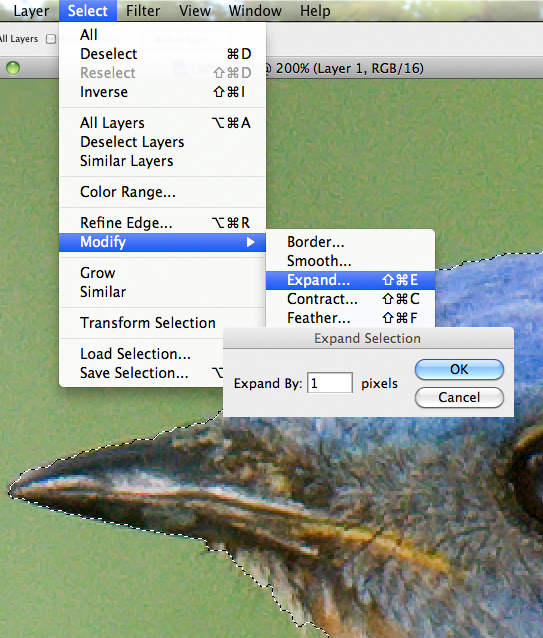
Fig.
11.1.4: Expanding the foreground selection by 1 pixel prior to inverting
the selection and reducing noise can reduce the effect of sloppy
selection. In
this image, the selection doesn’t follow the outer contour of the bird
with perfect
precision. Expanding the selection by 1 or 2 pixels adds a safety
buffer.
As you can see in the above
figure, the selection of the bird’s beak is not entirely precise.
Expanding the selection by one or two pixels prior to inverting the
selection and reducing noise can help to avoid losing fine details
around the perimeter of the foreground. As mentioned in section
10.6, you can also feather
the selection by a small radius to force the filter strength to fall
off around the edges of the selection or active layer.
In the example above I selected the bird via the
Quick Select tool, which works extremely well in simple cases like the
one shown here—where the bird and background are visually separable
both spacially and chromatically (i.e., are of starkly different
colors). For more challenging foreground/background separation
scenarios, you can resort to other selection techniques (such as Select by Color Range or by
painting in Quick Mask mode)
as discussed in section 10.6. For the
purpose of noise reduction,
however, many of these more complex scenarios admit a simpler solution:
the blur tool. If only
very limited regions of the image show excessive noise, such as around
the corners or in a few restricted dark areas, you can remove the noise
manually by painting it away using the blur tool, as illustrated below.
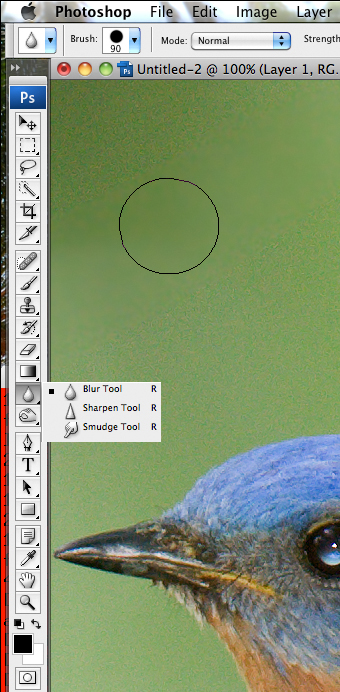
Fig.
11.1.5:
Reducing noise manually via the blur
tool. The black circle is the blur tool cursor; the
diagonal swath painted with the blur tool is now
devoid of noise. This technique is most useful for
images in which only small areas have noise.
In the figure above, I’ve enabled the blur tool and
swept it repeatedly across a diagonal swath of the background, just to
illustrate the effect. If you look closely, you can see that the
diagonal region where the brush is located (the large, black circle
denotes the brush cursor) is virtually devoid of any noise. In
theory, you could brush away all the noise in this image’s background
in this way, but you’d have to be very careful when working close to
the edge of the bird (to avoid accidentally brushing away detail in the
bird); that could be very tedious and time consuming, so I recommend
only using the blur tool when the noisy parts of the image are very
limited in size and aren’t close to the bird or other important
foreground elements.
When
we get to Chapter 12 we’ll consider the task of developing a personal workflow—a
stereotyped ordering of processing operations
that you typically apply to all your bird images—and there
we’ll consider some of the tradeoffs involved in applying certain
filters before or after certain other ones. In the case of
noise reduction, the order in which you apply the noise filter and
(separately) a sharpening filter can affect the resulting appearance of
your image. For example, a fine-scale sharpening filter can
reduce the effectiveness of a subsequent noise-reduction filter by, in
effect, “sharpening the noise” and making it harder for the
noise filter to see the noise as “noise” rather than “detail”. If you follow the above D-PIE technique for noise
reduction, this issue becomes less relevant since you’ll typically be
reducing the noise only in the background, and sharpening details only
(or, at least, most aggressively) in the foreground.
In section 2.5 we discussed
the types and sources of
noise, from the perspective of sensor technologies. In the realm
of image postprocessing, noise is typically classified instead by its
visual effect on the image, with the primary classification being
between luminance noise and chrominance (or “chroma”) noise. Luminance noise
results from fine-scale errors in pixel intensity (brightness), whereas
chroma noise results from errors in pixel color. I’ve rarely
found a need to reduce chroma noise in images taken with my digital
cameras, and indeed aggressive use of the Reduce Color Noise slider in
Photoshop often reduces color saturation to a significant degree,
so I typically leave that slider set at zero. However, if you
shoot at very high ISO settings with a non-pro DLSR camera, chroma
noise may indeed be a problem in your images, especially in dark areas
of underexposed photos.
If you’re shooting in RAW (and you should be),
there’s another option for reducing both luminance and chrominance
noise in Photoshop. When you open a RAW file in Photoshop, you’re
first taken to the Adobe Camera Raw
(ACR) application, which
converts the camera-specific RAW file into a brand-independent format
that Photoshop proper can work with. During this RAW-conversion
process, certain basic image manipulations can be performed, and in
some cases these manipulations will have higher image fidelity when
performed during RAW conversion than if performed after conversion in
Photoshop proper. The reasons for this are a bit technical (e.g.,
access to the original linear color space, the ability to read the
un-interpolated values measured via the Bayer pattern, etc.), but the
important point is that noise reduction can sometimes be more effective
when performed in ACR than when performed in Photoshop proper1,2. The figure below
illustrates how to reduce noise in ACR.
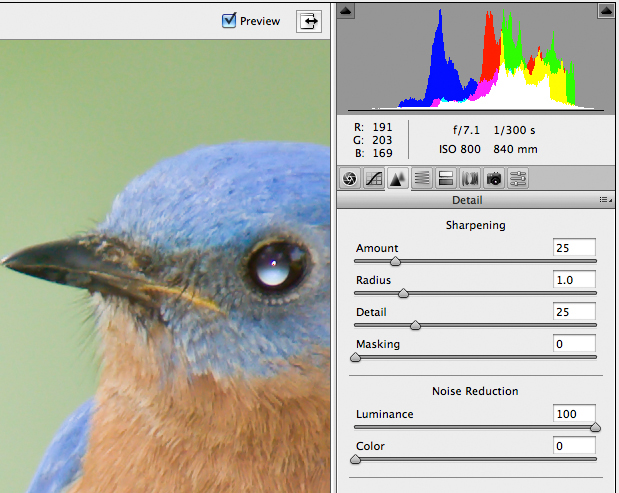
Fig.
11.1.6:
Reducing noise during RAW conversion can be more effective than
doing it later in Photoshop. In Adobe Camera Raw I typically set
the luminance
slider to 100; for most of my images, this significantly reduces
background noise
without affecting foreground detail in any noticable way.
In the figure above, the Luminance noise reduction
slider is set to 100, while the color slider is set to 0. When
processing RAW files from my Canon EOS 1D Mark III camera, I’ve found
that reducing luminance noise in this way can be extremely effective,
often completely removing background noise without having any
discernible effect on the foreground detail. Since this process
doesn’t require that I select the bird and process the background
separately from the foreground, this is a very efficient option (though
in most cases I’ll still need to separate the bird
from the background anyway when adjusting exposure and
sharpness). Note that the effectiveness of this process will
differ from camera to camera (especially between pro and non-pro camera
bodies), and also depends on how noisy your images are to begin with.
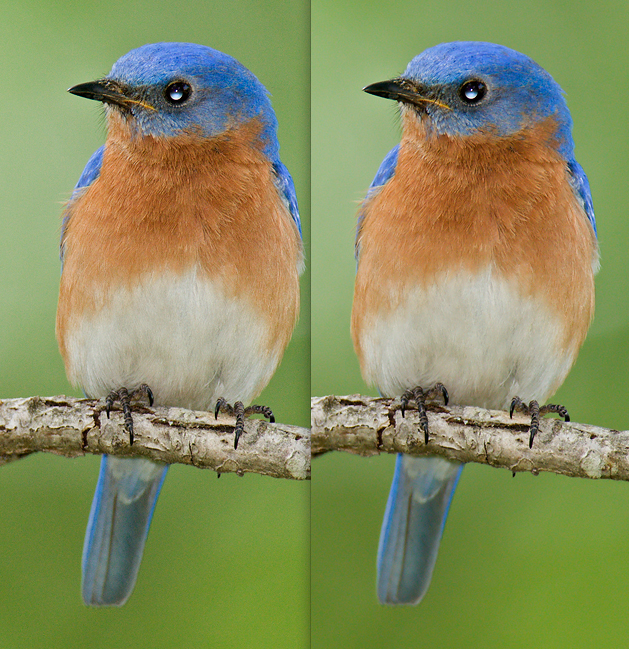
Fig.
11.1.7:
The result of reducing noise during RAW conversion. Left pane:
the original image.
Right pane: after aggressive noise reduction in RAW conversion.
Notice that the background
noise has been very substantially reduced, while the foreground detail
is almost entirely
unaffected. Results may vary between camera models and images.
The figure above shows the same image, without noise
reduction in ACR
(left panel) and with noise reduction in ACR (right panel); in both
cases the luminance noise reduction was set to 100 and the chrominance
noise reduction to 0. As you can see, the background noise has
been largely eliminated, without any discernible effect on the
bird. Note in particular that the “whiskers” (what ornithologists call rictal bristles) are retained here,
whereas the method detailed earlier in this section, which relied on
separating the foreground from the background, largely obliterates
these types of details, since they’re generally too difficult to
efficiently select with the Quick Selection tool.
Keep in mind also that different cameras, each using
different imaging sensor technologies, will produce different types and
amounts of noise, and these will be more or less difficult to remove
during RAW processing. Many comparisons can be found in
photography forums (see Appendix A) between the quality of different
RAW processing engines and different noise-reduction programs, with
different programs coming out ahead or behind depending on which
version of the software is used, which settings in the software are
selected, and which images are compared. Incorporating
third-party noise-reduction software into your workflow is addressed in
Chapter 12.
The issue of noise is often less important when your
sole purpose is to post your images on the internet at reasonable
sizes. Prior to posting an image on the internet you’ll typically
want to reduce your image from, say, 3000×3000 pixels to perhaps 800×800 pixels. The process of
reducing the resolution of an image often results in a “free” reduction of visible noise.
In the figure below, the bluebird images from the previous figure are
shown at 40% crop. The image on the right has undergone noise
reduction in ACR; the image on the left has not. As you can see,
the noise in the left image is very subtle, and on my monitor it
appears quite acceptable as-is.
Fig.
11.1.8: Noise reduction is less important for images posted on the
internet.
When reducing an image’s resolution prior to posting on the internet,
low levels
of luminance noise are often effectively eliminated by the
down-sampling algorithm.
Left: original image with no noise reduction. Right: same image,
but with noise
reduction applied during RAW conversion. The resulting
differences are very subtle.
Note that for some (perhaps many) viewers, the total
absence of noise is not always ideal. Though it’s fairly easy in
Photoshop to render all of your backgrounds perfectly smooth and 100%
noise-free, a small amount of fine-grained noise can sometimes mimic
the impression of traditional film grain, which more mature audiences
may find to be simultaneously familiar and pleasing. Overly
smoothed images can in some cases appear almost like computer-generated
scenes as seen in a video game or virtual reality simulation, and
though some audiences may find this pleasing, others may not. At
the very least, be careful not to be overy aggressive in reducing noise
in regions that do retain some foreground details (such as branches in
or near the focal plane), since this does tend to look a bit unnatural
when overdone.
It needs to be mentioned that there are cases in
which noise can affect the main subject, rather than just the
background. This is typically only the case when using
excessively high ISO values (e.g., above ISO 1600 for models comparable
to the Canon EOS 1D Mark III), though it can also occur for subjects
with both white and black plumage elements, when exposing for the white
elements. In such cases, you may want to consider applying
moderate noise reduction to the bird, but with the Preserve Details and Sharpen Details sliders set to some
non-zero value. Indeed, you may to some extent be able to use the
Sharpen Details
feature of the noise reduction filter in place of the Unsharp Mask, to sharpen the bird
while also reducing noise. I’ve had only very moderate success in
applying this technique, but it’s at least worth keeping in the back of
your mind as you explore your processing options.
Finally, note that the use of in-camera noise
reduction (sometimes called “high-ISO noise reduction”) is generally a bad idea, since
once it’s been applied it can’t be undone. Noise reduction and
sharpening, when done in-camera, are often only available when shooting
JPEG images (rather than RAW). When shooting in RAW, in-camera
sharpening and noise reduction functions typically only affect the
in-camera preview, not the RAW image itself. These settings may
be transmitted along with the RAW file as “sidecar” instructions to the processing
software, but they typically don’t “destructively” (i.e., irreversibly) affect the
RAW file itself. Also, since many sharpening and noise reduction
algorithms are compute-intensive, the in-camera versions of these
algorithms are sometimes simplified so as to execute faster (and more
sloppily) than the corresponding functions that you’d perform later on
your computer in Photoshop.
1.
http://www.adobe.com/digitalimag/pdfs/ps_workflow_sec2.pdf
2. Photoshop CS3
for Windows and Macintosh by E. Weinmann and P .Lourekas (2007)
|
|
|