|
11.2 Fixing
Blown Highlights
Few things are more frustrating
than taking a photo of a beautiful bird in a perfect pose, watching as
the bird flies far, far away, and then looking at your LCD and finding
that the photo was significantly over- or under-exposed. If
you’re following the ETTR or BETTR protocols described in
section 6.2,
then you’re more likely to over-expose than under-expose your
images. As long as no important details have been lost through clipping (section
2.7.4), over-exposure is
always better than
under-exposure, because under-exposure typically increases noise and posterization (via
reduced photon counts), whereas over-exposure (as
long as the highlights aren’t
clipped and no additional feather glare is induced via overuse of
flash) simply stores the information in a different set of bits inside
the image file. In this section we’ll address the issue of blown
highlights. In section 11.3 we’ll
discuss exposure correction in
the more general case.
When you load your RAW image into Photoshop, it
first goes through the Adobe Camera
Raw (ACR) converter, as mentioned
in the previous section. The figure below shows an over-exposed
image in ACR.
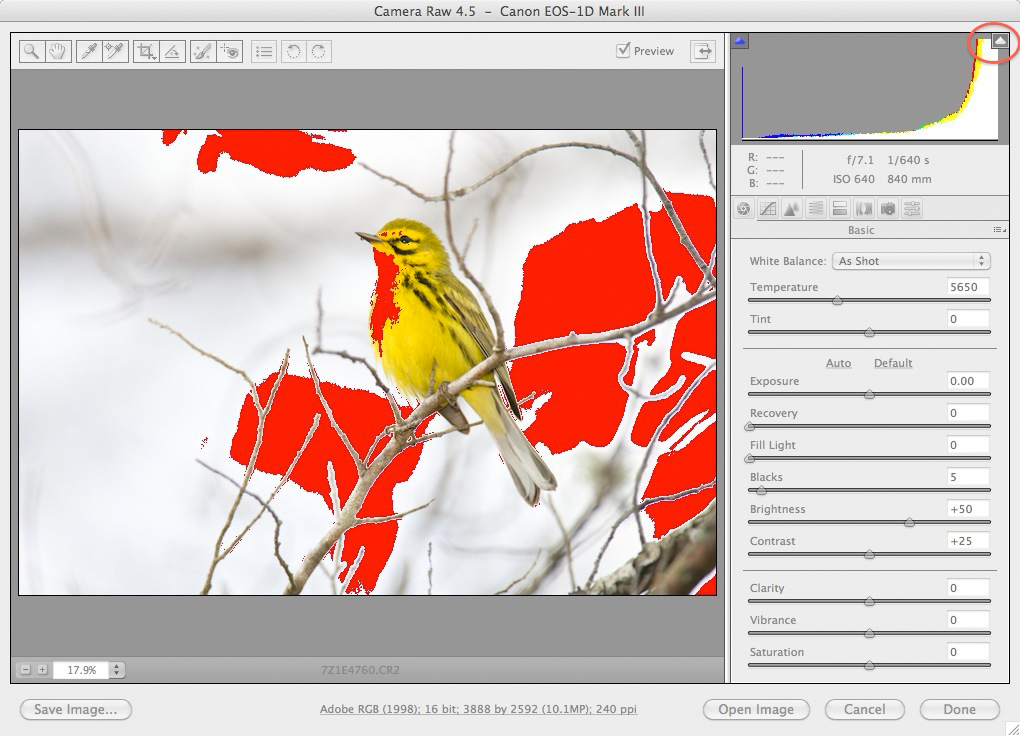
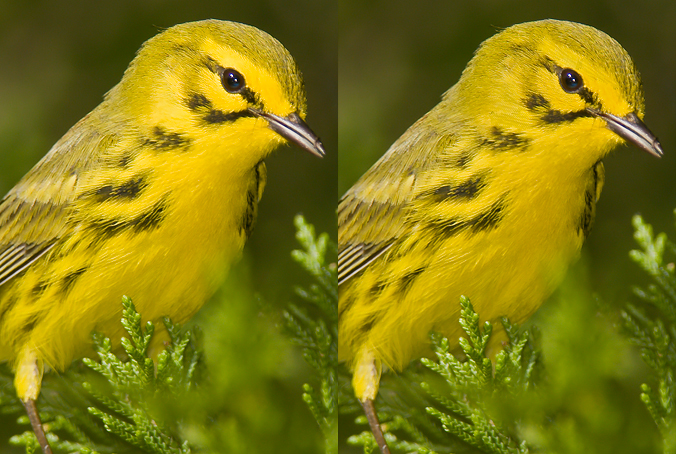
Fig. 11.2.1:
Clipped highlights in Adobe Camera Raw. The red areas indicate
regions that the software predicts will lose substantial detail during
RAW conversion,
due to overexposure. The small white triangle in the upper right
corner of the screen
toggles the highlight alerts. The Recovery slider can often
reduce the incidence of
clipped highlights; in some cases it can eliminate them entirely,
though in other
cases it can’t.
Reducing the clipping in the bird is most important; reducing it
in the background is typically less critical, though it’s still
desirable if possible.
The red areas in the above figure show the regions
in which highlight
clipping either has occurred,
or that the software predicts will occur during RAW
conversion. (To enable the red clipping indicators in
ACR, you may need to click the small, white triangle in the upper
right-hand corner of the histogram in ACR). According to the
BETTR philosophy (Bird Exposed To The
Right—section 6.2),
the clipping in the
background regions of the image may be somewhat acceptable, when
they’re
necessary for properly exposing the bird. But the clipping inside
the bird will result in loss of subject detail, which is far less
acceptable. In the case of
this particular photo
(above), the throat and chest region of this warbler will, if
corrective steps aren’t taken during RAW conversion, end up largely as
a pure yellow blob with no discernible detail. Fortunately, many
cases of slight clipping can be corrected, either in ACR or in
Photoshop proper.
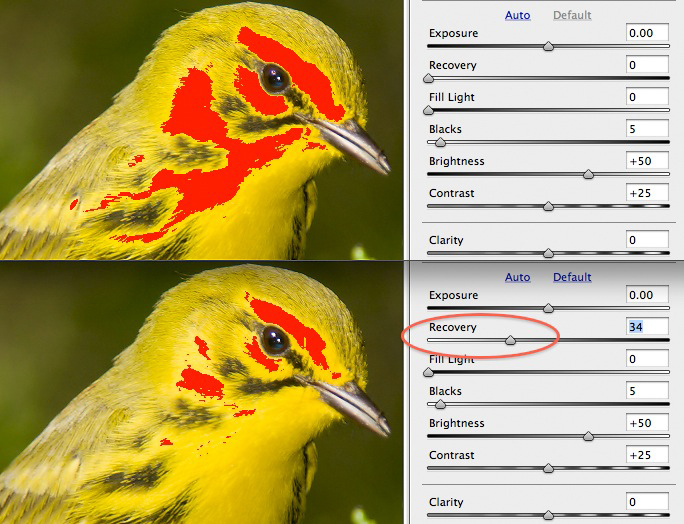
In the main control panel of ACR you’ll see there is
a slider called Recovery.
By slowly sliding this slider to the
right you’ll see the red areas (indicating clipped highlights) contract
and possibly disappear entirely. (You might want to try holding
the Option or Alt key while doing this, to mask out everything but the
red). The figure below illustrates
this for another warbler photo that has been over-exposed. In the
top pane is the original image, while the bottom pane shows the effect
of increasing Recovery to
34%. As you can see, the red areas have
been substantially reduced, though not completely eliminated.
That means some clipping is bound to occur during RAW conversion, which
we’ll need to correct in Photoshop
proper using other methods.
Fig. 11.2.2:
Reducing clipping of highlights via the Recovery slider in Adobe
Camera Raw. Increasing the Recovery setting reduces the extent of
the clipping
in the image, though there is usually a point of diminishing
returns. Setting
the Recovery slider above about 50% or so often decreases overall image
brightness without reducing the clipping region appreciably.
For
this particular image, increasing Recovery
past 34% does not reduce the
red areas significantly; past this point it simply darkens the overall
image without reducing clipping in any appreciable way. You’ll
generally want to find the smallest Recovery
amount
that maximally reduces the clipping without darkening the image
too much. Though you can also reduce clipping by decreasing the Exposure or Brightness settings, these have a
more pronounced effect on
the overall brightness of the image, whereas moderate Recovery settings
generally improve clipping with only the most subtle effects on overall
image
brightness.
Once you’ve found a good setting for the Recovery
slider and adjusted any other settings in ACR (such as noise
reduction—section 11.1)
as desired, you can
proceed with the RAW
conversion and open the image in Photoshop proper (remembering to do so
in 16-bit1). Highlight
clipping will no longer be shown in red, but by inspecting your image
carefully you may be able to discern a lack of detail in the remaining
clipped regions (those that Recovery
couldn’t fully fix). In the
figure below, the left pane shows the warbler
photo from the previous figure, after RAW conversion. Notice the
homogeneous yellow regions above and below the eye and below the cheek
patch. These were the regions that remained red (indicating
clipping) even after using the Recovery
slider in ACR. In the
right pane is the result of using the Shadows/Highlights
tool in
Photoshop proper.
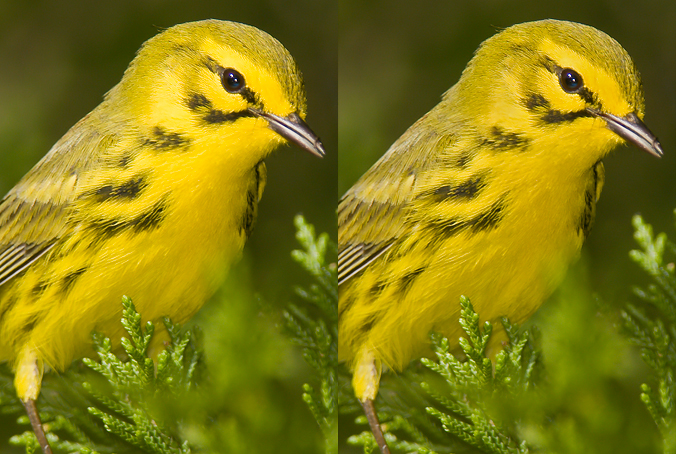
Fig. 11.2.3:
Restoring details in bright regions via the Highlights tool.
Left: the original image. Right: the image after applying
Highlight reduction.
The bright yellow areas around the bird’s eye and lower cheek have been
darkened in the right image, and may contain a slight bit of additional
visible detail. It’s usually best to apply Highlights to just the
regions of
the image that clearly need it (via an appropriate selection tool).
The figure below shows the Shadows/Highlights tool
in action. In section 11.3 we’ll explore
the use of
this tool in greater detail as we consider the more general
problem of correcting overall exposure and lighting patterns. For
now, we’ll limit our
attention to the Highlights
portion of the tool. For clipped
highlights in bird photos, a highly effective way to use this tool is
to
first select the bird (or even just a portion of the bird containing
the blown highlights) and then invoke the tool via the menu option Image > Adjustments >
Shadow/Highlight (on my computer I have this set to the keyboard
shortcut Cmd-H, since I use
it so much). I recommend starting out with a small
radius and a small tonal width, and then aggressively increasing the Amount slider (in the Highlights pane). The goal is
to reduce the highlights until details start to emerge in the areas
where the highlights are (nearly) blown. In extreme
cases you may need to
set the Amount
slider to 100% and then increase the tonal width until you notice a
change. Beware that if you apply this procedure too aggressively,
you’ll
notice unpleasant image artifacts, such
as excessive gray in white areas. Also, if you set the radius too
small you’ll usually obliterate details rather than enhancing them.
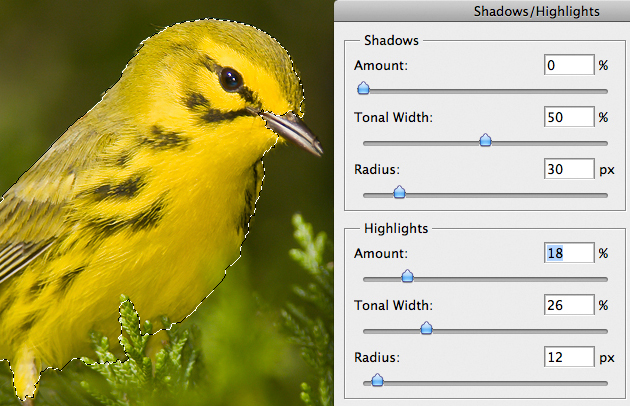
Fig. 11.2.4:
Applying the Shadows/Highlights tool to just the bird.
By first selecting the bird (using your favorite selection tool), you
can limit the effect of the Shadows/Highlights tool to just the bird.
It's usually best to keep the Radius and Tonal Width small, and to
explore increasing values for the Amount slider. Sometimes you
may need to increase Tonal Width to see any effect. Using a
Radius of zero often obliterates detail rather than restoring it.
If the Highlights tool doesn’t give you the effect you’re
trying to achieve, you can sometimes get what you want by instead
adjusting the Output Levels
white point in the Levels
tool. This is the small white slider at the bottom-right corner
of the Levels window, in the Output Levels pane.
Decreasing this slider usually has the same effect as using the Highlights tool, but when Highlights misbehaves (for example,
when it won’t allow subtle adjustments, or
when it induces saturation or contrast artifacts) it’s worthwhile trying this
alternative method.
Note that accentuating highlights is
best performed before
reducing the image size. If your primary
use for your images is to post them on your web page or to distribute
them
compactly on the internet, you probably reduce most of your images to
25%-50% (or less) of
their original size before posting them, so that they fit more easily
into the viewer’s internet browser window. Using the Highlights tool (to accentuate
details at the extreme white end of the spectrum) prior to reducing the
image
size is generally more effective than doing it after resizing, because
it brings out more details that can be retained during the
interpolation phase of the resizing algorithm. I always apply the
Highlights tool
before resizing (downward) if there’s even a hint of blown highlights
in the image. Also, aggressively applying Highlights to a reduced-resolution
image can induce a halo around the selected region, while applying it
to the full-resolution original before downsizing usually doesn’t.
Obviously, the Highlights
tool (and the Recovery
slider in ACR) can’t magically
re-create details that were obliterated by clipping. In the cases
in which these tools do seem to be effective, what they are actually
doing is merely
emphasizing details that are otherwise too subtle to see on your
screen, most
likely because of a narrow color
gamut (see section 5.2.2) or due
to other conditions affecting
rendering or viewing of the image. That is, the details were
indeed present before you used the Highlights
or Recovery tool to bring
them out, but you
couldn’t see them (well) because either your screen is limited in its
ability
to
render extremely fine differences in color, or your eyes are similarly
limited in their ability to discern such differences when faithfully
rendered. In the case of the Recovery
slider in ACR, you’re also preventing details from being lost during
RAW conversion (i.e., during translation between color spaces and/or
bit depths).
The bald eagle head in the figure below illustrates
this well. Because bald eagles (Haliaeetus
leucocephalus) have white heads (as adults), it
can be very difficult to discern feather detail in the bird’s
head—even if that detail is indeed present in the image (i.e., even
if the highlights haven’t been blown). In the figure below we’ve
applied the Highlights tool
to accentuate the fine differences in
different shades of white in the bird’s head, thereby making it easier
to see the minute details in the white feathers. Note that this
process tends to give an overall grayish cast to the bird’s head,
which previously was closer to pure white. This is the cost of
this technique, and is largely unavoidable if you want to bring out
details in
a pure white bird, since shades of
white are by definition shades
of
gray.
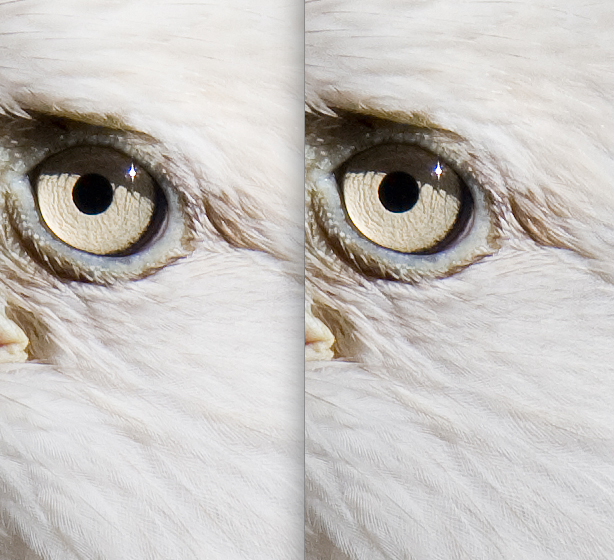
Fig. 11.2.5:
Restoring visible detail in the white head of a bald eagle.
White subjects are always difficult. If you expose to the right
without
triggering the highlight alerts, you’ll retain all the details in the
bird
but you may still need to apply some postprocessing to make those
details visible to the human eye. Left: original image.
Right: after
applying the Highlights tool. The right image is grayer overall,
but gives the perception of increased detail, due to fine-scale
contrast in the white areas.
In those cases
in which the Highlights tool
fails to bring out enough detail (because
the detail simply no longer exists in the image), a common remedy is to
clone in detail from a different part of the image (or from a different
image of the same bird or species).
This can be
accomplished very simply, as follows:
|
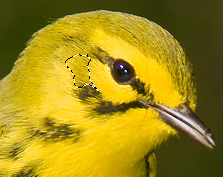
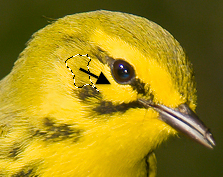
1.
Use your favorite selection
tool to select a small region of the bird
having (roughly) the same color as the area where the highlights are
blown (but
more texture and details):
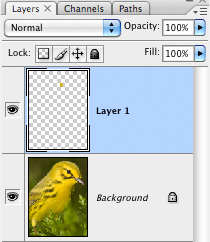
2.
Convert that selection into a
layer, via the key combination Cmd-J
or Ctrl-J:
3.
Invoke the Move tool (by
pressing the V key):
and then use your mouse to drag
the cloned piece so that it covers the area of blown highlights:
4.
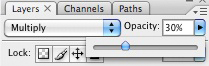
In the Layers pane, set the Blend
Mode to either darken,
multiply or linear
burn, and then reduce the opacity until the new layer blends in
well
with the original image (typically 20%-50%), leaving only its texture
showing through:
|
The figure below illustrates the effect of this technique. The
left part of the figure shows the original image which has been treated
with the Highlights filter. The bright yellow areas around the
eye and the lower cheek still lack detail, so we’ve used the above
procedure to c some of the texture from other parts of the bird’s
head onto these blown regions.
Fig. 11.2.6:
Creating the illusion of detail via texture cloning. In the left
image,
the bright yellow areas around the eye lack detail. In the right
image, these
areas now appear to have texture. This texture was cloned in from
other
parts of the bird’s head. The texture layers were given a low
opacity so as
to blend in with the base layer. Saturation was also reduced,
since the
texture layers had a strong olive cast.
Notice in the right panel of the
figure above that the cloned-in textures impart a slight olive
cast to the areas where they were superimposed. This can be
rectified by reducing the saturation (of just those regions) via the Saturation filter (Image > Adjustments > Hue /
Saturation).
A refinement of the above technique allows you to
precisely match the sizes and shapes of the source and target
areas. First, select the target area (the area lacking
texture). Then invoke the menu option Select > Transform Selection.
This will allow you to drag the selection to the source area without
actually copying any pixels (just be careful when using your mouse,
that you don’t distort the boundary; you need to click on the interior
of the selection, rather than on the boundary itself). Once
you’ve got the selection boundary positioned in the source area (an
area with good texture), just press Enter
or Return to anchor the
selection there. Now you can proceed as above: press Cmd-J / Ctrl-J to copy the source
pixels to a new layer, use the Move
tool (press V) to drag the new pixels to the destination area,
and then adjust the opacity as desired (in the Layers panel). You may also
need to de-saturate and adjust Levels
to get a perfect blend. Merging the new layer into the old is
optional at this point.
The next two figures provide another example of the
above techniques. In the first figure below, notice that the
bird’s chest contains some very bright white patches (left pane).
The right pane shows
the effect of using the Highlights tool on just the bird’s chest,
followed by the use of the Levels tool (see section 11.3)
to darken the
blacks in that region. Although the new image looks better, the
whites in the chest still lack detail.
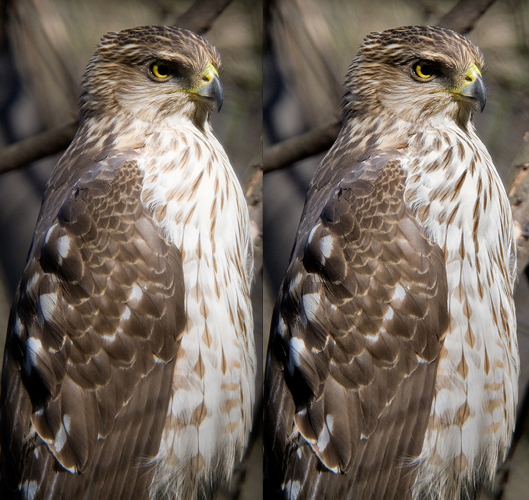
Fig. 11.2.7:
Reducing brightness in regions with blown highlights.
Left: original image. Right: after reducing brightness of the
bird’s
chest via the Highlights tool. The contrast was also increased by
increasing the blacks using the Level tool.
In the figure below, we’ve
additionally applied the cloning technique to add some false detail to
the bird’s chest. The left pane duplicates the image from above
(i.e., after use of Highlights and Levels). The right pane shows
the
result of cloning in texture from the bird’s chest. A
moderately-sized area of the bird’s chest was cloned and repositioned
very slightly (with a low opacity); this was repeated
several times with random positioning of the cloned layer, but always
in the chest area. The effect is subtle, but you should be able
to
see that the bird’s chest has fewer areas of solid white lacking any
detail.
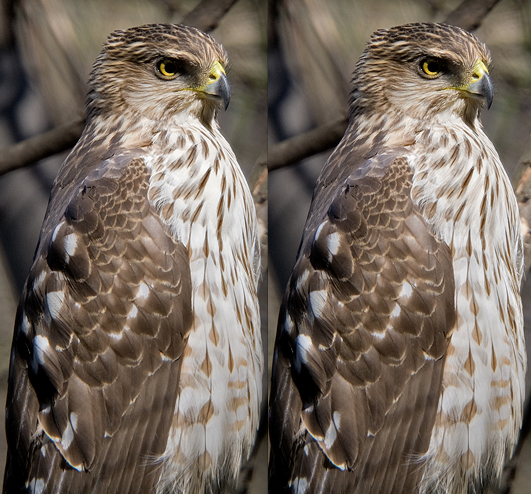
Fig. 11.2.8:
Cloning in detail to fix blown highlights. Left: original
image after applying Highlights and Level tools to the bird’s chest.
Right: after cloning detail from some parts of the bird’s chest to
other parts of the same region, with a low opacity. Areas that
were previously pure white now have some streaking, to create
the illusion of detail in areas where detail was lost due to blown
highlights.
The Highlights tool described
earlier can also be used to remedy a problem related to that of blown
highlights: feather glare.
In the figure below, the top image
suffers from severe feather glare in the bird’s flight feathers and on
the bird’s lower back, as well as in the middle part of the chestnut
band running down the bird’s chest. The bottom pane shows the
result of applying the Highlight tool to just these areas. As you
can see, the glare has been reduced a bit, though it has not been
completely
eliminated. Feather glare is a very difficult thing to fix in
postprocess; the best defense against it is to be careful when using
flash, especially at close range, to avoid inducing a glare in the
first place (unfortunately, bright sunlight also induces feather glare).
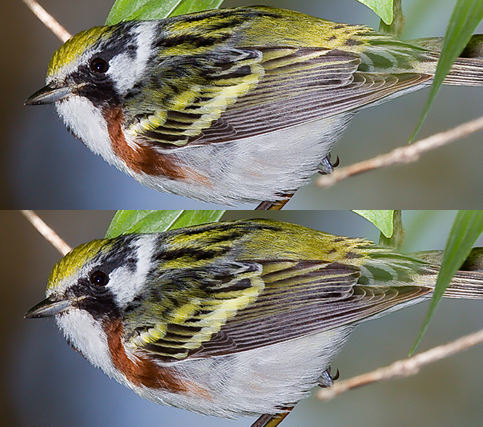
Fig. 11.2.9:
Reducing feather glare. Top: original image. Bottom:
after selecting the regions with extreme feather glare (flight feathers
on the wing, and the bird’s rump and part of its chestnut side).
Highlights were reduced via the Highlights tool. Some contrast
was also added by increasing the blacks via the Level tool
(moving the leftmost histogram boundary slightly to the right).
If you do need to correct feather
glare
after the fact, the Highlight tool and a cloning technique similar to
that described above can be useful. For feather glare, you can
select the region of the glare, copy it to a separate layer, and then
(without moving the layer) set the Blend Mode to multiply, darken, or linear
burn with an opacity of 30% to 50% or thereabouts.
Finally, note
that, as with any form of image manipulation, the techniques described
above are intended only to improve the aesthetics of the image.
Once you start cloning feathers from one part of the bird
to another, your image is no longer strictly a photograph of the bird, but rather
more of an artistic rendering.
It’s conceivable that in extreme cases you could end up making changes
that are even misleading, especially to viewers hoping to use your
images for the purposes of field identification or documentation of
migration patterns (e.g., your bird, of one particular subspecies,
might start to look more like that of another subspecies which doesn’t normally occur in the place
where you photographed it). In my
opinion, there is absolutely nothing wrong with manipulating your
images in any way that you like for the purpose of creating artistic
renderings—just so long as long as you don’t misrepresent a
manipulated image as a raw photograph to be used for scientific or
documentary purposes. If anyone accuses you of “doctoring” your
photos, you can simply point out that your images are meant to be
artistic renderings of birds, not as tools for identification or
scientific
documentation. To the extent that the majority of us lack
Leonardo da Vinci’s expertise with oil and canvas, or Audubon’s skill
with watercolors, images captured with a digital camera and
subsequently manipulated on the computer provide the only opportunity
for many of
us to create exquisite avian art. Various crabby and
argumentative people (so-called “purists”) will argue that digital
manipulation is dishonest, lazy, and probably even
unpatriotic. I recommend ignoring them, with the caveats given
above.
1In Adobe CS3, you can open a RAW file in
16-bit by clicking on the information line at the bottom of the Adobe
Camera Raw window, which will bring up the Workflow Options window, and
then changing the Depth setting to 16-bit. All images will then
default to 16 bit in ACR until you change the setting back to 8-bit.
|
|
|