|
13.3 HDR and
Tone Mapping
Unless you’ve been living under a
rock for the past few years, you’ve probably heard of HDR, or High Dynamic Range imaging.
The major impetus for developing this
technique was the severe lack of dynamic range in digital
cameras. Recall from chapter 2 that digital imaging sensors can
only capture detail in a fairly narrow range of light levels: they can
either retain detail in extremely bright areas of a scene, or in
extremely dark areas, but not both (or not well, anyway). For
scenes having detail in
both bright and dark areas, you’ll typically have to choose whether you
want to retain the bright details or the dark details. If you
choose to retain the bright details, the darker areas of the image will
generally come out as solid areas of black; alternatively, if you
increase the exposure so as to retain details in the darker areas of
the scene, you’ll likely blow the highlights, thereby losing details in
the bright areas. The idea of HDR is to take multiple shots of
the scene at different exposures and then to merge those exposures so
that details from both the bright and dark areas of the scene can be
rendered together in the same, composite image.
The figure below shows an HDR image of a stationary
bird. This image resulted from merging three photos
together. The camera’s exposure
bracketing feature was used to
rapidly take the three photos in quick succession, using three shutter
speeds: 1/160 sec, 1/400 sec, and 1/1000 sec. As we’ll illustrate
shortly, the slower shutter speed captured details in the dark body but
blew the highlights in the head, whereas the faster shutter speed
correctly exposed the head but resulted in poor exposure of the
body. In this section we’ll show two different methods for
combining these details from multiple exposures into a single image.
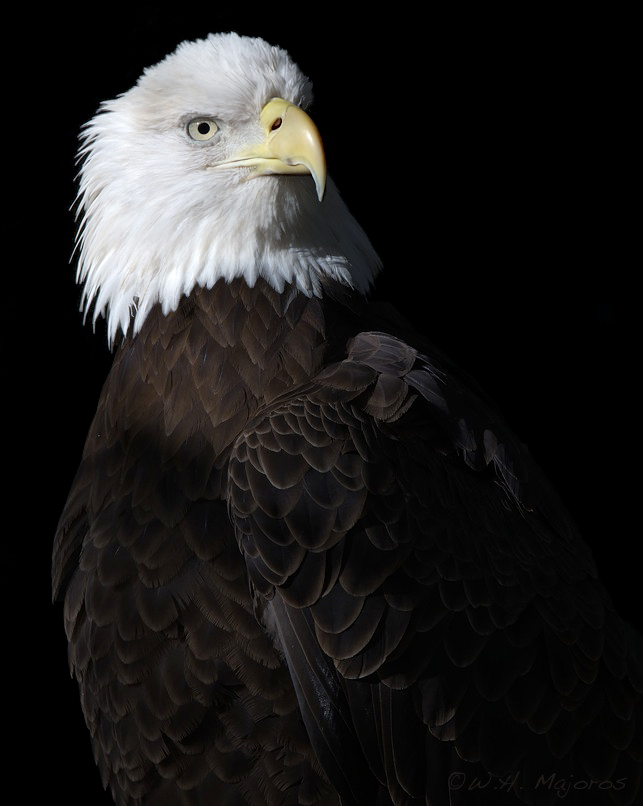 Fig.
13.3.1: An HDR image of a static bird. The bird and camera need to
Fig.
13.3.1: An HDR image of a static bird. The bird and camera need to
remain perfectly still so that multiple exposures can be merged without
creating shadows or duplicated features. This image was created by
merging three exposures: 1/160 sec, 1/400 sec, and 1/1000 sec
(ISO 800, f/10).
The figure below illustrates the Merge to HDR window
in Photoshop version CS3. At left are shown the photos
being merged (three in this case). As you can see, the top photo
was overexposed by 1.3 EV units
(exposure values, or stops of
light relative to neutral metering—see section 6.1),
while the bottom
photo was underexposed by
the same amount (1.3 EV).
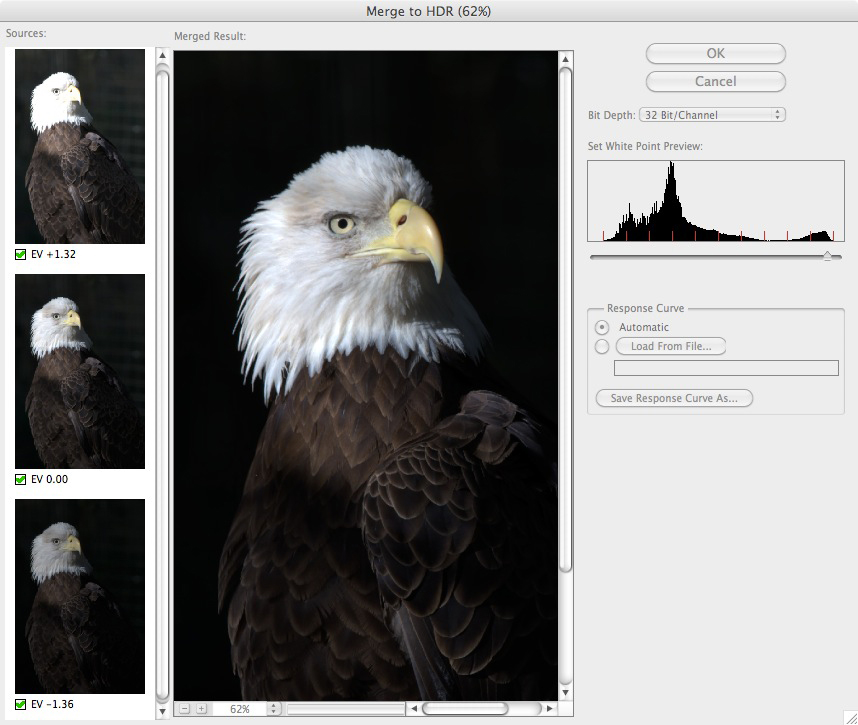
Fig.
13.3.2: The Merge to HDR window in Photoshop CS3. The images
being merged
are shown at left; the large frame in the middle shows a rough preview
of the merged
image. The white-point slider (at right) adjusts the overall
brightness.
There’s very little for you to
adjust in the Merge to HDR
window. The check-boxes under the
individual photos at left allow you to include or un-include any of the
photos in the merging process; checking and un-checking these will
automatically update the preview image shown in the middle of the
window. Including more images can be good or bad: although the
brightest and darkest photos may seem to contain all the information
you need for retaining details in darker and brighter areas of the
image, respectively, the intermediate photos may help the merging
algorithm to more accurately align the images during merging. In
some cases, however, including additional photos may increase the
chances of a mis-alignment (since there are more opportunities for
doing so). In the figure below you can see what
happens when images are not perfectly merged: there are obvious cases
of duplicated features in the bird’s plumage, as well as other
unsightly artifacts.
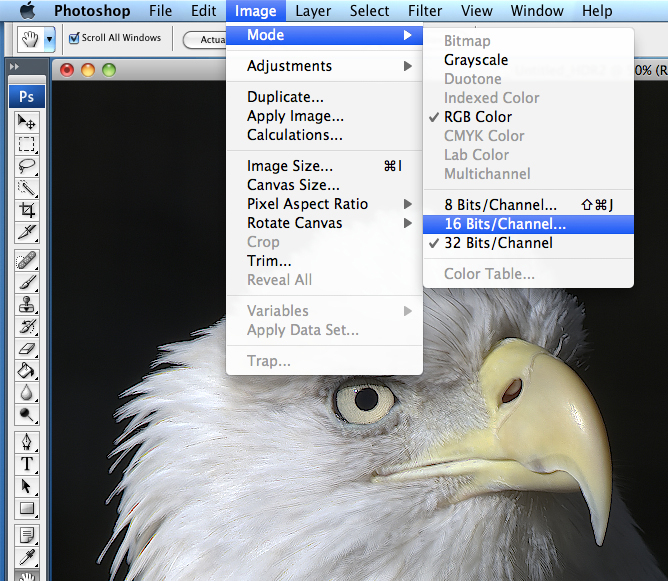
Fig.
13.3.3: Conversion from a 32-bit HDR image to a normal 16-bit image.
Note the apparent blurring in the feathers, due to mis-alignment during
the
automated merging process. This is one reason to prefer manual
merging.
The figure above shows the next required step in the
HDR merging
procedure in Photoshop CS3. The first step actually merged the
images, but stored them in a larger color space of 32
bits/channel. Images in this ultra-wide color space can’t be used
for many practical purposes, since most consumer-grade printers and
computer monitors
are 24-bit devices (8 bits per channel), and indeed, most of the image
processing
options in Photoshop CS3 are limited to 16 or even 8-bit (per channel)
images.
You’ll therefore need to reduce the bit depth to 16 (or 8), as
illustrated above using the Image
> Mode menu option. This
conversion triggers Photoshop to bring up the HDR Conversion window,
which allows you to control how Photoshop does the mapping from 32 bits
to 16 bits. This window is illustrated below.
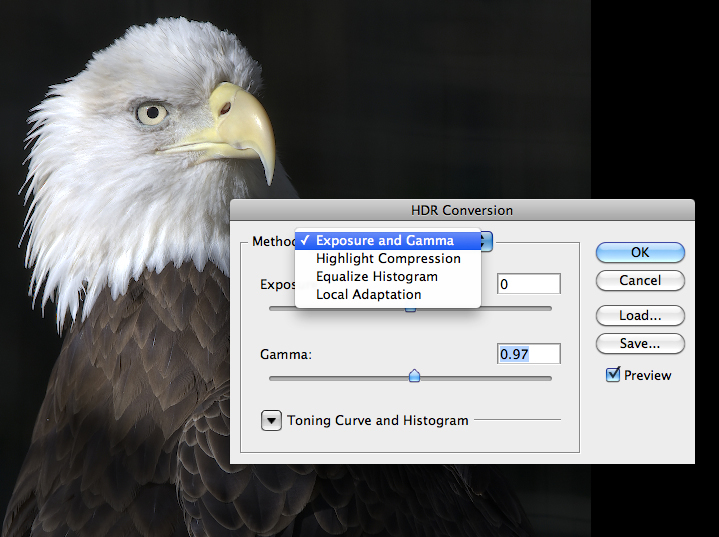
Fig.
13.3.4: The HDR Conversion window in Photoshop CS3. This
window opens automatically when converting a 32-bit HDR image
into the 16-bit color space. It allows you to specify how you want
32-bit pixel values to be mapped to 16-bit values. The Local
Adaptation
option is very popular, but is tedious; it requires you to carefully
draw
a detailed tone curve (not shown here) to map between the color spaces.
In the example above, we’ve opted
to use the Exposure and Gamma
method for the mapping from 32-bits to
16-bits. Because I’m lazy, I typically use this option and leave
the Exposure and Gamma sliders at their default
values. Many
users, however, prefer to use the Local
Adaptation method, which then
opens a Curves-like interface
in the Toning Curve and Histogam
pane at
the bottom of the window (shown collapsed here). Just like with
the Curves tool, the Local Adaptation interface allows
you to draw a
curve to dictate how pixel brightness values are to
be transformed. Whereas the Curves
tool maps 16-bit pixels to
16-bit pixels (or 8-bit to 8-bit), the Local Adaptation converter maps
32-bit pixels to 16-bit (or 8-bit), but it otherwise is operating
according to the
same principle: the curve that you draw provides a mapping from
brightness values on the x-axis
of the curve (input values) to brightness values on
the y-axis (output
values). A perfectly diagonal curve (the default) maps every
brightness value to the same exact value, so no change in the overall
histogram will occur. However, since you’re mapping values from a
32-bit space to a 16-bit space, information will necessarily be lost,
in intermediate values. Any value in the 32-bit space that has no
exact counterpart in the 16-bit space will be mapped to the
nearest value in 16-bits. Pixel values are thus
conflated, and this can result in loss of detail. What
you’ll typically want to do in Local
Adaptation is to find those
regions of the luminance domain that correspond well to areas in the
image where you’d like to retain the most information. You can
then locally re-shape the tone curve in these areas so as to stretch
intervals in the domain (input of the tone curve) to map them to larger
intervals in the range (output of the tone curve); this should in
theory result in fewer intermediate values in parts of the domain being
conflated
to the same values in the range.
In practice, I find the Local Adaptation interface
in Photoshop CS3 to be far too tedious and unwieldy. Instead, I
either rely on the default tone curve during conversion and then apply
my own, heuristic tone-mapping-like transformations in 16-bits, or
bypass the automated HDR pipeline and merge the images manually via
layers and layer masks; both of these techniques are described later in
this section. For serious HDR work, you’ll likely want to invest
in more advanced HDR software such as Photomatix,
or upgrade to
Photoshop CS5.
We’ll now consider the more manually intensive
alternative to automated HDR. Though more work is required on
your part, this technique can give you greater control over the
results, and eliminates some of the artifacts that can occur in
automated HDR pipelines. The idea is simply to load multiple
exposures into Photoshop as separate layers, and then to use layer
masks to choose which parts of which exposures to include in the final
image.
The Load Layers
interface (File > Scripts >
Load Files into Stack) provides a convenient way to load
multiple
photos as separate layers in a single Photoshop file (see below).
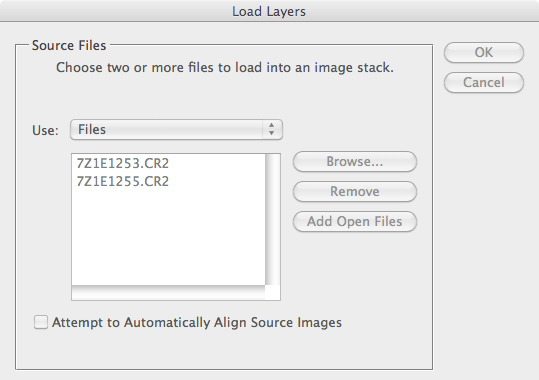
Fig.
13.3.5: The Load Layers tool in Photoshop allows you to import
multiple photos as separate layers of the same image file, but
unfortunately causes the Adobe Camera Raw interface to be
bypassed.
The problem with using this method to load your
image layers is that it
bypasses the Adobe Camera Raw interface, so you’re not able to specify
custom adjustments to be made during RAW conversion, and as we saw in
chapter 12, certain adjustments are often better made during RAW
conversion than later in Photoshop proper. The solution to this
problem is to simply open each of the photos in the usual way, going
through Adobe Camera Raw, and then to copy and past each photo into a
single Photoshop file. You can do this by using the Select >
All option to select the image pixels of each photo, press Cmd-C /
Ctrl-C to copy those pixels, and then paste the selected image
into a
common file as a separate layer, via Cmd-V
/ Ctrl-V.
The figure below shows the result of applying this
procedure to load two images as separate layers of a single Photoshop
file. In this example we’ve included only the brightest and
darkest of the three images used in the previous example; we’ve then
added a layer mask to the top layer to allow some pixels from the lower
layer to show through. Since the bottom layer was the brighter of
the two, we drew the layer mask (using a soft-edged black brush) so as
to mask out the bird’s body; this allows brighter body pixels of the
lower layer to show through, while the darker head pixels of the upper
layer occlude the overexposed head pixels of the layer below.
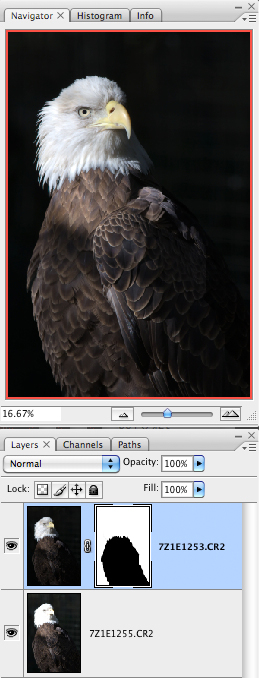
Fig.
13.3.6: Manually merging different exposures
via layers and layer masks. Doing HDR manually
like this can be a bit more laborious than the automatic
method, but affords greater control.
There are two potentially tricky aspects of the
technique illustrated
above. The first is the careful blending of the different layers
at the edges of the layer mask. In his case, the use of a
soft-edged brush when drawing the layer mask sufficed; the mask was
kept
strickly within the brown region of the bird at the neck line, so that
no obvious blending artifacts would show up. In some cases you
may actually need to zoom in and carefully brush a detailed contour in
the layer mask at critical junctions. A shortcut that sometimes
works quite well is to first use the Quick
Selection tool to select a
region of a layer and then leave this selection active when you create
the layer mask; the selection will be copied to the layer mask as an
initial masking pattern. You can then fine-tune this initial mask
as needed, using a standard black or white brush (or an appropriate
shade of gray for blending).
The other tricky aspect that can arise is the proper
alignment of the layers. This is typically less of an issue
than in automated HDR, since you generally won’t be merging pixels at a
very fine level as in the automated approaches. The issue
typically only arises in the form of alignment of whole body parts, and
in these cases you can perform the alignment by hand, using the Move
tool (which is invoked by pressing the V key). With the Move tool
you can drag a layer using the mouse cursor. In order to help you
prcisely align two layers, you may need to zoom in to 100% or more;
you’ll obviously need to have an image mask in place so that you can
see a
portion of both layers.
Finally, we’ll briefly address a topic closely
related to HDR: that of so-called tone-mapping.
Recall from our
discussion above that the conversion of 32-bit HDR image files to
16-bit files utilized a tone curve
to allow local stretching of the
luminance domain, so as to mitigate loss of details due to conflation
of intermedate 32-bit values to their nearest 16-bit values in the
parts of the domain deemed most important. The
process of specifying this curve is sometimes referred to as tone
mapping. The term is also used, however, to refer to
tricks
applied strictly within the 16-bit or 8-bit color space to produce
effects reminiscent of those often seen in HDR imaging. In the
case of 16-bit images, this technique is in a real sense a true form of
HDR,
since the 16-bit file will generally have a higher dynamic range than
what most computer monitors can render. (Recall that JPG files
are 8-bit-per-channel images, and that most computer monitors are at
most 24-bit
devices, meaning that they utilize no more than 8 bits per
channel). The idea is simply to adaptively adjust the 16-bit
image—typically region-by-region—to maximize the amount of detail
apparent in each region, prior to conversion to 8-bit. This is
essentially the D-PIE
approach introduced in section 11.1:
differentially processing image
elements so as to maximize the detail and aesthetics of each part of
the image—e.g., the bird versus the background, or even the bird’s
face, wings, eye, beak, etc., separately.
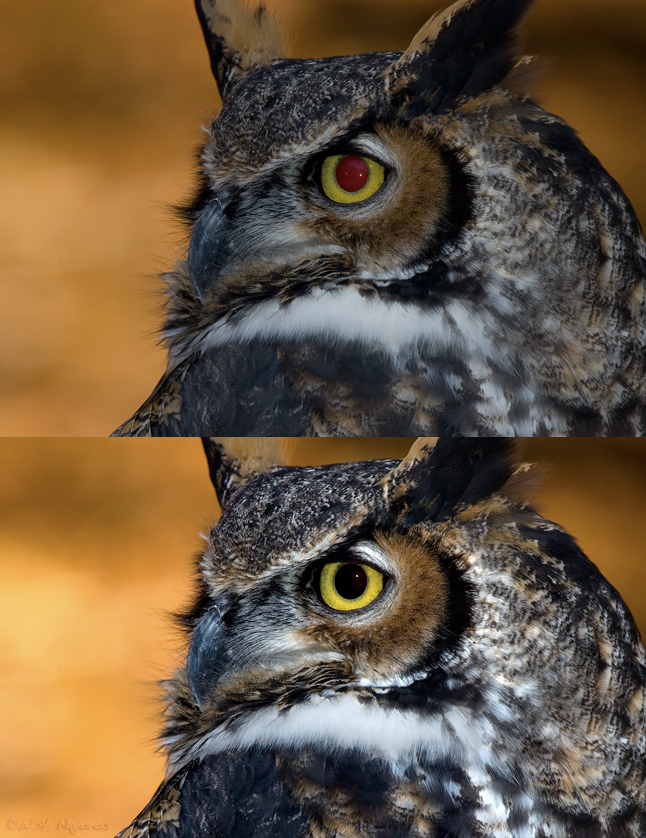
Fig.
13.3.7: Differential processing of image elements is sometimes
referred to as tone mapping, because it allows you to modify key
regions in the image to either simulate the style of an image produced
via HDR, or to tailor an image's zones so as to better exploit
perceptual
biases in the human visual system. In this example, many tiny
parts
of the
bird's plumage were selected and individually brightened by different
amounts,
to increase variability and create the illusion of higher
dynamic range.
When looked at
more generally, the idea of locally optimizing parts of an
image—whether you call it tone-mapping or D-PIE or something
else—is a very powerful, and in fact very old concept. In the
ancient days of film, darkroom effects such as dodging and burning were
sometimes used to lighten shadows and darken highlights, to achieve an
effect more aesthetically pleasing to the artist. Though some “purists” might consider this a perversion
of reality, in truth there
is some theoretical justification for applying such
transformations. Though
the human eye is much like a camera lens, the process of continuous
human
perception is more complex than that of capturing a still image with a
camera. The iris of a viewer’s eye can continuously vary the
aperture as he or she directs his/her attention to different parts of a
photograph or painting (or a natural scene). To some degree, this
can be thought of as
a biological means of mapping the enormous dynamic range of the real
world to the more restricted range of the visual system (about 6.5 f-stops for the human
retina). Though
humans are thought to be able to discriminate about ten
million different colors (roughly 7.8 bits per channel in an RGB
color space), and can in theory achieve a 10-stop contrast ratio via
adaptive use of the iris and other biological means, doing so is not
necessarily easy. Locally adapting a photograph
to use a narrower range of intensities may thus make viewing easier for
the human observer. In this sense, the static human retina can be
considered
a
low-dynamic-range sensor, and the tone-mapping technique is thus
justified
for mapping a higher dynamic-range computer image (even if only a
paltry 8
bits/channel) into a more pleasing representation—i.e., an image that is “easier on the eyes”.
|
|
|
