|
13.5 Merging
Poses
The nice thing about digital
photography is that with a copious stash of memory cards you can take
far more photos in the field that you’d be likely to do if you were
shooting film. This allows you to be pickier when choosing which
of your images to share with the world. If you’re a real
perfectionist, however, you may find that for a particular subject you
simply have no photos that satisfy all of your aesthetic
preferences. Sometimes, however, you’ll notice that one of your
images satisfies some of your requirements, while other photos of the
same bird satisfy other requirements. In these cases you might
consider merging these images, keeping the best parts of each image for
inclusion in the final, composite image. We’ve already been doing
this in the preceding chapters: first as we merged the background of
one image with the foreground of another image, and then as we merged
portions of differently exposed photos in the case of HDR. In
this section we’ll consider yet another application: merging different
poses of a bird into a single, “frankenstein” creature.
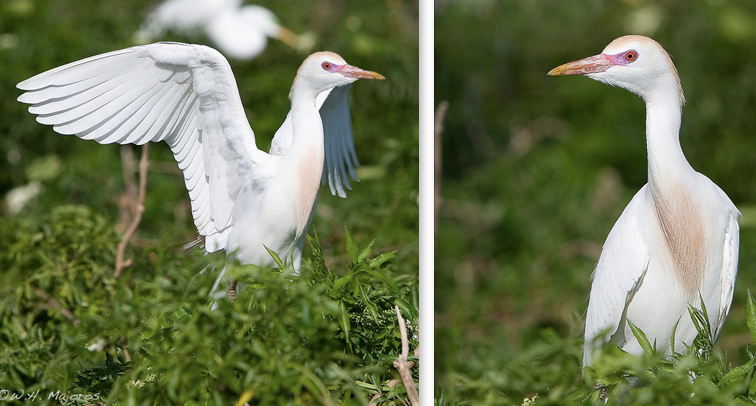
Fig. 13.5.1: Two images of the same bird in different poses.
The left image features some nice wing action, but the angle
of the head isn’t ideal. The right image features a better profile
of the head, but lacks any wing action. These photos can be
merged to combine the better aspects of the two poses.
The figure above shows two photos
of the same bird. The left photo features some nice wing action,
though angle of the head isn’t ideal—if it was turned a tiny bit to the
right, a better profile would be presented. The photo on the
right
features the same bird presenting a slightly better profile, though
unfortunately it’s facing left instead of right, and it’s slightly
larger in frame. We’ll show how to very easily overcome both of
these issues, resulting in an image that can be merged into the first,
thereby combining elements from both poses.
The first thing to do is to mirror the second image
(the right image in the figure above) so that the bird is facing to the
right. This is as simple as invoking Image > Rotate Canvas > Flip Canvas
Horizontal. Once this is done, we can begin thinking about
how to
resize the image so that the bird’s proportions match those in the left
photo. The first thing to do is to ensure that both images are
being viewed at the same zoom level. The two photos can then be
positioned side-by-side on the screen, with the scroll bars adjusted so
that the bird’s head is clearly visible within the window
frame. Now we can invoke the Image > Canvas Size tool and try
different sizing proportions (see section 12.7)
until we find one that
equalizes the sizes of the two birds. If you wish to be
more exacting, you can use the Ruler
tool to measure various dimensions
of the bird (e.g., its beak length) in the two images. Just keep
in
mind that some measurements can be deceptive, due to different angles
(e.g., foreshortening of features due to camera perspective).
The next step is to select a portion of one image to
be merged into the other image. For this example we’ve selected
the bird’s head from the rightmost image in the above figure, and
copied it via Cmd-C / Ctrl-C.
We then pasted this selection as a
new layer in the other image (the leftmost photo in the above
figure). The figure below shows the Layers panel resulting from
this operation. The top layer contains only the bird’s head from
the other photo.
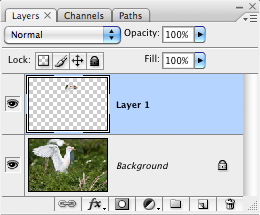
Fig. 13.5.2:
The Layers panel after copying
the bird’s head from one photo into another.
Though not shown here, a layer mask can
be used to trim the new head and aid in
blending it with the lower layer.
What remains
now is to adjust the new layer so that it blends in seamlessly with the
lower layer. First we’ll need to invoke the Move tool (press V)
and use the mouse cursor to drag the new head into place in front of
the
old head in the lower layer. In this case, some parts of the old
head
ended up still being visible behind the new head (not shown
here). There are several techniques that could be used to rectify
this, including the use of the Clone
tool and/or the use of layer
masks. We opted to use the Clone
tool, since it’s generally very
fast and convenient. The figure below shows just the top layer
after the Clone tool was
applied to cover up parts of the old head
showing through. The source for the Clone tool was taken to be a
region of the background layer close to the drawing (target)
location.
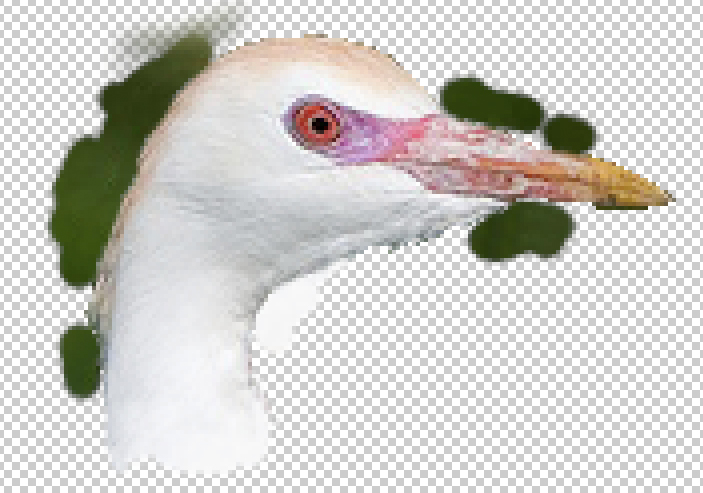
Fig. 13.5.3:
The new layer after some touch-up with the Clone tool.
Pixels from nearby areas of the lower layer were cloned into this
layer to cover up parts of the old head that were showing through.
The Eraser tool was also used to trim away some of the darker
background pixels from around the new head.
In addition to
the Clone tool, the Eraser tool was
used to trim away some unwanted pixels from the new
head. Recall from previous sections in this chapter that it’s
sometimes useful to enlarge a selection before copying pixels, to
ensure that nothing is inadvertently omitted. In this case, some
of the pixels around the new head were slightly too dark, and needed to
be trimmed away using the Eraser tool;
a layer mask could equally well
have served this purpose.
The figure below shows the result. The top
image is the original; the bottom is the composite image featuring the
better head profile.
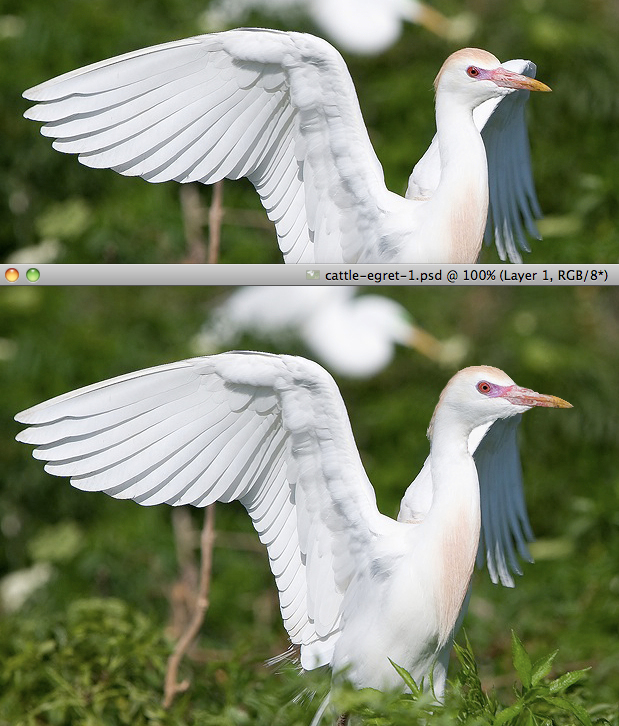
Fig. 13.5.4:
The result of merging the poses. Top: one of the two original
images. Bottom: the final “frankenstein” image, after
grafting the head from
another image onto this body. Merging poses takes time and
effort, and is
perhaps best left for the birds that are most special to you, or most
rarely seen.
Like replacing the background of
an image, merging different poses of a bird can be time-consuming; I
rarely ever do it, because of the time and effort involved. These
types of highly manipulative techniques are perhaps best left for those
rare cases where you’ve got a photo of a very special bird (e.g., a
species rarely seen in your area), but the photo isn’t ideal and you
don’t have the option of simply taking more photos of the bird in hopes
of getting the ideal image.
A related application is that of adding canvas when part of the bird
(typically the wingtips) have been clipped. Personally, I think
some photographers put too much emphasis on the issue of clipped
wingtips; when proportions are fixed by publication constraints, the
logical (if not artistic) desire to retain all extremities often needs
to take a back seat to the more important consideration of subject size
and position in the frame, and it’s doubtful in many cases that general
viewers would find the clipping of a bit of wingtip to be that terribly
offensive, given current trends in artistic photography.
Nevertheless, it’s sometimes the case that you’ll wish you had captured
more of the scene around the periphery of the photo. The same
technique described above can be used to clone in extremities such as
clipped wings or feet from other photos of the same subject.
You’d first have to expand the image via Image > Canvas Size, to make
room for the addition of grafted elements. Once this is done, you
can copy a selection from a second image and past it into the
(enlarged) first image, or use the Clone
tool with the cloning source set to the other image. When
choosing a new canvas size, it’s usually best to over-estimate how much
additional “canvas” you’ll need, since you can always
crop the image later using the Crop
tool.
Note that if you’re desperate to re-create a clipped
wingtip or other extremity but don’t have any other photos of the same
bird that you can use, you can sometimes get away with mirroring the
symmetric feature from, e.g., the bird’s other wing or other
foot. This needn’t be as difficult as it may seem. Though
the source for the clone operation will likely be at the wrong angle
and orientation, the rotation and mirroring tools available under Edit > Transform will often
prove sufficient to achieve the desired effect.
Another possible use of this technique is when
you’re shooting with an extremely shallow depth-of-field (DOF), so that
only part of the bird can be in-focus in any one image. You might
conceivably want to try merging the different in-focus regions from
different shots, to produce a composite image having all or most of the
bird in focus. There are surely other applications that one can
think of. The wonderful thing about digital processing
technologies is the great flexibility that they afford the creative
mind. And creativity is a good thing.
|
|
|