14.2 Matting
and framing Prints
Once you’ve got a quality print in
your hands, the next task to get it into a form that can be mounted on
someone’s wall. Typically, this involves matting and framing of the print, which are
probably far easier than you realize. Assuming you live within
driving distance of an art supply store such as Michael’s, or are willing to order
supplies online (i.e., via Dick Blick
or similar merchants), you should be able to mat and frame your art
yourself at a very reasonable cost, as we’ll describe in detail in this
section.
First, however, it’s worthwhile to consider several
other options for preparing an image for wall-hanging that don’t
involve frames. These options typically require special
manufacturing processes that can’t usually be performed at home, and
therefore involve a certain minimum up-front cost. However, the
results are often so striking that there’s the very real possibility of
selling these types of prints for enough money to both cover the
manufacturing expenses and possibly even reap a sizeable
profit.
14.2.1
Canvas Prints
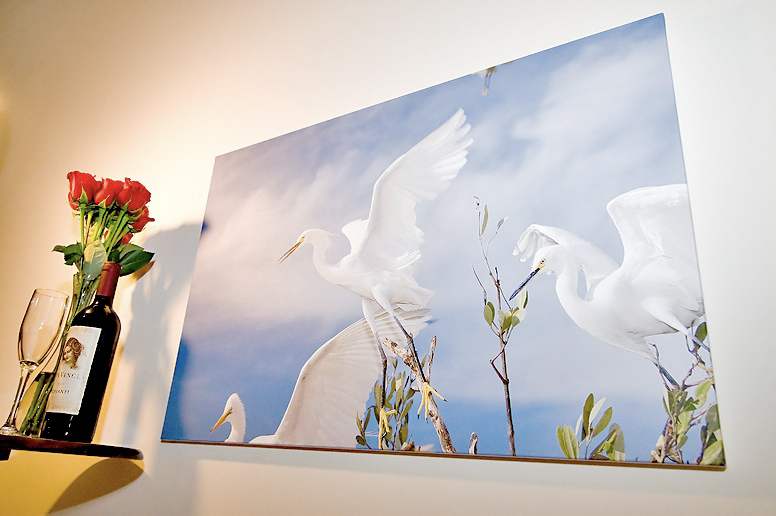
The first option is the canvas print,
of which an example is shown below. This photo was taken by a 10
megapixel camera. The wine bottle and roses should give you
some perspective in terms of the size of the mounted artwork.
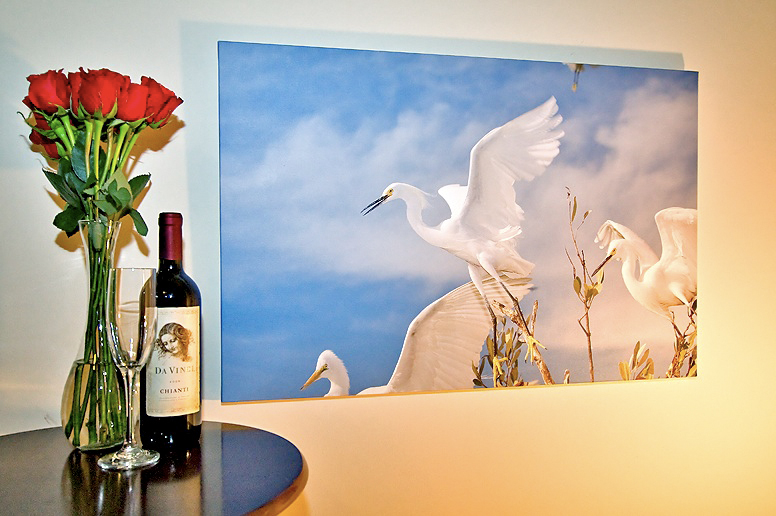
Fig. 14.2.1: A
large canvas print of a 10 megapixel photo.
This piece measures 21 inches by 32 inches. Many printing
companies now have the capability to print to canvas.
This print is 21×32 inches—nearly two feet tall by
three feet
wide! The image is actually printed onto canvas, just like what painters
use, and stretched onto a wooden frame just like a traditional oil
painting. With the right kind of photo, the final product can,
indeed, evoke comparisons to the works of the “Old Masters”. In
the case of the above print, I actually carried this one around the
halls of Duke University’s engineering building and was repeatedly
asked: “Did
you paint that yourself?!”
Another view of this work in different lighting is
shown below. It’s worth noting, just in passing, the effect of
the yellow lamplight on the perceived colors of the wall-mounted
piece. Be mindful of this when assessing your prints: they may
look significantly better in proper gallery lighting than they do in
your dimly-lit bedroom.
Fig. 14.2.2: The same canvas as above, from a different angle.
Notice the effect of the yellow lamp light on the piece.
I personally
think the potential for canvas prints is enormous. While the
average art connoisseur may
not be especially interested in bird photography, per se, if you can make your photo
look like an original oil painting, the potential for sales may
increase substantially, at least with the appropriate clientele.
If printed by a reputable dealer such as ImageKind or WHCC, the results should be of high
enough quality to interest many consumers who normally would only be in
the market for painted works.
In the close-up below you can see that despite the
rough texture of the canvas substrate, the sharpness of the imposed
image can be quite exacting even when viewed close up. This
particular print was a 100% crop (i.e., not cropped at all in
postprocess) of a 10 megapixel photo from a Canon pro DSLR.
Sharpening was performed in Photoshop at the 0.3 level, at 500%.
Because this camera has 14-bit A/D color conversion, very subtle color
gradations are possible in the resulting images, which as you can see
were faithfully reproduced in the canvas print as shown below (note the
smooth color gradations in the upper left corner).
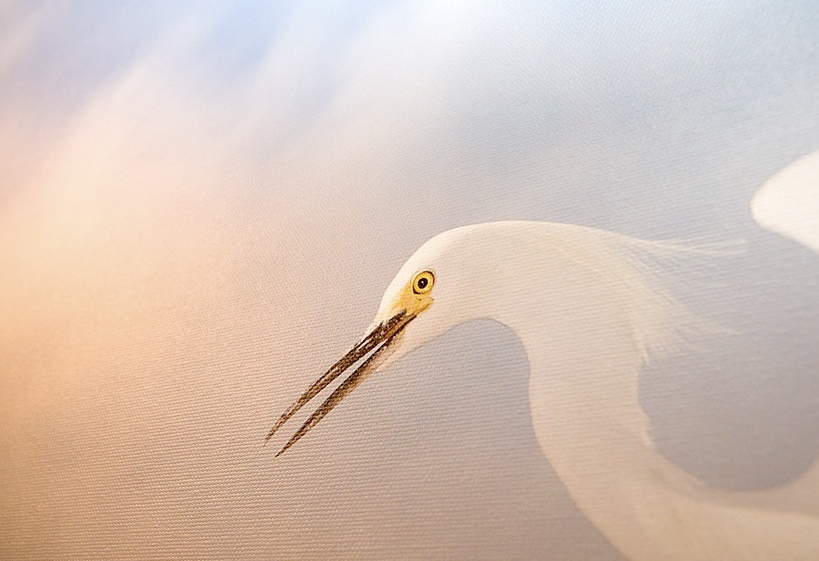
Fig. 14.2.3: A close-up view of the large canvas print shown earlier.
Notice the texture of the canvas. Despite the bumpy surface, fine
details can still be retained when printing onto this medium.
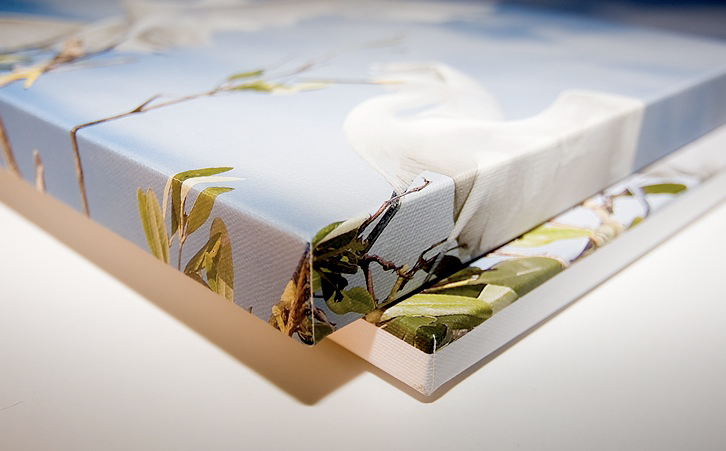
There are two main types of canvas
prints: so-called gallery wraps,
and museum wraps. These
terms aren’t always used correctly, so it’s worthwhile to double-check
before placing an order for a canvas print. As illustrated by the
figure below, gallery wraps (the top piece in the figure) involve
stretching the artwork so that it covers both the front of the piece
and the sides, whereas a museum wrap (the bottom piece in the figure)
typically has a white border around the sides of the mounted
piece. Museum wraps are generally intended to be framed, whereas
gallery wraps can be hung directly on the wall without any additional
framing or matting. As such, museum wraps can have
imperfections visible on their sides (which the frame would normally
hide), such as staples or crooked edge lines.
Fig. 14.2.4: Gallery wrap (top) versus museum wrap (bottom).
In a gallery wrap, the image wraps around the edges of the
piece, producing ready-to-hang artwork. Museum wraps
typically have (mostly) blank borders on the sides of the
piece, and may also have visible staples (not shown here).
An additional thing to notice from the above figure is the difference
in thickness between the two pieces. Some
manufacturers offer different thickness options during ordering, while
others prescribe a particular thickness for particular print sizes, or
prescribe one thickness for gallery wraps and another for museum
wraps. It’s useful for museum wraps to be thinner, since they
need to fit into a frame (typically), while gallery wraps often look
better in the three-dimensional world when they’re stretched onto a
thicker frame.
Canvas prints do tend to be expensive to
manufacture. One way to reduce the cost is to stretch the canvas
yourself. From some manufacturers, such as ImageKind and WHCC,
you can order a rolled canvas for typically half the price of the
stretched
product. To finish the piece, you need to buy stretcher bars (the wooden frame
that the canvas is to be mounted on) and attach the canvas to the
assembled stretcher bars. Stretcher bars are available
unassembled from internet merchants such as Dick Blick for very
reasonable prices (typically less than $10 per side).
14.2.2
Standard Prints
For standard prints, both framing and matting are recommended if you
intend to sell to the general public. A print which has already
been matted and framed is basically ready to mount on the wall, so many
buyers will be less hesitant to make such a purchase than if you were
merely offering a naked print. If the consumer has to attend to
the matting and framing him/herself, he or she will probably have it
done by a professional framer, and that will typically entail a
fairly large cost (often in excess of $100 US). A pre-framed
print requires less work for the buyer, and eliminates hidden framing
costs. It’s what many American consumers would call a no-brainer.
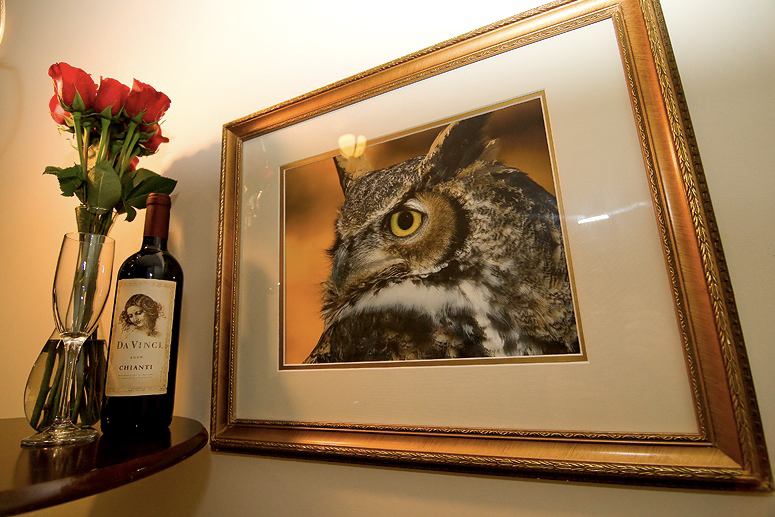
Fig. 14.2.5: A traditional framed and matted print.
The visible portion of the photo is 11×14 (inches),
while the frame size is 16×20.
Notice the matching
colors of the frame, the mat’s inner bevel, and the
photo’s background. Coordinated colors can make
a big difference in the overall impact of your artwork.
The first step in matting and framing a print is to
actually choose which mat,
and which frame, to use for a given print. For the print shown
above, I chose a gold-colored frame since the background of the owl
featured out-of-focus golden autumn leaves. It’s often desirable
to have the frame’s color match a dominant color in the image being
framed. In this particular case you can see that the frame is
fairly narrow—less than half the width of the mat. The mat is, of course, the wide blank
border separating the image from the outer wooden frame. In this
case I’ve used a composite
mat, which consists of several layers. You can see that the
innermost portion of the mat (the bevel)
consists of a narrow golden band that wraps tightly around the central
image. The matching of the colors between the outer frame, the
innermost mat band, and the photo’s background, were of course not
accidental, and in many cases you’ll want these elements to match.
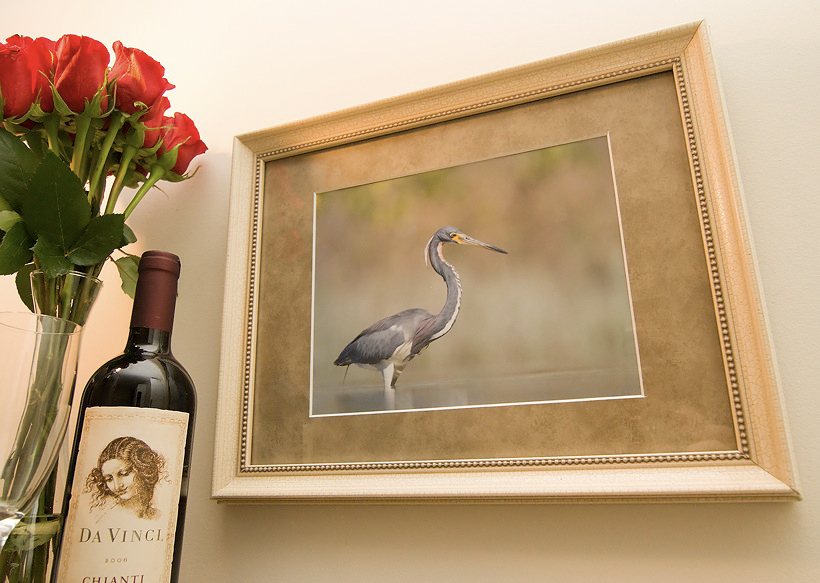
Below is another image—this one a golden eagle (Aquila chrysaetos)—which I’ve
chosen to frame in silver rather than in gold. Despite the
reference to “gold” in the bird’s common name (“golden eagle”), I felt
that the dominant color of the image was given by the background, and
that was largely silver. (Note that the faux golden hues apparent in
portions of the frame are due to reflections from a yellow lamp at
left). For the mat I chose black because much of the bird was
shadowed in black, though I insisted on having a white inner bevel on the mat, since it helps to
strongly delineate between the black mat and the somewhat lighter
background of the image, and also because I feel that the stark
whiteness of the bevel draws the eye inward toward the photo from the
frame. Always keep in mind the dynamics
of your artwork—i.e., the strength with which various elements draw
the eye. The overall dynamics can be enormously affected by your
choice of frame and mat.
Fig. 14.2.6: Another framed print. Notice again the
coordinated colors: the black mat matches the bird’s
shadows, while the silver frame and white mat bevel
match the background and the highlights of the bird.
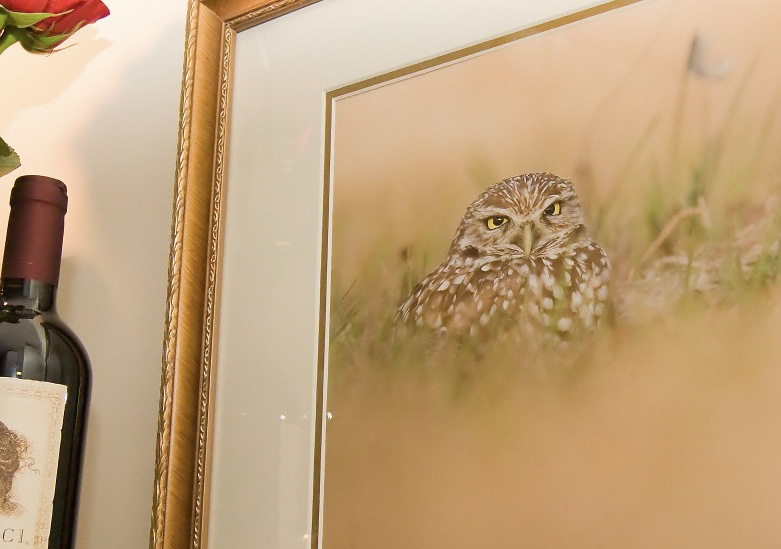
For the burrowing owl (Athene cunicularia) image below I
again chose a gold frame and a white mat with a wide golden
bevel. The gold again matches with the background color in the
photo. In all of these cases so far, the prints I’ve been dealing
with were 11×16 (inches), though the inner
window of the mat has been
only 11×14, so two inches of the image
have been obscured. The
outer frames were 16×20 inches. The mats are thus
providing a
border of 3.5 inches on the vertical edges and 2.5 inches on the
horizontal edges. I prefer borders in the 3-inch range because
they make the whole work look significantly larger, thereby increasing
the so-called “WOW factor”. In my opinion, fine art
should never
appear hurried or cluttered. If someone’s going to pay $300 for
your piece, they’re going to have to be convinced that it’s a premium product, ready to hang in a
high-class home. Borders of gold or silver with generously-sized neutral-colored mats reinforce the notion that
this is a piece appropriate for hanging in a place of luxury, and are therefore worthy of
a three-digit price tag.
Fig. 14.2.7: Close-up of a framed print. The gold
bevel of the mat can be seen more clearly in this
figure, showing that the mat is actually made up
of several layers.
Note, however, that properly framing a print doesn’t have to cost you a
lot of
money, if you do it yourself. For the owls and eagle shown above,
the
prints cost me $15 to $20 (plus shipping) to have professionally made
via mail order,
the pre-cut mats were about $8 at the local art supply store, and the
frames were $40, though I got them for $20 each during a 50%-off
sale. So each of these pieces cost me under $50 to make, and
would
probably sell for $100 or more.
Below is an example of a smaller
print—8×10 (inches) in this case.
This print was actually made
using the self-serve kiosk at WalMart,
which cost about $5 (it would have been closer to $2 if I’d selected
the one-hour deal). The mat was also about $5 at the local Michael’s art store. The
frame I again picked up during a half-off sale at Michael’s, for
probably $20 or so. In choosing the frame color and mat color for
this photo, I actually held the photo up to a number of combinations of
mats and frames until I found one that looked the nicest to me.
Note that while coordinated colors are often a good bet, the ultimate
criterion is whether the total package makes you feel good when you look at
it. No amount of rationalizing about color combinations will
change how the final package makes the viewer feel during that first tenth of a
second when he or she takes in the work visually.
Fig. 14.2.8: A smaller print. The photo is
a standard 8×10, while the
frame is 11×14.
Note that mats don’t have to be a solid color.
Doing the actual framing is quite simple, as long as
you’re using standard photo and frame sizes. Standard sizes for
prints are 5×7, 8×10, and 11×14. You should be able to
find
pre-cut mats and pre-made frames for all of these photo sizes in your
local art supply store. Recall that for the framed prints shown
above, while the prints were 11×16, I ended up matting them to 11×14,
since pre-cut mats in the latter size were readily available. I
think the prints look better at their original size (11×16), since the
standard sizes seem too “squarish” to me, but until I find the time
to
order or make custom-sized mats, they’ll just have to stay squarish.
For non-standard sizes, you can either pay to have
the photo custom framed, or
construct a custom frame/mat set yourself. Cutting your own mats
can
be done using a simple Xacto
knife (i.e., a razor blade), though for high precision cuts it’s
recommended that you instead buy a special mat cutter, which will
likely cost
more
than a few dollars. Similarly, precision cutting of custom frames
requires special tools, as does the glass front. A far easier
alternative is to order a custom
frame/mat set from a discount online retailer, such as PictureFrames.com.
Once you’ve got
the frame and mat (and glass front), assembling everything is sheer
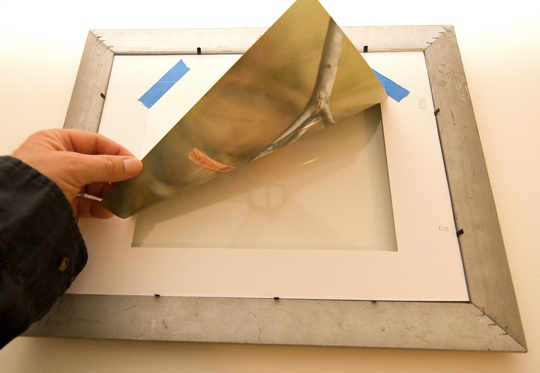
simplicity (mostly). As illustrated in the figure below, the way
I like to
do it is to lay the frame face-down on a clean surface, then lay the
mat on top of that, and then lay the print (again, face-down) on top of
that.
Fig. 14.2.9: Attaching the print to the mat.
There are several ways to do this, but the
simplest is to just tape the print to the mat
with a low-adhesive, acid-free tape.
The
blue tape that you see in the figure above is painter’s tape, which is useful
because it comes off easily without ripping the print or the mat
(usually). That’s very useful because you’ll typically want to
make fine adjustments to the positioning of the print within the mat
window. The way I do it is to very carefully lift the whole
assembly (being careful to hold it together so that the glass doesn’t
fall out and break!) and peek at it from the other side, to see how the
photo is positioned within the mat window. Once I’ve got it
positioned properly, I typically don’t add any more tape to the back,
since one or two pieces are typically enough to hold it in place.
I’ve found in the past that if I tape all the edges of the print, then
over time the print can warp,
which over-taping can exacerbate by creating wrinkles in the visible
portion of the print. With only one edge held in place by tape,
any expansion of the paper (due to humidity or simple aging) is easily
accommodated via internal slippage.
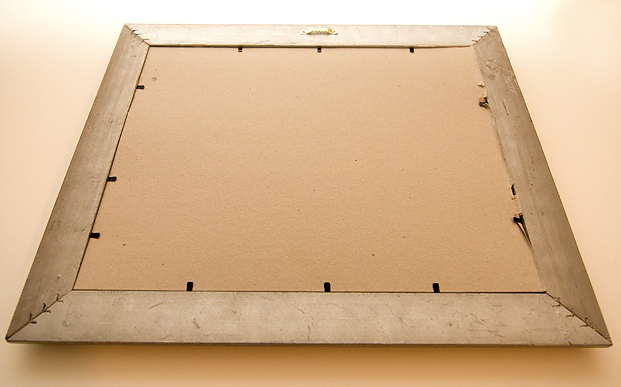
Fig. 14.2.10: The finished product, seen from behind.
The cardboard backing protects the print from behind.
Metal nubs attached to the wooden frame are bent into
position to hold the backing in place.
The last step is to put the backing
piece on. In the example shown above, a simple piece of
cardboard was included with the purchased frame; tiny metal nubs
embedded in the frame can be bent down with your fingers to hold the
cardboard in place. This was a cheap frame. A nicer frame
would have a more solid backing made of masonite or similar material,
with slidable metal strips that can be inserted into matching grooves
in the wood (or some similar mechanism). The cheaper, bending
nubs shown in the above example tend to break off after being adjusted
a few times. You can replace them with heavy-duty staples or
small
nails—being careful not to split the wood of the frame.
A somewhat cleverer alternative to the above method is to first
attach the mat to the backing board by taping one edge to form a hinge. What
you end up with is something like a book, which can be
opened and closed. If you open the “book” and lay the print loosely on the
backing board, you can then carefully close the “book” by flipping the mat over on top
of the print. Now you can see how the print looks in the mat
window. Once you’ve got the print positioned the way you want it
(by trial and error—i.e.,
opening the book, moving the print, and then closing the book again),
you can then tape the print to the backing board. Now the mat,
print,
and backing board are all attached to each other, and can be placed
into the frame just as described earlier. This alternative method
is
very popular, though I prefer the method described earlier, because I
like to quickly consider several alternative combinations of frame,
mat, and print, and the earlier method allows me to do that much more
quickly.
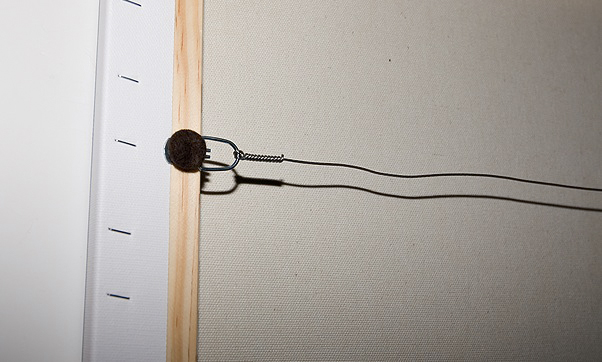
Once the print
has been matted and framed, there still remains the issue of how to hang the frame. In the
example above, a simple metal hanging clip (seen at the top of the figure) was screwed to the back of the
frame with two tiny screws. More expensive frames typically have
a piece of wire running the width of the frame’s back (see the figure
below). If the frame you’ve purchased didn’t include either of
these, you can purchase them cheaply at most frame shops or art supply
stores. Felt pads are also useful for keeping the frame out of
direct contact with the wall. Over time, wall paint can adhere to
the frame, so that when the artwork is moved to a new location in the
home, pieces of wall paint come along with it. The felt pads can
help to prefent this.
Fig. 14.2.11: A hanging wire on the back of a canvas print. The
wire is used to hang the print on a nail. Notice the small piece
of
felt; these can be placed at regular intervals on the back edge of
the piece, to prevent long-term fusing to the wall paint.
While matting
can improve the overall impact of your photo by creating a more
distinct separation from its environs (i.e., the wall it’s mounted on),
it’s not always necessary, or even ideal, artistically. The main technical reason for using a mat is
to keep the print physically separated from the outer pane of glass, to
avoid having the print fuse to the glass over time; once a print has
fused to the glass, if it later shifts or warps in the frame then the
surface can tear and end up looking terrible. But there is
another option, which is to use neither a mat nor any glass in the framing of the
print. Traditionally, the purpose of the glass was to protect the
print from scratches, fingerprints, and dust. But many labs can
now apply a protective lacquer directly to the print, reducing the
potential for both physical damage as well as the fading effects of UV
light.
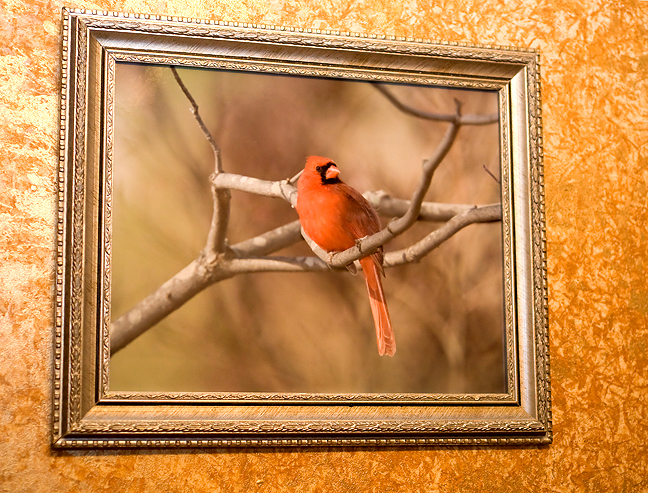 Fig.
14.2.12: An 11×14 print
mounted on masonite and then framed
Fig.
14.2.12: An 11×14 print
mounted on masonite and then framed
without any glass. The lab applied a coat of clear, protective
lacquer
which should prevent damage from scratches and fingerprints (though
time will tell...). The lack of a mat is consistent with the
painting-like
appearance of the image; many classical paintings are framed un-matted.
For the photo
shown above, when I ordered the print I asked for it to be mounted on a
sheet of 1/8 inch masonite and to have it coated with a glossy
lacquer. I then removed the glass pane from the cheap frame I
bought at Michael’s (my local art supply store) and just placed the
masonite-mounted print directly in the frame. This photo has a
bit of a dreamy quality that makes it look almost like a painting, and
since many classical paintings are framed without any matting, I think
this photo looks fine without a mat as well. Note that some labs
can also print to canvas and then mount the canvas onto masonite
(rather than stretching it over a wooden frame as in a gallery
wrap). I haven’t tried this yet, but I suspect that for photos
having a dreamy, painting-like quality, this might be ideal for framing
in the style just described.
|