Chapter
2
Cameras
Choosing
the proper camera gear is obviously an important first step for any
would-be bird photographer. Perhaps the greatest impediment is
the bewildering range of
options that are available. There are numerous manufacturers, each
offering a plethora of different models, all with different specs and
at sometimes vastly different prices.
Cameras today range in price from several hundred to several thousand
US dollars, and lenses can cost far more than the cameras they’re
attached to. Of course, different people have different goals when it
comes to photographing birds, and so the optimal choice of equipment
will depend on not only how much money you have to spend (or how many
banks you’re willing to rob), but also how much firepower you really need.
In this chapter I’ll be considering a wide range of
camera options—including even the cheesy
point-and-shoot cameras, which can, in combination with a decent
spotting scope, often produce quite satisfying images via the practice
of digiscoping (see section
2.2). However, since virtually all pro (and
a great many amateur) bird photographers use digital SLR (DSLR) cameras and
detachable, telephoto lenses, I’ll be concentrating on this class of
photographic solutions. In Part II of this book I’ll be covering all
issues related to technique, and that’s where I’ll go into great
detail on the operation of the camera. For the present chapter I’ll
instead be discussing the capabilities of various types of cameras,
with the overriding emphasis on helping you choose the best camera for
your particular bird
photography goals. Since the next chapter (Chapter 3) focuses on the
equally important problem of choosing an appropriate lens, we’ll
largely restrict our attention in this chapter to non-lens-related
camera issues (except for the special case of digiscoping, or when
considering camera models having the lens
built in).
2.1
DSLR Cameras
Today, pro
bird photographers (and most serious amateurs) use a type of camera
known as a digital SLR, or DSLR. The “D” in
DSLR of course requires no explanation, but the significance of the “SLR” part of that acronym is less
widely understood by
non-photographers. The acronym actually stands
for Single Lens Reflex,
though that’s utterly useless to know, so don’t bother trying to
remember it.
An SLR camera—whether digital or film-based—is basically a camera that
accepts interchangeable lenses. And that’s a very good thing: it means that you can upgrade to a
better lens when
you grow out of your current lens (or when you can afford the better
one). And if you already own multiple lenses, it means that you can
choose
the most appropriate lens for each situation.
This last point is especially relevant for bird
photography, since birds come in many different sizes, and also because
they often differ in how close they will allow you to approach them.
Birds of different sizes and/or at different distances will fill
different amounts of the image frame for a given lens. By switching to
a different lens you can change how much of the frame is taken up by
the bird—and how much is left over for the
bird’s surroundings. For a small or distant bird, you’ll want a lens
having a larger focal length
(this term is discussed in great detail in
Chapter 3), which translates into greater magnification. For a larger
bird at close range, however, a large-focal-length lens may result in
only part of the bird being in frame, which sometimes isn’t what you
want for the photo you’re trying to craft. Although zoom lenses (these are discussed in
detail in Chapter 3) offer some flexibility in this regard, no digital camera with a built-in
zoom (whether “digital
zoom” or “optical
zoom”, or some combination thereof) will
give you the flexibility of a DSLR camera in terms of either “framing
the shot” (we will discuss frame composition
in some detail in Chapter 6) or in terms of “reach”—i.e., raw magnification, as needed for
obtaining detailed shots of small birds at a distance.
2.1.1 The
SLR Light Path
In addition
to accepting interchangeable lenses, there is one very important
feature of SLR (and DSLR) cameras, namely, that they allow you to see
the subject as it appears through the lens, before you actually take
the photo. This is due to the use of a mirror inside the camera, which
deflects the light path coming in through the lens and directs it
through the pentaprism and
further through the viewfinder,
where you
place your eye while taking the picture. Because of this feature,
what
you see through the viewfinder is—with very few caveats—exactly
what the imaging sensor (or
film) sees when the photo is captured. The figure below illustrates how
this all works.
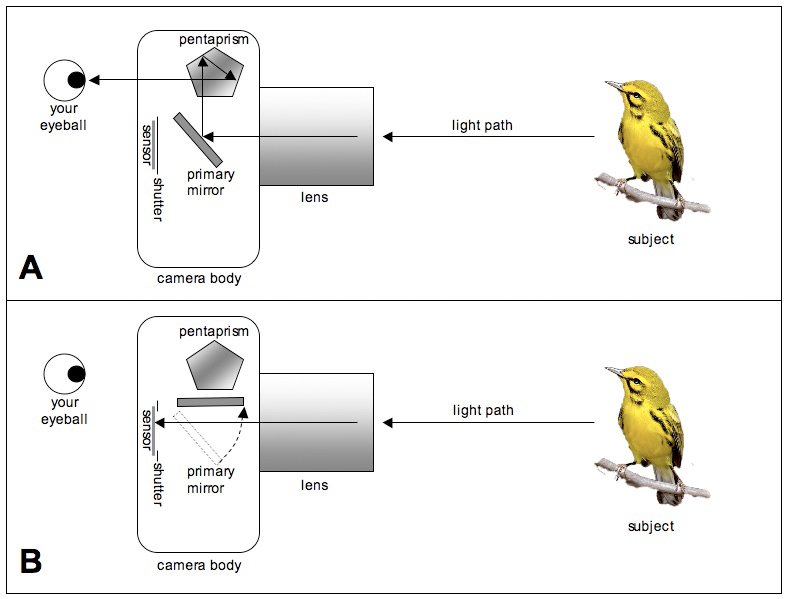
Fig. 2.1: SLR
Anatomy. (A) Light from the subject passes through the lens and is
deflected
by the primary mirror through the pentaprism and into your eye. (B)
After pressing the
shutter-release button, the mirror flips up and the shutter opens,
permitting
the light path to
strike the sensor, where image data is collected.
As you can see
from the figure, rays of light (i.e., photons)
from the
subject pass through the main lens, are reflected by the primary mirror
into
the pentaprism, and are then
focused on your retina, so that you can
see almost exactly what the camera’s imaging sensor (or film) will “see” when you press the button and
snap the picture. Part A of
the
figure shows the configuration of the SLR camera during the composition phase of operation,
when the user composes the
image by adjusting the focus, the aperture and other exposure
parameters, and the framing
(position of the subject within the image) of the scene. Part B
of the figure shows what happens when the user presses the shutter release button: the primary
mirror flips up, the shutter opens, and the sensor/film is exposed to
the light focused on it by the main lens, so that the subject and scene
can be captured into a static image. Since most birds tend to move
about quite a lot, the duration of the imaging
interval, during which
light is continuously accumulated by the sensor/film, needs to be kept
extremely brief,
as we’ll discuss in much greater detail in later chapters.
In
order to appreciate the advantages of the SLR camera
architecture, it’s useful to consider a few of the most popular
alternatives. In older (and, admittedly, still some contemporary)
devices known as rangefinder
cameras,
the user instead looks through a rangefinder
lens built permanently into the camera, which is completely unaffected
by the particular lens attached to the camera (some rangefinder
cameras, like DSLRs, also accept interchangeable lenses), as
illustrated below.
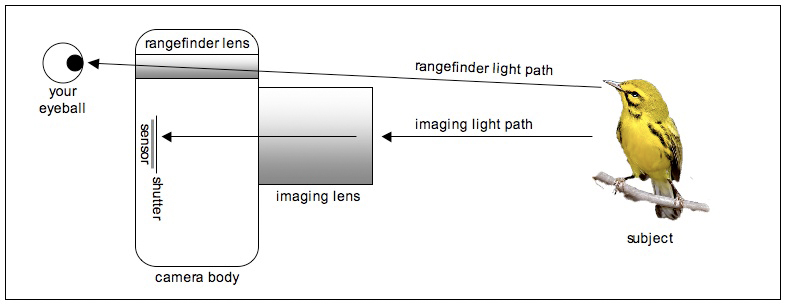
Fig. 2.2:
Rangefinder Anatomy. Unlike in an SLR, the image reaching your eye is
not the
same as the image projected onto the sensor. You cannot pre-visualize
the image that will be
captured through the imaging lens (unless the camera offers a "Live
View" feature).
However, rangefinder cameras do have one advantage: there is no
vibration from
the mirror slapping into place as there is with an SLR.
The advantage of
the SLR approach is obvious: by giving you a “preview”
of the photo before you even press the button, you are able to judge
the aesthetic quality of the scene, and to decide whether (or when) to
even take the photo. In the case of bird photography, in which you’d
typically be using a telephoto lens producing a fair amount of
magnification, the ability to see the subject through the lens during
composition means that you’ll have that much more information as you
decide whether the photo is worth capturing at the given time.
Furthermore, you’ll be able to see more precisely what your subject is
doing at any instant in time; much of bird photography is about
snapping the photo at the right time—i.e.,
when the wind is blowing the feathers in just the right way, or when he
or she has his/her head cocked at just the right angle so as to catch
that glimmer in the eye, etc... It’s also useful for verifying
that the subject is fully in-focus.
2.1.2
Live View
A close
contender to the through-the-lens view offered by traditional SLR
cameras is the “Live View” feature that comes standard on
most
point-and-shoot cameras these days and is becoming standard on the
newer generations of DSLR bodies being released. In Live View, there is no mirror
diverting the light path from the imaging sensor, and even the shutter
mechanism, which normally covers the imaging sensor, is left open.
Imagery from the sensor is continuously fed, in real time, to the LCD
screen on the back of the camera, where you can see the actual image
being captured by the sensor. This is just about as close as you can
get to a WYSIWYG—What You See Is What You Get—scenario in still photography,
since the only factor differentiating what you see in Live View from
what you get in the captured photo is the time lag between
when your brain decides that it likes the image it’s seeing and
when your finger actually presses the button and the image is recorded
to digital media.
Fig. 2.3:
LiveView shows you exactly what the imaging sensor is recording
electronically, by feeding the
electronic signal from the sensor into the LCD panel on the back of
your camera.
Although Live View is rapidly finding its way into
the feature set of most modern DSLR models, this feature still faces
some uphill evolution. First, the quality of the image rendered on the
LCD screen on the back of the camera depends on the
resolution and color fidelity of the LCD itself. It’s
doubtful that any future camera model will have an LCD screen as large
as the one you use at home to eventually edit your photos on your
personal computer. Using the digital
zoom feature in Live View to enlarge the subject on the LCD can
mitigate the resolution issue to some degree, but the problem with this
practice is that at larger magnifications the digital zoom results in
an image that is very jumpy—i.e.,
as the camera/lens unit shifts ever so slightly due to air movements or
hand tremors, the optical leveraging
(see section 3.5) conferred by the
magnification level of the system
can induce such large-scale movements of the image rendered on the LCD
that the view becomes effectively useless for the purposes of operating
the camera.
Another problem with Live View is that leaving the
sensor activated for a long time can result in significant generation
of heat (since the sensor is
an electronic device drawing a fairly significant amount of electrical
current). Unfortunately, heat affects optical fidelity—as you
probably know from the way cars on a hot road in summer can appear
distorted in the distance. Sensor heat is a major contributor to
image noise, an issue we’ll consider more
fully later in this chapter.
2.1.3 TTL
Exposure and Focusing
A further
advantage of the basic SLR architecture (as well as some non-SLR
designs) is the ability of the camera to further divert some of the
incoming light for various other purposes. The most obvious of
these other purposes is the management of exposure—i.e., judging to what
degree the resulting image is likely to be overexposed (unpleasantly bright
and washed-out) or underexposed
(overly dark, dull, or drab). The advent of TTL—Through
The Lens—exposure has
drastically simplified the photographer’s task of correctly setting the
exposure parameters so as to achieve a pleasing image in the resulting
photo. Modern flash technology (flash is discussed in detail in section
4.3 and in Chapter 7) is also
dependent on TTL capability for assessing
the appropriate
flash output power to achieve a desired exposure level.
Another use for further diversion of the incoming
light path is for autofocus,
also known more concisely as AF
(autofocus is discussed in much more detail in section 2.6). Between
auto-exposure (commonly abbreviated AE)
and autofocus, quite an enormous amount of manual effort is eliminated
(or at least, significantly reduced), leaving the photographer free to
concentrate on the subject and the scene. The automation of these
functions also transforms the “learning curve” for new photographers,
so that novices can begin getting good photos soon after picking up the
camera. Though these functions are also available in today’s
point-and-shoot cameras, the ability to override AE and AF in those
situations that require it (we will be considering many such situations
in this book) render DSLR’s much more powerful when placed in the hands
of more competent users. The fact that
film-based SLR cameras have served as the workhorses of professional
photography for many years serves as a testament to
the utility of this camera architecture for high-quality imaging, even
in the
digital age.
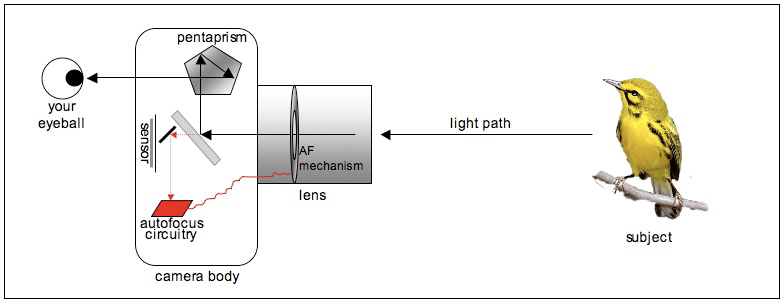
Fig. 2.4:
Autofocus in an SLR. Part of the main mirror is semi-
transparent, allowing some of the light to pass through to be
directed into an autofocus circuit, which in turn adjusts elements
in the lens so as to maintain focus.
2.1.4
Lens Mounts
The place on a DSLR camera where
the lens is attached (and the precise
mechanical and electrical means by which that attachment is made) is
called the mount.
Different
manufacturers have different (and largely incompatible) mounts, explaining why lenses of
one manufacturer will, more often than not, be incompatible with
cameras of another make (a notable exception is that of so-called third-party lenses, which are
discussed in section 3.6). It is for this
reason that one’s
choice of a
camera model should take into consideration not only the features
offered by the model under consideration, but also the lens line of the
manufacturer of the camera. In the case of bird photography, it
is very
arguably the case that the lens line of a manufacturer is far more
important than the roster of features touted for the most recent camera
model marketed by that company. If a manufacturer’s lens line
doesn’t include a number of good birding lenses in the 400mm to 600mm
range, it is my opinion that investment in any of
that company’s camera models is ill-advised for any ambitious bird
photographer.
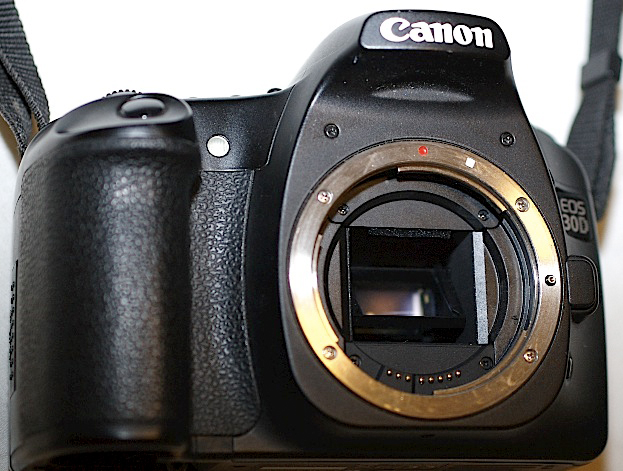
Fig. 2.5: A
DSLR lens mount. The mount
(circular metal ring) is where the lens engages.
The precise pattern of ridges and grooves in the mount precludes
compatibility between
competing brands. Notice the eight electrical contacts at the
bottom of
the mount,
which allow the camera to control the lens’ focuser and iris (aperture).
Even within a single company’s camera offerings,
it’s not unlikely that you’ll encounter several different types of
mounts. As a first example we’ll consider Canon. Canon’s
current
product line includes two different (and only partially
cross-compatible) mount types: EF
and EF-S. The former, EF-mount, is the current
standard for all Canon cameras and lenses: any EF lens should work fine
on any current Canon camera model. (By “current” I simply mean
any
product line currently listed in Canon’s catalogue; previously offered
Canon products that are now no longer being manufactured are not
considered “current”, for the purposes of this
discussion).
Lenses
designated as EF-S, on the
other hand, are only fully compatible with Canon’s consumer and pro-sumer camera bodies, and are at
most only partially functional on Canon’s pro bodies (see section 2.1.5, below, for a
description of these different classes of bodies), because EF-S
lenses restrict the light path so as to focus it on a reduced sensor
region. Cameras with larger sensors can sometimes utilize these
lenses,
though vignetting will
typically occur, leaving an unpleasant, faded ring around the outside
of the image. Canon’s main competitor, Nikon, also utilizes two
distinct mounts for the different sensor sizes of its cameras: AF for
larger sensors and AF-S for the smaller ones.
When purchasing used equipment, it’s good to keep in
mind that older mount types also exist, and are generally not
compatible with the most recent mount types. As just one example,
a
number of older, FD-mount
lenses (especially long telephoto lenses in the 600-800mm range) appear
weekly or monthly on used resale sites such as Amazon and Craig’s
List.
Attaching an older, FD-mount lens to a newer Canon body requires the
use of a special adapter, which of course requires an additional outlay
of cash, and may be hard to find even in the second-hand markets.
Most
importantly, these FD-mount telephoto lenses typically don’t support
autofocus on EF-mount cameras, making them very difficult to use for
practical bird
photography. On the other hand, because of these handicaps, these older
FD-mount telephoto lenses tend to be extremely cheap, so if you’re
working within the constraints of a very tight budget, this might be
exactly what you’re looking for. Just keep in mind that manual-focus
lenses can be very, very challenging to use for bird photography,
especially for birds in flight or for small birds such as warblers that
tend not to stay still for more than a few seconds.
2.1.5
Product Lines
The top-tier
DSLR manufacturers (e.g., Canon, Nikon) partition their product lines
into distinct segments to exploit the inherent economics of the
feature/price spectrum. The three broad categories of DSLR products are:
professional
pro-sumer
consumer
The consumer lines are
generally targeted at novices—i.e., first-time buyers who are not
yet sure how serious they are about photography, or who are strongly
budget-constrained (or both). In the U.S. these cameras often run
for
$500 to $900 for the body alone (not including any lens, which must be
purchased separately in order to use the camera). Some of the
popular
models in Canon’s line-up have included the Digital Rebel, the Rebel
XT, XTi, and XSi. Surprisingly, these
models have tended to have
rather
high pixel densities—often rivaling or even exceeding
the pixel
density of more expensive cameras from the same manufacturer. The
reason for these higher resolutions is discussed somewhat later, though
the short version of the story is that these cheaper models tend to
have larger numbers of noisier pixels than the more expensive models,
so that the overall level of detail in images will often be lower than
in the pro and pro-sumer bodies, after controlling for noise.
We’ll discuss this in much more detail in section 2.3.
The pro-sumer bodies are those that are targeted at
the serious amateurs. In the U.S. they have run between about
$800 and
$1300 for the body alone. The imaging quality of
these models can be quite good, compared to professional models, and
with proper post-processing, the images from these cameras can
sometimes rival that of the far more expensive pro models.
Continuing with the
Canon example, this manufacturer’s pro-sumer line has included models
such as the 20D, 30D, 40D, and 50D, which have ranged from 8 megapixels
to 15 megapixels, all in a 1.6x crop factor (crop factors are discussed in great
detail in section 2.3). Canon’s pro body line,
which has included
models such as the 1D and 1Ds (with various additional designations
such as Mark II, Mark IIn, and Mark III) currently run about $4000
to
$7000 in the U.S.
Whether you should buy a
consumer, prosumer, or professional model is a difficult question,
though one which should be rendered much easier as you read the
following sections and chapters. A brief characterization of the
differences—with a number of caveats to follow
in
the sections
ahead—is as follows. For beginning
photographers,
the consumer line
is a reasonable place to start, though those who feel reasonably
convinced that they’re likely to continue pursuing photography for
some time to come would very probably be better off investing in a
pro-sumer model right away. The pro-sumer models tend to offer a very
nice “sweet-spot” in terms of the quality-price
tradeoff. In the U.S.
they can be had, new, for between $800 and $1300 for the body alone
(you’d need to buy a lens separately), or a bit more for a kit that includes both the body and
a starter lens. Used bodies are generally a few hundred dollars
cheaper, but with the rampant scamming that occurs on internet-based
auction sites such as eBay and the like, it’s much wiser to purchase
used equipment from reputable resellers such as B&H and Adorama.
The big resellers sometimes offer cameras that have been factory
reconditioned by the
original manufacturer, and will sometimes offer their own in-house
warranty.
Professional camera bodies tend to be
enormously expensive compared to the consumer and prosumer
models.
Whereas pro-sumer bodies in the U.S. hover somewhat above or below
$1000, pro bodies from Canon and Nikon currently run about $4000 to
$8000. Many serious amateurs, after spending several years using
pro-sumer models, decide to upgrade to a pro body. While the
prosumer
bodies undoubtedly provide the greatest “bang for the buck” in terms of
features and image quality per dollar, the dominant camera
manufacturers always ensure that the prosumer bodies lack just enough
features that the serious amateurs will be tempted to upgrade to the
pro model.
This “handicapping” of the non-pro bodies relative
to the pro models can take a number of forms, encompassing things
ranging from image quality and ease-of-use to durability. Whereas
non-pro bodies are generally constructed of plastic (often with an
inner metal chassis), pro bodies typically feature an all-metal
construction, making them heavier (and sometimes bulkier) but also much
more durable. Since cameras for wildlife photography are
generally used
outdoors, durability can be a desirable feature. Many pro bodies
are “weatherproof”, meaning that they can safely be
used in snow, sleet, or
light rain (though this ability is sometimes predicated on the use of a
“pro” lens having a rubber gasket, so
that moisture can’t enter the
camera via the lens mount). In practice, since rain tends to make
photography difficult for other reasons (such as reduced visibility or
fogging of outer lens surfaces), weatherproofing tends to be more of a
peace-of-mind feature for those who sometimes hike large distances from
their car on days with an uncertain weather forecast.
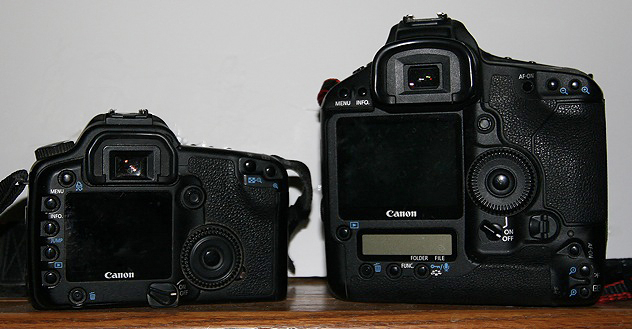
Fig. 2.1.6:
Pro-sumer Body (left) vs. pro body (right).
The pro body, the Canon 1D Mark III, is significantly larger and heavier
than the pro-sumer body, the Canon 30D. The pro body has better
weather sealing, a better viewfinder, an easier hold for portrait
shots, and a more durable shutter, but lacks a built-in flash.
Pro bodies generally feature significantly more accurate autofocus
capabilities (autofocus is discussed in section 2.6),
so that users of
pro bodies may expect to get fewer out-of-focus (OOF) images during a
shoot than users of non-pro bodies. A notable exception to this
general
rule is the now-infamous example of the Canon EOS 1D Mark III, which,
despite its initial $4500 US price tag, was prone (at least for
particular units) to producing sometimes large numbers of inexplicably
out-of-focus shots, due to manufacturing defects (which now appear to
be fully corrected). Pro bodies often have lower noise levels
(noise is
discussed in sections 2.3 and 2.5) than their non-pro counterparts, may
have
better color fidelity, often have bigger and brighter viewfinders, and
generally allow greater use of teleconverters (teleconverters are
discussed in section 3.4) without requiring
manual focusing.
Current pro offerings from the dominant
manufacturers also feature longer expected shutter lives than cheaper
bodies—say, 300000 versus 100000
expected shutter actuations before
failure. The truth is that this difference is not as important as it
may seem. Firstly, these are only expected shutter lives; some pro
bodies have needed to have their shutters replaced after as few as 300
shutter actuations. While still under warranty, shutter replacements
are generally performed free-of-charge by the manufacturer;
out-of-warranty
shutter replacements are typically $200 to $300 US. Spending an
extra
$3000 on a pro rather than prosumer body in the hopes of putting off a
$250 shutter repair for an extra year or two seems hardly
worthwhile.
Furthermore, at the rate technology continues to advance, it’s doubtful
that many serious photography addicts can go more than a couple years
without upgrading to the newest model.
As I’ll show in Part III of this book, much of the
image quality sacrificed by using a non-pro body can be regained during
post-processing through the effective use of image enhancement software
(though at the cost of spending more time manually processing the
images after they come out of the camera). That leaves only one
major
feature that the prosumer bodies lack: namely, pro autofocus
capability. There are several components to this. One component
is the
ability to focus accurately and rapidly in low light; for the purpose
of photographing flying birds at not-very-wide apertures (aperture is
discussed in section 3.1), pro autofocus can
easily make the difference
between getting a pleasing photo of the bird and getting a photo so
blurred as to be useless for most artistic purposes. Non-pro
bodies have
traditionally been limited to autofocusing with lenses that are f/5.6
or faster, which is most often problematic when using a teleconverter
(section 3.4). Pro bodies sometimes focus
faster (and have higher frame rates—see section 2.6.1) than non-pro
bodies, which can be very useful for fast-moving birds in flight.
Finally, pro autofocus
has traditionally been more consistently accurate, and pro bodies have
often been better calibrated at the factory so as to minimize the
incidence of systematic front-focusing
or back-focusing problems
(front/back focusing is discussed in section 2.6.3).
Fortunately,
this
latter advantage is beginning to disappear now that the so-called AF
microadjust feature (section 2.6.3)
is
increasingly being incorporated into pro-sumer bodies, so that users
can
calibrate the autofocus of their cameras themselves.
In
summary, while pro bodies do offer features not present
in the cheaper models, for bird photography the pro-sumer models
continue to become increasingly capable. In the further sections of
this chapter we’ll consider in much greater detail the various
technological issues—such as sensor design, megapixels,
and
ISO—which can complicate the task of
choosing a suitable camera for
bird photography.
|