|
3.8 Bells and
Whistles
There are a few other useful
features that some lenses offer, which you may want to take into
consideration when shopping for a birding lens. Just keep in mind
that these are far less important than the basic lens parameters that
we’ve already discussed: focal length, maximum aperture, and overall
image quality.
3.8.1
Full-time Manual Override
Most lenses have a switch that
turns autofocus on and off. If you find that autofocus doesn’t
work well for the shot you’re trying to take (for example, if there’s a
stick in front of part of the bird), then you have to flip that switch
on the lens before manually focusing. Some newer lenses feature a
full-time manual override
mechanism, which means that you can adjust the focus manually any time
you want, without first flipping the manual/AF switch on the
lens. This is only useful in one-shot mode, after the camera has
finished autofocusing, and while you still have your finger on the
shutter-release button. At this point you can manually adjust the
focus and then press the shutter-release button the rest of the way to
take the photo. Note that if you manually adjust the focus before
pressing the shutter-release button halfway, then the autofocus will
still kick in (if you haven’t disabled it via the switch on the lens)
when you press the shutter-release button, which usually isn’t what you
want. The product literature for lenses having full-time manual
override make it sound like an indispensible feature, but in truth I
rarely use it.
3.8.2
Range Limiter Switches
A more useful feature is the range
limiter switch, which many of the cheaper lenses don’t have, and even
on the more expensive lenses it’s often not implemented as well as it
could be. This is a switch that allows you to limit the lens’
focus capability to a range of distances. If you’re at a birding
location in which all the bird are far away, you may be able to improve
the autofocus acquisition speed by limiting the lens so as to focus
only subjects at a distance. Conversely, if all the birds are
very close, you may improve AF speed by limiting the lens to only focus
on nearby subjects. The limiter switch typically has a threshold
distance, N, which might be
20 or 30 feet or so, and may allow you to limit the lens to focus only
at distances greater than N
feet, or less than N feet, or
to allow focusing at any distance (i.e., limiting disabled).
In the figure below is the control panel for a Canon
600mm lens. The top switch is the focus limiter switch. The
leftmost setting disables the limiter, so that the lens can focus at
any distance. This is the setting that I use 99.9% of the
time. The middle setting allows you to focus only on subjects
between 5.5 and 16.2 meters away from the lens, and the rightmost
setting permits focusing only on subjects further than 16 meters.
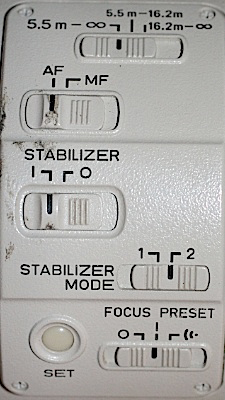
Fig. 3.8.1: The
control panel of the Canon 600mm f/4L IS lens.
The focus limiter switch is at top. Below that is the autofocus
switch (this lens has full-time manual override), then the switch
to disable image stabilization and a switch for stabilizer mode
(mode 2 is panning mode). I never use the focus preset (it
accidentally got turned on for this photo).
The way the
limiter improves AF speed is to keep the lens from from racking in and
out over its entire focus range when the camera has lost focus.
Recall from section 2.6 that SLR cameras use a
trick to quickly
determine exactly how much the lens’ focusing element has to be
adjusted, and in which direction, in order to bring a subject
immediately into focus. For subjects with poor contrast, however,
this system fails. It can also fail if the current setting of the
lens’ focusing element is far from where it needs to be in order for
the subject to be in focus. In either case, the camera will
typically rack the lens’ focusing element in and out over its full
range, searching for a high-contrast subject to focus on. For
some lenses this can be a very slow process. By limiting the
lens’ focusing range, you can speed up this process, since the camera
has a reduced range to search through in order to find the
subject. If you’ve already got the bird almost in focus, however,
the camera should be able to adjust the focusing element without
racking (though somethings it does anyway, especially in low light, and
especially for cameras will poor AF), and then the limiter switch will
have no effect on AF speed.
In practice, I rarely use this feature, because I
always forget to turn limiting off after I move on to the next
bird. If the next bird is outside the focus range I’ve set on the
limiter switch, then the lens won’t be able to focus on that next
bird. It may take a moment then to realize why the camera isn’t
focusing on the bird, and by the time you realize the problem and
change the setting on the limiter switch, the bird may be gone.
For that reason, I only use the limiter switch in very challenging
lighting conditions, where the AF system is having trouble finding the
bird and hence doing a lot of racking.
3.8.3
Lens Hoods
A very simple, but very useful,
lens feature is the lens hood. Most super-telephoto lenses (i.e.,
those with focal length of 300mm or more) have them. The hood is
the part of the lens beyond the last glass element (the objective lens
element). It shields the lens from the direct rays of the
sunlight that can cause glare and reduce image contrast.
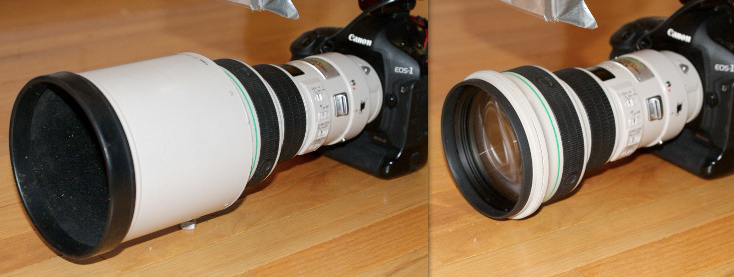
Fig. 3.8.2:
Canon 400mm f/4 lens with (left) and
without (right) lens hood attached. The lens hood
protects the objective lens element (glass visible in
image on the right) from glare and from damage
in the field.
In the figure above is shown a 400mm f/4
lens with and without the lens hood attached. As you can see, the
lens looks much less impressive without the hood, and indeed most
people don’t realize that about a third of this lens (with the hood
attached) is empty. A nice, long hood like this is very effective
at reducing glare, and also helps to protect the lens itself.
With the hood in place, the objective lens element is far less likely
to come into contact with tree branches or other objects that may
scratch the lens. Also, if you drop the lens, there’s a
possibility that it will land on the lens hood, which may prevent
damage to the lens itself.
Not all lens hoods are removable like the one shown
above. Removable hoods are good for cleaning, since it’s easier
to get at the glass to clean it with the hood removed. However, I
never leave the hood off in the field; only during cleaning of the
lens. Note also that lens hoods for expensive lenses are
themselves typically expensive, so it’s a good idea to take care of
them.
|
|
|