8.3 Poses and Aliasing
Once you’ve got the right angle,
the right composition, and the right exposure, the only thing left is
to wait for the bird to strike the right pose. In many cases it
can be a very, very long wait, and even when (or if) the bird does assume the posture
you’re looking for, it may do so for only a fraction of a second.
While watching the bird you need to be patient, but ever ready to
smoothly press the shutter release—without jerking the camera and
ruining the shot—the instant the shot becomes available. In many
instances, by the time your brain registers that the conditions are
right and signals to your finger to press the button, and before the
exposure is fully captured, the bird will already have moved.
This is all a normal part of bird photography in the field. It’s
frustrating, but you just have to get used to it. If you’re
persistent, then over time you should begin to accumulate a number of
lucky shots in which the bird was captured in the perfect pose for the
scene. Those few great shots make it all worthwhile.
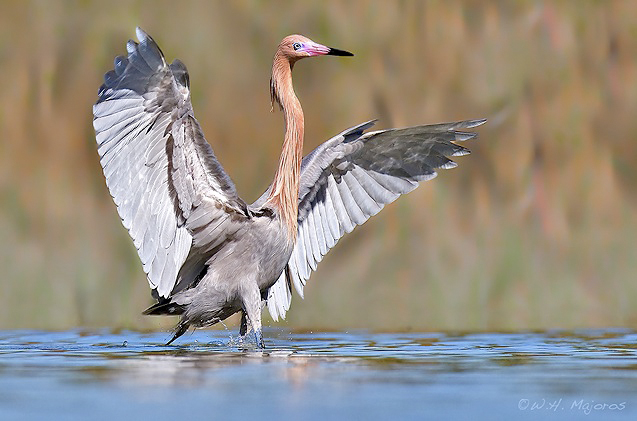
Fig. 8.3.1 :
Capturing good poses in the field takes a lot of patience.
For birds with light underwing colors, be sure to account for that
when setting your exposure parameters, to avoid blown highlights.
Also, when framing the shot, leave enough space around the bird
so that you don’t clip the wings if the bird happens to spread them.
The strategy that I use for obtaining good poses
from my subjects is as follows. First, as soon as the bird
assumes any decent pose at all, I take the shot. This allows me
to check my exposure, flash ratio, and focusing accuracy. Also,
if the bird flies off after that shot, at least I’ll have one image of
that individual; this is more important for rare species, in which case
the photo at least documents that you saw the bird. As soon as
the bird strikes a better pose—even if only marginally better—I take a
second shot. Every time the bird gives me a slightly better pose
than any it gave me before, I take the shot, just in case this happens
to be the last shot I get before the bird flies off.
Fig. 8.3.2 :
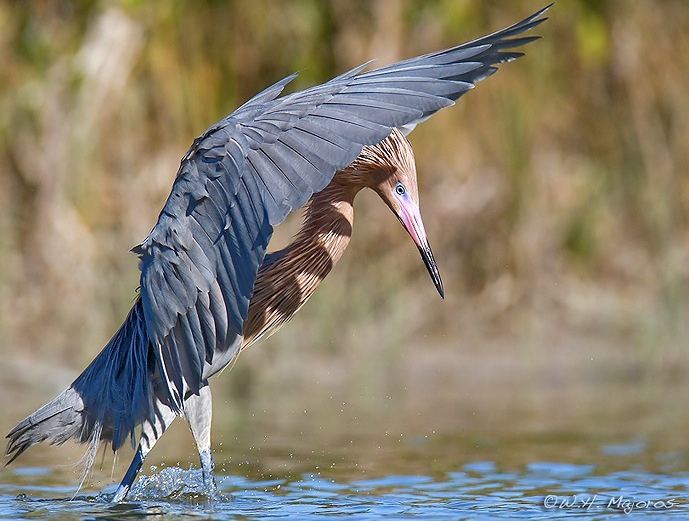
Some birds are more cooperative than others when it comes
to posing. Reddish egrets and tricolored herons tend to strike a
lot of
interesting poses when they’re hunting. Capturing interesting
poses in
other species can require much more patience (and luck).
One of the best opportunities for capturing
interesting poses is when photographing birds that are
hunting—especially large birds such as herons and egrets (raptors are
nice too, in this regard, but can be harder to get close to).
Many large waterbirds such as tricolored herons (Egretta tricolor) and reddish
egrets (Egretta rufescens) use
their wings to shade the surface of the water or possibly to break up
their silhouette so as to confuse their prey, and these are of course
ideal times to try to get a shot. One thing to be aware of, when
seeking these types of shots, is to account for the effect of the wing flashing on your exposure,
since many birds have lighter underwing colors that may get overexposed
if you set your exposure based on the bird’s dorsal plumage (which is
usually darker). Also, if the extension of the wings is very
brief, there may be shutter-speed issues involved, assuming you want to
freeze the motion (as opposed to utilizing motion blur for artistic
purposes). Sudden wing extension can also result in clipped wings if you’ve framed the
shot for the bird with the wings tucked in. It’s useful to try to
anticipate what the bird might do next, and to try to make sure your
exposure, shutter speed, autofocus mode, and framing can accomodate the
most likely (and desirable) behaviors that may occur.
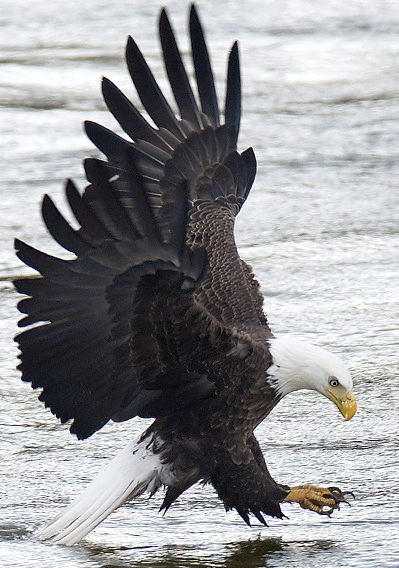
Fig. 8.3.3 :
Hunting shots tend to be very dramatic,
due to the implied action of the bird’s pose. A fast
shutter speed and a fast drive mode (or good hand-
eye coordination if you’re sniping) can be critical in
capturing these types of shots.
Capturing an
image of the bird with its prey—or, in other words, “capturing the capture”—is a great way to make a photo
that people are likely to find interesting. Doing so can require
an enormous amount of either patience or luck (or some of both), but is
often more than worthwhile. When the bird finally does nab its
victim, there’s likely to be some quick action that you’d ideally like
to capture, and that means shooting in continuous autofocus mode and continuous drive mode (see sections
2.6 and 6.6).
As mentioned earlier in this book, capturing fast
action sequences can be very tricky. As the mirror flips up for
each shot, the autofocus system is briefly blinded, creating the
potential for losing the subject. For cameras with fast
continuous drive mode (such as the 10 frames-per-second shooting of
today’s pro sports cameras), this problem is only exacerbated.
For some types of action, it may be better to snipe than to spray-and-pray (section 6.6)—i.e.,
to use single-frame rather than continuous drive
mode. Sniping allows you to pick the exact moment of exposure,
whereas machine-gunning relies on blind luck (though in the latter case
your luck effectively increases, the faster the camera can
shoot). I personally tend to snipe for everything except birds in
flight; that may not be the best strategy, though, so you should use
your own judgement when selecting the drive mode for action shots.

Fig. 8.3.4 :
Photos that show the hunter with its prey tend to be very
popular with general audiences (as long as there’s no blood). In
this
case the triumphant posture of the bird with its large prize helps to
make up for the otherwise poor composition and background.
Prey captures can, of course, be bloody at
times. Though it likely goes without saying, images of violent
behavior in nature, while typically not in any way shocking or
offensive to naturalists or seasoned nature photographers, may put off
gentler folk—some of whom may end up viewing, or even buying, your
work—and may therefore warrant more sensitive treatment when assembling
your portfolio. This of course depends on the purpose of your
photography: photography intended for scientific documentation of
animal behavior is clearly in a different class from so-called “fine
art” photography that aims to create
sellable works of art for the
general public.
Though action shots are almost always interesting
(when properly captured), static images of birds at rest can in some
cases be just as alluring to many viewers as intense action shots, and
in the field these will likely form the bulk of a typical day’s catch
for a casual bird photographer. One very useful ingredient for
otherwise static scenes is wind.
While many bird photographers feel inclined to stay indoors during
inclement weather, I find that wind and other climatic elements create
some of the best opportunities for capturing interesting poses and
compositions in the field. As a case in point, the heron photo
below was captured on a windy, mostly overcast day, and ended up being
used as the front cover of a calendar for a nature association; it was
also a finalist for a statewide photo content in North Carolina, though
it was ultimately disqualified due to having been previously published
(on the aforementioned calendar).
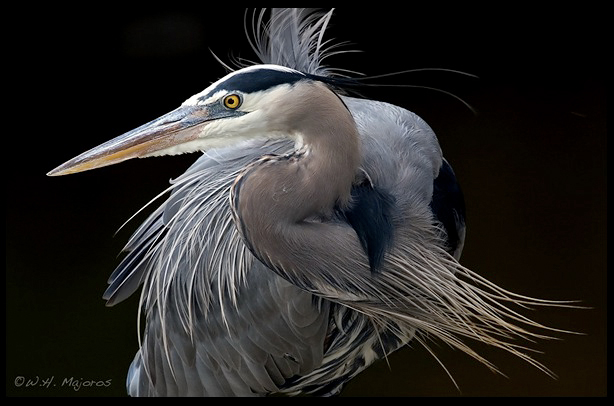
Fig. 8.3.5 :
Don’t underestimate the potential of wind to spruce up a scene.
Though I’ve shot thousands of photos of this particular bird, this one
shot
taken on a windy day eclipses all the others. Inclement weather
can result
in ideal conditions for capturing novel poses and scenes.
This particular heron, a wild and free-ranging bird, lives on the
campus of the university where I work. I’ve taken literally thousands of photos of this
particular bird over the years, but it’s this one shot, taken on an
inclement-weather day, that rises above all the others I’ve taken of
this bird. The moral of the story is: don’t be a fair-weather
photogapher. As long as you can adequately protect your equipment
from damage by the elements, it can be very worthwhile to venture out
when the weather becomes a bit “dicey”. You may be pleasantly
surprised at the results.
On fair-weather days with plenty of light,
photographing birds in flight can be a productive route to capturing
interesting poses. You’ll again want to utilize the continuous autofocus and continuous drive modes on your
camera when tracking birds in flight, and depending on the speed of the
bird and its wingbeats, a shutter speed of between 1/500 and 1/1600 sec
will usually be needed if you want to fully freeze the wings. As
with hummingbird photography (section 7.7),
completely freezing all
motion isn’t always necessary, since some amount of motion blur may
contribute to the dynamic impression that an image conveys.
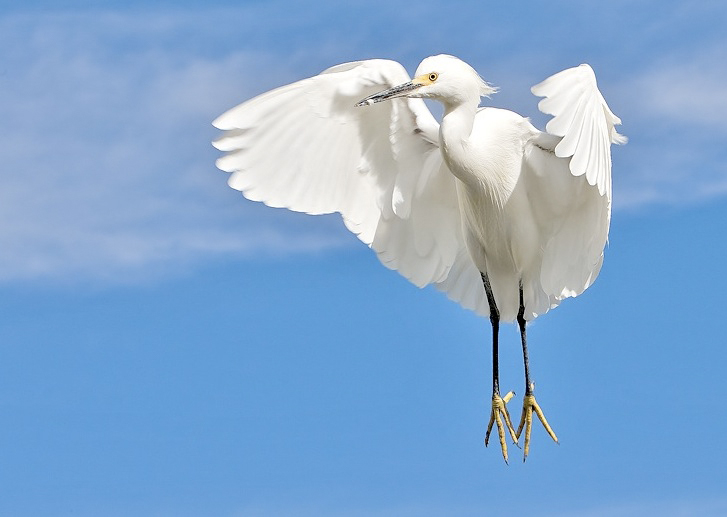
Fig. 8.3.6 :
Flight shots are considered by many birders to be the
holy grail of bird photography. Some photographers seek flight
shots because of the challenges involved, while others prize them
for their aesthetics. In terms of capturing interesting poses, the
beginning and end of the flight typically yield the greatest potential.
Note that there are several easily recognizable
classes of flight shots. One is hovering,
which is most commonly observed in hummingbirds, kingfishers, and
ospreys, but can also be observed on rare occasions in egrets (e.g.,
the image above) and other species ranging in size from warblers to
pelicans. Another class includes the jump shot (when the bird is taking
off) and the landing shot
(see the image below); these latter two can require a great amount of
patience and luck, but are often worth pursuing. Both types are
rendered infinitely more feasible given the knowledge of a well-used
perch or roosting site, and this obviously requires spending some time
getting to know the birds and their day-to-day habits.
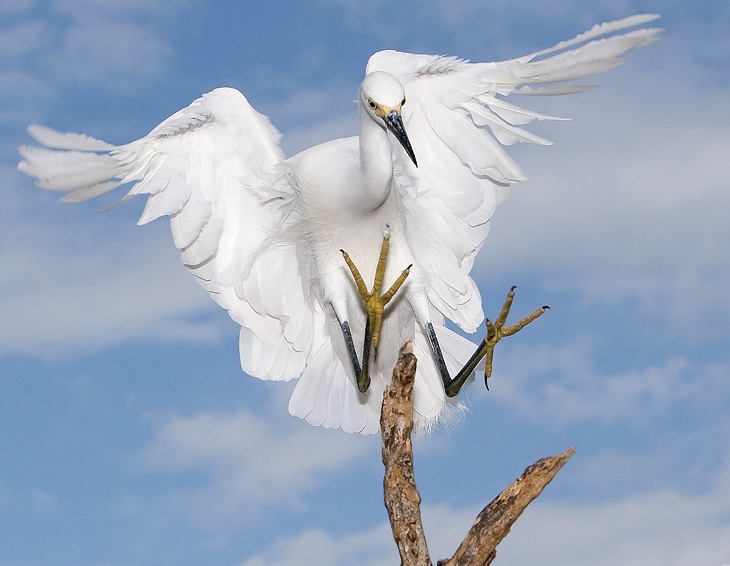
Fig. 8.3.7 :
Staking out a commonly-used perch can be a great way to
get landing shots—though even for popular perches this can still
require a fair amount of patience. Remember that birds typically
land (and take off) facing into the wind. High winds often
complicate
the act of landing, and can result in more interesting poses.
Another promising class of action
shots is that involving interactions—whether
between individuals of the same species or different species.
Predator-prey interactions are obviously a special case of this.
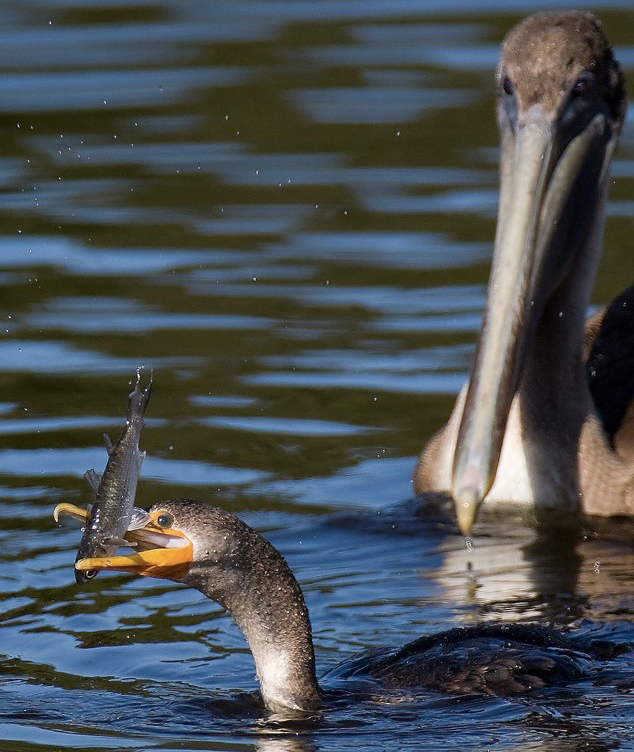
One thing you’ll commonly see in the field is what is known as kleptoparasitism—theft of food from
one animal by another. Kleptoparasitism is common among raptors
such as ospreys and eagles, but is also seen somewhat regularly among
waterbirds such as cormorants, herons, ibises, and pelicans.
Fig. 8.3.8 :
Interactions between birds can be especially common
on their hunting grounds, where attempted theft of food
(called kleptoparasitism) may be rampant.
An especially productive milieu
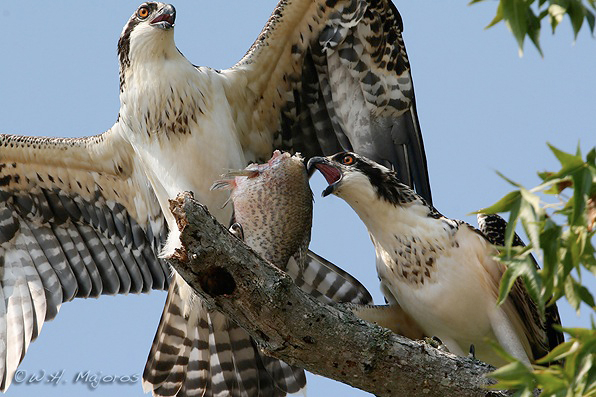
for interaction shots is the nest or sibling cohort. When in the
nest, siblings will often fight, steal food from one another, gaze into
each others’ eyes, or even preen each others’ feathers. Many of
these behaviors persist after the young birds grow large and leave the
nest. One strategy which is often extremely productive is to find
a bird’s nest and to follow the family all the way through from nest
building to the fledging of the chicks and beyond. Though many
nests fail, enough succeed that with time and perseverance you’re
likely to get many very, very satisfying shots by following this
approach, as long as you can put in the time at the nests.
Fig. 8.3.9 :
Interactions between siblings at or near the nest can be
great fun to watch—and to photograph. Note that the framing of
this shot could be improved by giving the bird on the left more
headroom.
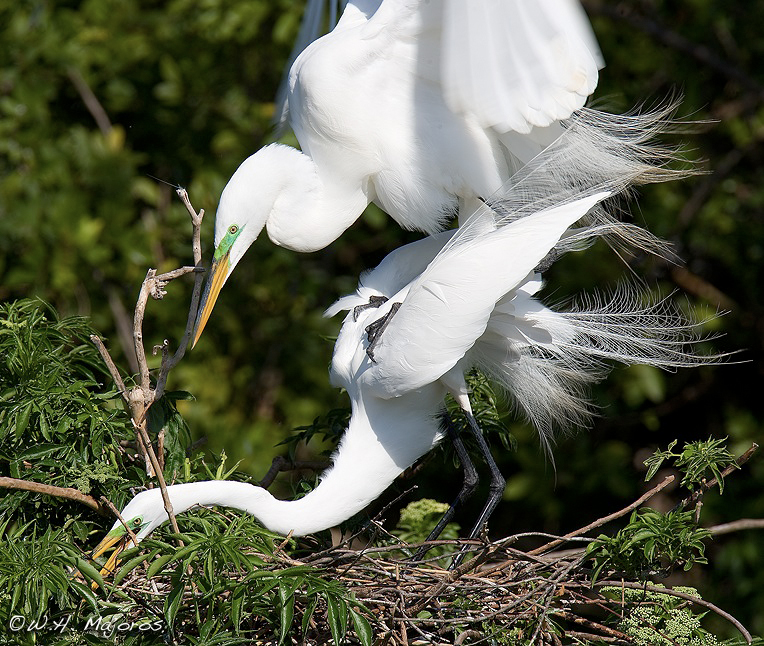
Another good behavior to capture in the field is mating. Some birds will
assume the most breathtaking poses when consummating their “marriage” (or the avian equivalent of
it). Many birds flap the wings quite vigorously during the act of
mating (presumably for balance), so a rather higher shutter speed is
probably in order for these types of shots. An especially good
place to visit, if mating shots are what you’re after, is a rookery or
other nesting colony, if you can find one (see section 8.7).
Fig. 8.3.10 :
Photos of birds in the act of mating can be quite dramatic.
The male stands on the female’s back and flaps his wings to maintain
balance.
Note that mating doesn’t always take place in the nest, though when it
does
that can be a bonus, in terms of image aesthetics.
In many species the act of mating
(i.e., insemination) is preceded by a protracted period of courtship, and for some species
this is the ultimate opportunity for capturing exquisite poses.
Courtship rituals differ from species to species, but they tend to be
the most dramatic in larger species such as herons and eagles. In
some species of eagles, for example, courtship can involve episodes of
semi-coordinated flight displays, occasionally climaxing in a so-called
whirling behavior
in which male and female lock talons and whirl rapidly downward toward
Earth for a brief moment before disengaging. The “spooning”
behavior of roseate spoonbills (Platalea
ajaja) is rather less energetic, but in many ways just as
riveting (see photo below).
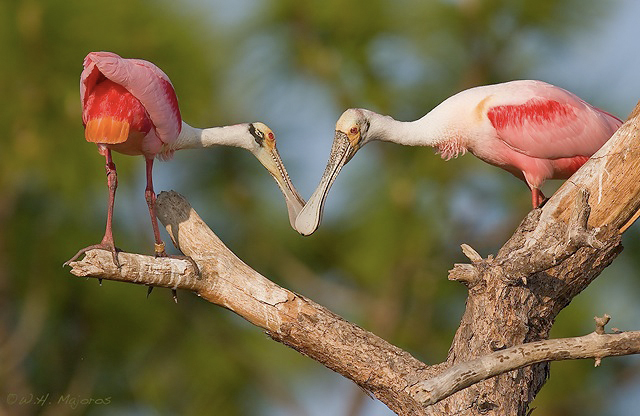
Fig. 8.3.11 :
Spoonbills “spooning”.
Courtship behaviors can differ enormously
between species, but most are worth capturing “on film” whenever
possible.
Courtship generally precedes egg-laying, though some birds will
continue to
engage in mating and courship behaviors even after the eggs have been
layed.
The timetable for breeding behavior can vary considerably according to
species
and geographic location.
The problem of capturing ideal poses is relevant
even when shooting common birds at your backyard feeder.
Interactions between different birds at the feeder can be an especially
attractive subject matter for backyard photography, though it’s usually
best if you can capture these interactions on natural perches near the
feeder, rather than on the feeder itself. However, scenes
involving man-made objects can occasionally prove rather photogenic, as
the image below hopefully attests.
Fig. 8.3.12 :
Interactions with man-made objects can sometimes result in
a more interesting photo. Note in this case that the bird’s tuft
is erect
and its
head is shown in profile, with the eye fully visible and the full shape
of
the
beak nicely outlined. Even without the metal bird in the photo,
this
would be
a good pose.
There are a few
technical issues related to bird poses that are worth briefly
mentioning before we conclude this section. The first is the
notion of aliasing.
This is what happens when a part of the bird (especially the beak)
lines up with some feature of the background (or even some other part
of the bird) and momentarily confuses
the viewer as he or she tries to resolve the separation between the
bird and the background. The waterthrush photo below is a prime
example of aliasing: the head and beak line up with the branch behind
it, and the bird’s superciliary stripe even matches the color of the
highlights in that branch.
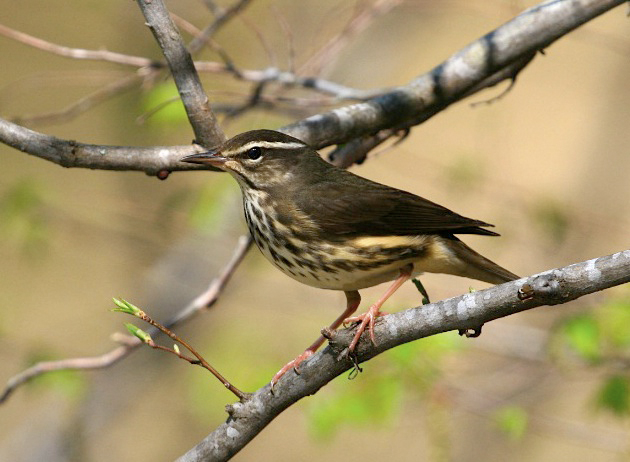
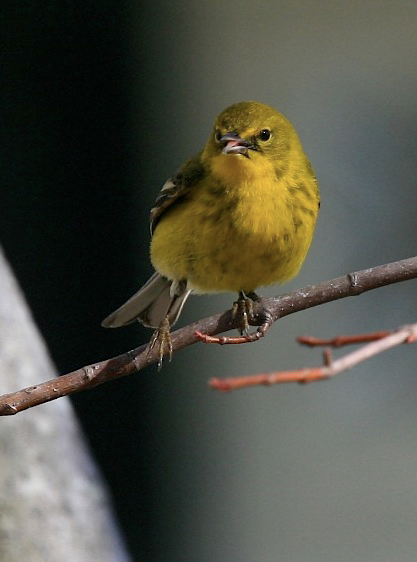
Fig. 8.3.13 :
A prime example of aliasing. Even though the upper branch is
behind the bird, it reduces the overall aesthetics of the image by
interrupting
the bird’s outline. The matching colors of the bird’s eye stripe
and the branch
highlights adds to the camouflage effect, requiring the viewer’s visual
cortex
to work harder to mentally parse out the bird from its
background.
Aliasing, when it occurs, may not
be immediately apparent to you, the
photographer, since you likely observed the subject over an extended
period in the field, and have more mental
context
to apply to the image. To a fresh pair of eyes seeing your photo
for
the first time, however, certain geometries of the scene can create a
slight visual confusion that, even if soon resolved by the viewer’s
visual cortex, may still leave the viewer feeling somewhat ambiguous
about the aesthetics of the captured image. For these reasons,
aliasing should be avoided in almost all cases (unless it’s being used
for some special purpose). Keep in mind that aliasing can also
occur between two different parts of the bird, if those parts line up
or one part occludes the other in a non-aesthetic way.
Another issue
relates to the foreshortening
of the bird’s beak when the bird is
facing more or less in the direction of the camera. The problem
is that viewers not familiar with that species may not realize that the
bird has a long beak, and since the beak is rendered foreshortened (and
perhaps largely out of focus) in the image, they’re left with a
potentially grossly inaccurate impression of the bird’s head shape,
which may in some cases leave them less enthusiastic about the image
than you’d otherwise expect.
Fig. 8.3.14 :
Foreshortening of the beak. When
viewing a bird head-on, the full extent of the
beak becomes difficult to perceive, potentially
requiring more mental effort on the part of the
viewer—which is generally a bad thing.
|