8.8 Planning a Bird Photography
Trip
While many birders and bird
photographers are entirely content to observe and photograph their
favorite feathered friends in their local parks and back yards,
most bird enthusiasts will jump at the chance to visit a renowned
birding destination in a remote location—whenever it’s both
financially and practically feasible to do so. For those
who’ve never been on a serious bird photography trip, however,
there are a number of useful tips that can help to make your trip
more productive and enjoyable, and hopefully to reduce the chance of an
unforeseen mishap or planning error. In this section we’ll very
briefly survey some common-sense tips to keep in mind when planning
your trip, and when you’re on location at the remote site.
8.8.1
Sources of
Information
The first quandary is, of course, where to find the information you
need in order to most effectively plan your trip. In the absence
of any other sources of info, your first choice should be Google. Start with very
specific searches such as “<site> bird photography” (for example, “everglades bird photography”), and if these produce only
meager results then fall back on more general searches based on just
the site name and perhaps additional terms such as “nature” or “wildlife”. For many sites you’ll be
able to track down a park map showing trails and landmarks. Try
to find (via Google) any blogs or photo albums posted by amateur or
professional photographers related to the site, to find out which parts
of the site tend to be most productive for wildlife photography.
See if there are any “photo blinds” (small shacks with holes for
photographing through while remaining unseen by nervous
wildlife). Search at flickr.com
for photo albums having the site name in their title. See if
there are any banding stations nearby (you can find these by searching
for banders’ blogs via Google); the people
manning these stations can be great sources of information. See
if you
can harvest any email addresses of photographers, birders, naturalists,
or park rangers who have been to or even frequent the site, and send
them a friendly email asking for any tips they may have about seeing
and getting close to the birds at the site. If they reply, thank
them graciously and then file their email address away in case you come
up with any specific and very pressing questions that you need to have
answered before you leave for your trip. If you’re lucky you may
make friends with someone who lives locally near the site, who can
appraise you of the changing situation at the site from year to year as
you plan repeated visits. These latter information sources are to
be cherished and rewarded richly with your sincerest thanks and many
lavish gifts!
Once you’ve arrived at the site, be sure to put
yourself in your most sociable and amicable mood. Think of
yourself as a CIA operative preparing to begin recruiting informants on
the ground in enemy territory. What types of secrets might your
informants harbor that could be useful to your campaign? Do not underestimate the value of the
potential information that you might be able to extract from
cooperative locals. Remember that they live there, day after day
after day, and you’re only a short-term visitor. They almost
certainly have information that could be useful to you. As just
one example, when I was photographing Burrowing Owls (Athene cunicularia) in Florida, a
local resident walked by and informed me that she knew of a better site
a block away where the owls tend to spend much more time above-ground
than did the individual birds I was stalking. She knew this
because she jogged around the neighborhood every afternoon, whereas I
had been in town a total of three days. She had observed these
birds every day for months, and therefore had information of great
value to me. Following her advice, I packed up my equipment and
went in search of this other nest. When I found the other nest I
immediately saw that she was right: whereas the birds I had been
observing stayed low down in the tall grass, the birds at this new site
spent more time perched higher up on substrates where I could get much
better photos. The moral of the story is: respect the locals and
their potential to provide what could be extremely valuable
intelligence for your photographic campaign.
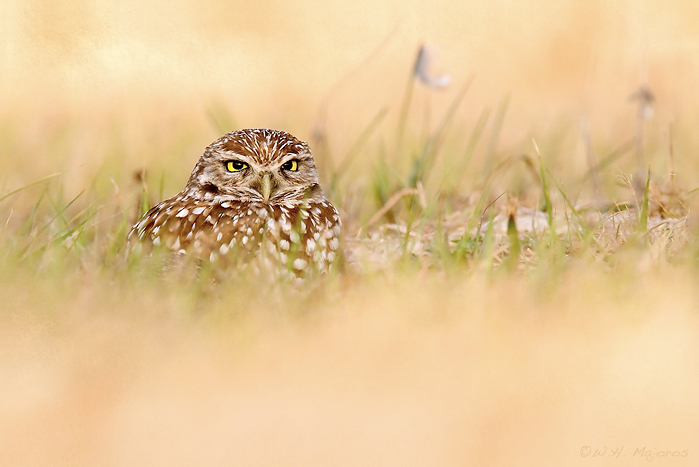
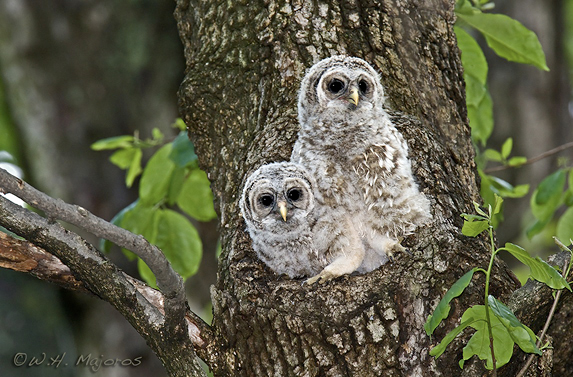
Fig. 8.8.1:
Don’t underestimate the value of local residents for providing useful
information. When trying to shoot burrowing owls in Florida, a
local jogger
informed me of a nearby nest in which the birds were more cooperative
than
at the nest I was currently working. I followed her advice and
ended up
getting much better photos at the second nest site as a result.
Be especially nice to every photographer you meet at
the site. For well-established sites you’ll often find that
there’s a group of photographers who visit the site annually, some of
whom will possess the accumulated knowledge of years’ worth of trips to
this very site. If you’re nice enough you may find that one or
more of them take a liking to you and will share their best secrets
regarding the ideal places, times, and techniques to use within the
site to obtain the best photographs.
Even park rangers can sometimes be good sources of
information. Those who spend all of their time in a toll booth or
behind a desk as the visitor’s center are probably less (than) useful,
but those who actually hike the trails every day often know quite a lot
about things like the current locations of active bird nests,
etc. Just keep in mind that as non-photographers their advice on
where to see birds in the park may not take into account your need to
get close enough or to see the bird from an aesthetic angle.
8.8.2
Scheduling
For many birding destinations, there is an ideal time of the year to be
there, and in the wrong season you may find that a given site is so
unproductive for your photography goals that you end up wishing you
hadn’t made the trip. For example, Magee Marsh in northern Ohio
can be an absolute nirvana for warbler lovers during the peak of spring
migration (around the middle of May at that location), but virtually
dead at other times of the year. At other locations the issue may
be less related to the timing of bird movements and more related to
practical issues such as the growth of foliage (which can obviously
impede efforts to get clear shots of birds without intervening leaves),
the weather (e.g., the rainy season), or even the number of tourists
present (such as at many coastal parks that attract hordes of
beachgoers). Figuring out what is the best time of year to visit
a given destination shouldn’t be terribly difficult for popular
bird-photography destinations. If Google doesn’t find the
information residing on some web page on the internet, a few emails to
individuals (likewise found via Google) either affiliated with the site
in some official capacity or at least familiar with the site (as
attested by photo blogs) may be productive.
When choosing the overall destination of your trip,
consider selecting a region with diverse habitats and diverse
species. By doing so you may lessen the importance of arriving at
precisely the right time, since different species in different habitats
may be in different phases of their yearly schedules, and as a result
you should improve the chance that there will be at least something
interesting for you to see and photograph on your trip. An
example of such a location is southwest Florida. At just about
any time of year you’re likely, with a little effort, to find something
interesting to photograph, though there are obviously peak times for
seeing specific types of birds and activities (e.g., the shorebird
migration, etc.).
For destinations featuring accessible nesting sites,
consider spending several days at the same site, or perhaps even a week
or more. Nesting sites, especially those for small birds, can
provide amazing opportunities for seeing (and photographically
documenting) the rapid growth of young birds into adult-sized juveniles
over a period of mere days. Nests often serve as stages on which
a vast array of bird behaviors can be observed. Even if your
photography goals are purely artistic, such a variety of behaviors will
often produce a wonderful variety of poses that can lend considerable
novelty to your photos. And obviously the potential for some “wildlife photojournalism” is a worthy consideration if
you’re looking to write an article or produce a collection of images
telling the story of a family of birds.
Fig. 8.8.2:
Nest sites can be especially productive, but the timing is always
tricky. For this owl nest, I got lucky and the chicks fledged the
very day that
I was there. If your destination features accessible bird nests,
consider staying
for several days, to maximize your chances of seeing something
interesting
at the nest site. Behaviors can change significantly from day to
day.
The other
important aspect of scheduling is the time-of-day component: i.e.,
finding out when the site opens and closes for the day (if it’s a
park), how far the site is from your hotel, and how early you’ll have
to wake up in order to be there at first light (or when the gates
open). Keep in mind that many (though not all) of the best bird
photos are taken early in the morning or around sunset, and
unfortunately there are sites that open rather late in the morning and
close early in the evening. Some such sites have special “photographer packages” that you can pay for, which allow
you to get into the before the general public, and/or stay later in the
evening. Be sure to read the fine print for these packages, since
they may require to to show up at a particular gate at a particular
time, and if you’re ten minutes late you may have
to wait an hour or two to get in via general admission.
When choosing a hotel, be sure to choose one as
close as possible to the main site you intend to visit. This will
allow you to get to the site early in the morning and to stay as late
as you need to. On intensive shoots in spring and summer I’ve
found that the long drive back to my hotel each night can severely
limit the amount of time I have for downloading my images, backing up
my files, buying and eating dinner, etc., and that this in turn
affected how much time I had to sleep and regain my energy for the next
day of hauling around my heavy gear in the hot sun for 12 hours.
Don’t underestimate the practical value of choosing a hotel closer to
the site.
Also, if you’re a breakfast or coffee person, you
may even want to consider which hotel offers a convenient route to the
site that features a Starbucks or Dunkin’ Donuts on the way to your
shoot site. Caffeine and carbohydrates merit special
consideration when your day plan includes hauling heavy gear around in
the field for twelve-plus hours. Obtaining your body’s fuel
quickly allows you to dedicate more time to capturing images in
whichever exotic location you’ve chosen to visit.
8.8.3
Accommodations and Pets
If, like me, the special someone in your life happens to have big,
floppy ears and a wet nose, then finding a hotel that accepts “pets” (I prefer the term “significant other”) may be important to you.
In the U.S., two popular chains that typically accept dogs are Red Roof
and Travelodge. Extra fees or deposits may be required when
bringing a pet. For long trips you’ll also need to find a local
pet store to buy provisions. Knowing where the local vets and
emergency animal hospitals are located is also very wise.
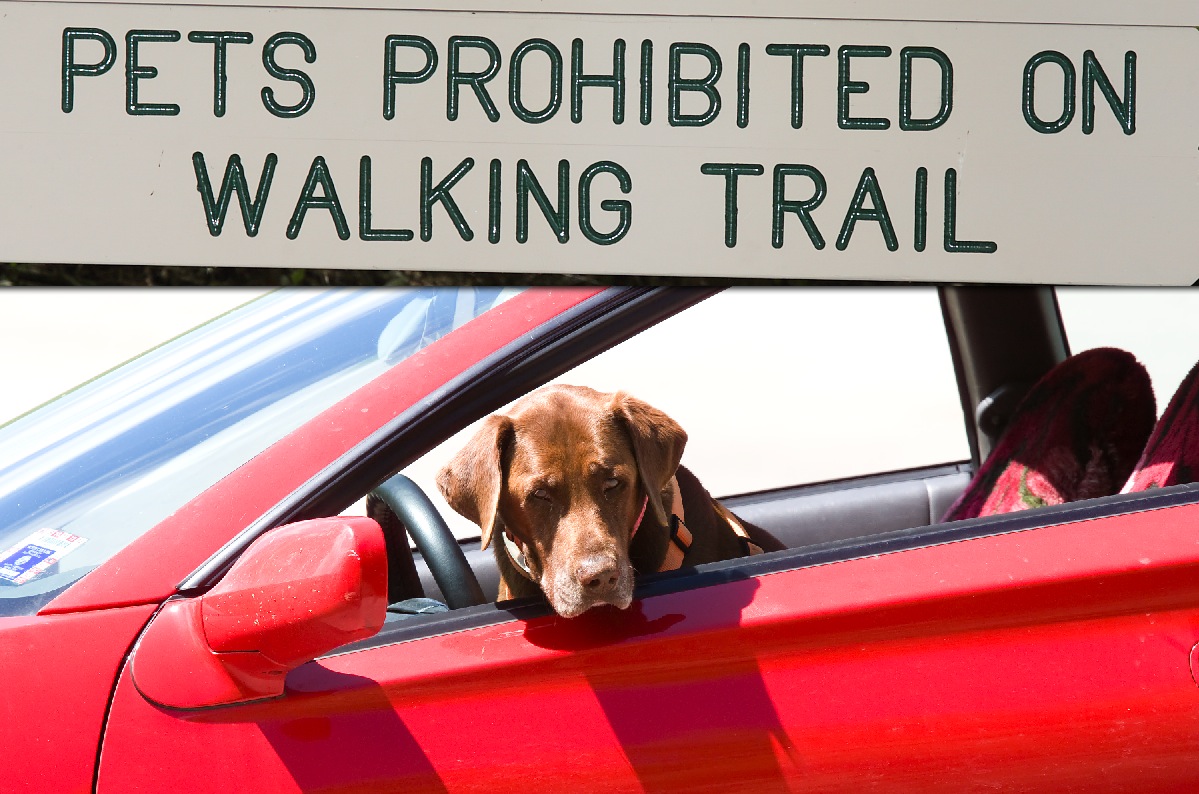
Fig. 8.8.3:
It’s an unfortunate fact that pets aren’t allowed to go everywhere
you are. A few emails or phone calls may be necessary to find out
where your
dog can accompany you in the field. Make sure you have a backup
plan in case
that information turns out to be wrong.
You’ll
obviously also need to find out whether your furry “significant other” is permitted to accompany you at
the site of the shoot. In many cases he or she won’t be allowed
to walk the trails where the birds are located, but be sure to inquire
as to whether s/he is at least permitted to stay in the car when you’re
out on the trails. There are a number of popular birding sites
(such as Chincoteague NWR in Virginia) where pets aren’t allowed to
enter the park, even if they stay in the car. Other sites allow
pets in the car but not on the trails, or may allow them on the trails
but not on the beach, etc. Some sites (such as Fort Desoto in
Florida) have set aside a special “dog beach” so that your special friend can
have his/her time in the sun after you’ve finished with the serious
business of capturing stunning bird photos. For national and
state parks, this type of information is often available on the park’s
web site. For other types of locations, a few emails or phone
calls may be needed to find out what the situation is regarding
pets. Often a ranger or park administrator can suggest options
for entertaining or even boarding your pet outside the park if
necessary (for example, Gatorland in Orlando, FL prohibits all dogs
even in the parking lot, and recommends that you board your “animal” at a local shelter if you plan to
visit their premises—this is why I no longer visit
Gatorland when I’m in Florida).
8.8.4
Travel
Traveling with big lenses—especially multiple big lenses—can be quite a
hassle, especially if you’re traveling by air. For travel via
automobile, there are a few suggestions that bear mentioning.
First, keep in mind that car accidents do happen, and that the $20,000
worth of gear packed into your trunk may be at risk if the driver
behind you decides to plow into your sub-compact car rather than
stopping when you unexpectedly do so. (Insuring your gear is a
very good idea, whether you frequently travel or not, and can often be
done simply as an inexpensive rider on your renter/homeowner’s
insurance policy). Also, if you do drive a compact car and are
forced to stow your gear in the open (such as in the cargo area of a
hatchback or in the front passenger or back seats), be sure not only to
cover your equipment with some type of sheet, but also to pile
additional, non-valuable items on top of the cover, such as empty soda
cans or the like, to give the impression to passers-by that the only
thing they’d be likely to find if they broke in was junk.
For air travel, the situation becomes more
complicated. Almost all of the photographers that I’ve talked to
regarding this matter have indicated to me that the only way they’d
take a $5000+ (US) lens on an aircraft is as carry-on luggage that they
can monitor visually during the entire flight. This seems to be
based on the common perception (which may very well be quite true) that
expensive camera lenses checked into baggage very often tend to be
stolen either by the baggage handlers at the airport or by enterprising
individuals monitoring the baggage claim areas for packages that look
like they might contain camera equipment.
For the few photographic trips I’ve taken that
involved air travel, I’ve taken my main lenses onboard as
carry-on. Many 500mm and 600mm lenses, without a camera attached
and with the lens hood removed, become surprisingly compact and will
often fit in the overhead compartment of large commercial
aircraft. For 400mm and sometimes even 500mm lenses it’s
sometimes possible to simply hang the camera-mounted lens around your
neck like an oversized tourist camera and to wear it thus during the
flight. Some airlines might not allow this, so be prepared in the
event that you need to quickly pack your lens for storage either in the
overhead bins or among the checked baggage in the plane’s baggage
hold.
Fig. 8.8.4:
Lens cases like this are great for protecting your lens from
physical damage, and for attracting thieves at the baggage claim.
If
you use such an obvious container for your equipment, at least place it
inside a duffel bag or other nondescript container.
For lenses in
checked baggage you’ll obviously want to make sure that the lens is
well-padded on all sides within its container. Using a container
(such as a large suitcase) without glaringly obvious advertisements
such as “Canon” or “Nikon” is of course recommended if you’d
prefer not to donate your equipment to local thieves at either
departure or destination cities. Detaching your camera from the
lens prior to packing is also recommended, so as to avoid stressing the
point of attachment via the normal shifting and jostling of luggage
that occurs during flight.
One alternative to taking your expensive lens and
camera onboard your flight is to instead ship it to the destination
city prior to your trip. Some hotels will allow you to ship
luggage directly to them once you’ve made a reservation. Note
that shipping expensive telephoto lenses with full-value insurance can
cost in the hundreds of dollars (US).
8.8.5
Equipment
Though we’ve already discussed equipment issues extensively in this
book, there are a few suggestions to be made regarding equipment to
take on a long birding trip. First, you’ll obviously want to take
your laptop or some other means of downloading photos from your memory
cards at the end of each day. Although there are specialized
devices that can be used to download your cards to a built-in hard
drive in the field, whenever possible I prefer to use a laptop so that
I can make multiple copies of all the files. I take at least two
external hard drives along, in case one hard drive fails during the
trip; I’ve had numerous hard drives fail in the past. I generally
keep one copy of every file on the laptop (during the trip), so I have
three copies of all files in total. When I leave the hotel each
day I lock the laptop and one of the hard drives in the in-room safe
(if there is one) and take the other hard drive with me to leave in the
car. Note that in hot weather it’s generally a bad idea to leave
a hard drive locked in your car all day. There are now compact
external drives that are small enough to place in a large pocket of
your photo vest, and this may be a better option in hot weather
(placing the drive into a sealed ziplock bag first, in case you get
wet). I also label both my drives and their corresponding power
cords. Since I always opt to use different brands of external
hard drives (to lessen the chance that a single faulty production run
at the factory will cause simultaneous failures in all my drives), the
power cables are generally incompatible between the different drives,
so it can be important to make sure you connect the right power cable
to the right drive; unfortunately, the power cables are usually made by
third parties and often don’t have the drive’s brand name on the cable
itself. White sticky labels are a simple solution. When
buying the drives, I usually try to choose a capacity which is roughly
twice as big as I expect to need, based on my previous trips to similar
locations.
If your laptop has a Firewire port, remember that
Firewire is usually faster than USB, and this can be important if you
get back to your hotel late in the evening and don’t have much time to
download your memory cards before retiring to bed. Most hard
drives these days are USB-only, so you may need to shop around to find
a Firewire-capable drive. The current version of Firewire is “Firewire 800”, which has a different plug size
than the older Firewire 400 (though you can buy an adapter to plug a
Firewire 400 drive into a Firewire 800 port), so make sure you get the
appropriate version. If your card reader is Firewire and you have
only one Firewire port on your laptop, then you’ll need to either buy a
Firewire “hub” (port
replicator), or use a USB hard drive if you need to attach both
the card reader and the external drive simultaneously (i.e., if you
don’t have enough free space on your laptop’s internal drive to
download the photos to first).
In terms of memory cards, it’s obviously a good idea
to have more than you need for a whole day of shooting. I choose
intermediate-capacity cards (i.e., not the largest currently
available), because they tend to be much cheaper than the
largest-capacity cards available, and they also allow me to avoid
placing “all my eggs in one basket”. I did have a card fail
once after I had put several hundred photos on it. Ironically, it
was the most expensive card I’ve ever bought (a Lexar premium model); none of the
dirt-cheap cards that I’ve bought (from Transcend) have ever failed, so I
don’t bother with the premium cards except when I want a card with a
higher transfer rate (such as the Sandisk
Extreme series) to use when shooting in spray-and-pray mode (see section
2.7.1). If a card does
fail, you can sometimes send it in to the
manufacturer to have them attempt to recover your data. For my
card that failed, I was able to get all of the photos off of it myself,
though I wasn’t able to write any more files to it until it was
repaired by the manufacturer.
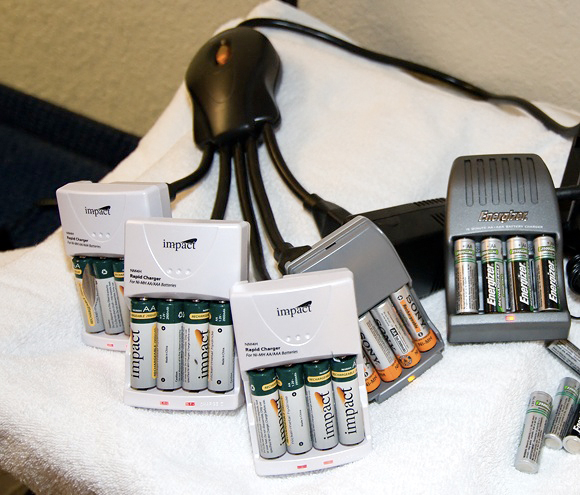
Fig. 8.8.5: If
you use flash, remember that you’ll need some way to
re-charge all of your batteries every night in the hotel. If the
hotel
room has few electrical outlets (which they often do), you’ll need
something like the Sentry Power Squid to connect all of your chargers.
If you’re a
flash user, one essential piece of equipment is a power strip for
plugging in multiple AA chargers. I use the Sentry Power Squid (see section
4.3.4), because normal power
strips generally don’t provide enough
physical space for more than two or three chargers.
8.8.6
Necessities
For intense shooting situations, you’ll obviously need to make sure you
have some fuel on hand to keep your body going, whether that means food
or caffeine (or both) in your particular case. If the site where
you’re going doesn’t have a refreshment stand, you’ll want to pack a
lunch and possibly even dinner if you’ll be shooting up till dusk on
long summer days. You’ll therefore want to think ahead about when
and where you’ll purchase your foodstuffs when you’re at your
destination city. As mentioned earlier, you may also want to
think about how you can get your breakfast and morning coffee (if
applicable) in the morning without having to drive out of your
way. Remember that in many cases the best photos are taken in the
early morning and late evening, so you don’t want to have to fiddle
around too much on your way to the site in the morning. My
personal preference is to keep several 12-packs of Diet Coke in the
trunk of my car for the purposes of obtaining my twice-daily caffeine
fix, and to hit the nearest bagel or donut joint on the way to the
shoot site for my morning carbohydrates.
Another issue that may likewise seem overly mundane
but is, I assure you, of prime importance, is to carefully take note of
the locations of restrooms at or near the site where you’ll be
shooting. There’s nothing worse than finding the ideal bird in
front of the ideal background, only to find that you suddenly need to
relieve your bowels and that the nearest restroom is a two-mile drive
to the other end of the park. At the warbler mecca that is Magee Marsh in Ohio, a perennial
joke among photographers is that with the length of the boardwalk and
the difficulty making one’s way quickly through the crowds that gather
there, it may be worthwhile to wear diapers or a urinary
catheter. Humor aside, there can be no doubt that large numbers
of potentially great photos have been lost due to the necessity of
making a long hike to the nearest restroom. This is why
it’s important to know where the nearest restroom is, and to think
ahead about when you might need to use the facilities. This may
be especially relevant to caffeine addicts.
8.8.7
Weather
Even the very best laid plans can be thwarted at the last minute by
Mother Nature. There are, however, several things you can do to
try to minimize the impact of weather on the success of your trip.
First, consider buying a mobile device that can
receive up-to-the-minute weather reports. I personally use an Apple iPhone with a special weather
application that can display animated radar. Just seeing a static
radar map can be useful for ascertaining whether there are any storms
in the vicinity, but with an animated map you can also see the
direction those storms are moving. This is especially critical
for those using cameras and/or lenses that are not weatherproof (i.e.,
are likely to be significantly damaged by rain). Whenever I see
dark clouds on the horizon, I check my iPhone and see if there’s any
severe weather headed my way. If there is, I bag each of my rigs
in a large plastic trash bag and start walking toward the car.
Second, on days for which the overall forecast
includes a chance of rain, consider taking an umbrella with you.
Many umbrellas come with a bag and a shoulder strap, so you needn’t
feel much more encumbered by carrying your umbrella with you. I
have a large “golf” umbrella that I either tuck under
my belt or attach to one of my tripod’s legs using velcro or automotive
clamps.
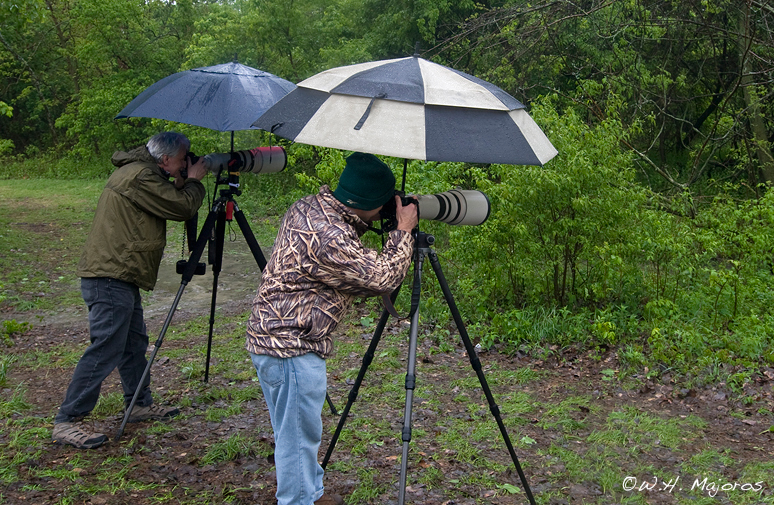
Fig. 8.8.6:
Don’t assume that inclement weather means that you have to spend
the day in your hotel room. Take an umbrella and some means of
attaching it
to your tripod. As long as there’s no wind and your equipment is
weatherproof,
a bit of rain needn’t keep you from going out into the field for at
least part of the day.
(Many thanks to Dale and George for demonstrating the use of umbrellas
in the rain!)
Third, on days
in which inclement weather is virtually assured, don’t necessarily
assume that you can’t do any bird photography that day. If the
inclement weather consists only of rain or snow (no wind), with a
weatherproof camera and lens it’s very feasible to go out with a large
umbrella and some trash bags (in case the wind picks up) and see if you
might get lucky despite the weather. For tripod-mounted rigs you
can attach an umbrella to your tripod or tripod head (see section 4.4.2
and the figure above), which can work very effectively as long as
there’s no wind. For hand-held work in cool temperatures, I like
to zip up my jacket and slide the umbrella’s handle down the front of
my jacket, so that the umbrella stays upright over my head (and camera)
without my having to hold it with my hands. (My jacket has an
inside pocket which I can slide the umbrella handle into, but even
without this feature it’s often possible to keep an umbrella in place
just by zipping up your jacket tighly around the umbrella’s
handle.) The main issue with umbrellas (besides the wind) is
making sure your flash unit and fresnel extender clear the underside of
the umbrella, so that you don’t end up with half-exposed images as the
umbrella occludes the top of the flash.
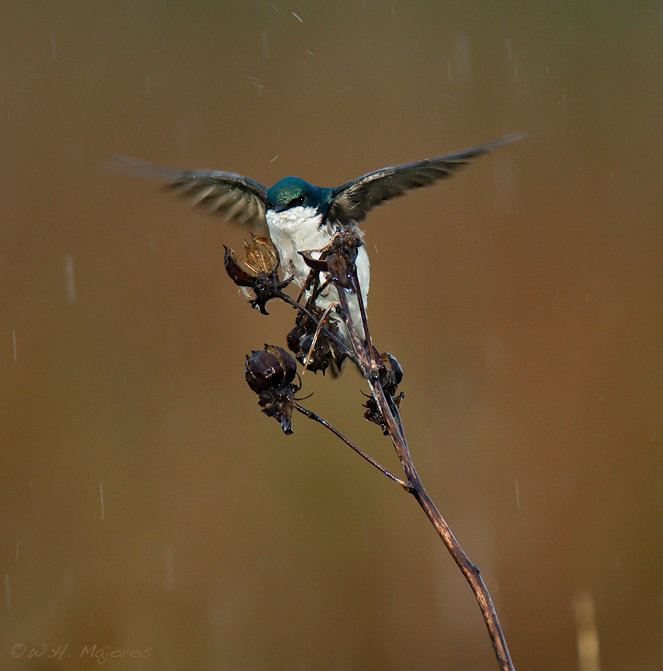
Fig. 8.8.7:
Precipitation can sometimes spruce up a photo, by letting
the viewer know something about the environmental context in which the
image was taken.
Finally, keep
in mind that inclement weather can sometimes be highly beneficial by
injecting novelty into your photos, either due to the unique lighting,
the presence of visible precipitation (especially snow), or any effects
the weather may have on the bird’s behavior. Caution is obviously
recommended to ensure the safety of your equipment (and yourself), but
beyond this it’s worthwhile to at least consider what you might be
missing in the field by staying in your hotel on rainy or snowy days.
8.8.8
Safety
Ensuring the safety of both your equipment and yourself (and any
companions) is obviously of the utmost importance when traveling to
remote shooting locations. There are a few safety-related issues
that are worth emphasizing here as they related specifically to
photography trips.
First, let’s consider personal safety.
Obviously you’ll want to take along some effective insect repellent and
sunscreen for those destinations involving lots of insects and/or
exposure to the sun. In the case of sunscreen, it’s especially
important to find a brand that won’t run into your eyes (since you’ll
depend so critically on your eyes during the shoot). I’ve yet to
find a brand of sunscreen that won’t run into my eyes, so rather than
using sunscreen on my face I instead wear a wide-brimmed hat that’s
flexible enough to bend out of the way when it contacts my flash unit
(i.e., when I look through my viewfinder).
Insect repellant is important not only for banishing
those annoying mosquitos, chiggers, flies, and gnats, but also for
keeping disease-carrying ticks off of your person and clothing.
It’s especially important to spray your shoes with a strong DEET or Bio-UD based formulation to keep
the ticks off (though ticks can also get on you from tall grasses and
branches of trees, so you need to spray more than just your
shoes). Be sure to check yourself nightly for ticks back at the
hotel. Keep in mind that some diseases, such as Lyme’s Disease, are transmitted by
the tiny deer ticks that can be very difficult to see without looking
very carefully. If you take your dog along on your birding
expeditions, be sure to coat him or her with Frontline or a similar product,
since any ticks that get onto your furry friend may later make their
way onto you. (Though I’ve yet to contract Lyme’s Disease, my dog
has had it and recovered. I’ve been bitten by untold numbers of
ticks over the years, so it’s probably just a matter of time before I
contract something).
Finally, consider very
seriously the issue of dangerous animals that may inhabit the site
where you’ll be shooting. Snakes are a prime concern in many
locales. A favorite technique of mine is to lie on my belly when
shooting waterbirds and shorebirds, but I’ve been warned on multiple
occasions by knowledgable naturalists at sites where venomous snakes
are known to occur with some frequency. If your site has venomous
snakes or other animals such as scorpions or the like, take the time to
research first-aid techniques for treating venomous bites, and be sure
to know beforehand where the nearest hospital is located. In
places such as Florida it’s also important to keep an eye out for
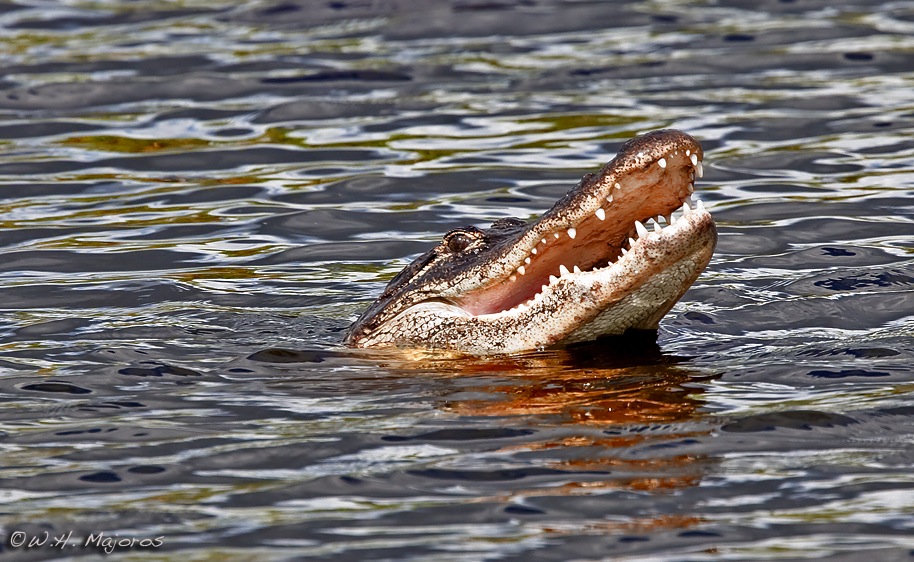
aligators. In other locations you may instead be more concerned
about bears. Keep in mind that a number of photographers have
been eaten by bears in the
past. It’s no joke: wildlife photography is
dangerous, and you need to know in advance about the dangers you may
face and how to successfully survive those dangers.
Fig. 8.8.8: Be
sure to find out what types of dangerous animals are present
at your destination site. If you like to shoot waterbirds or
shorebirds while
lying on your belly, be on the lookout for snakes and gators.
Now let’s
consider the safety of your equipment. First let’s consider
theft. Equipment can be stolen either from your car, from your
hotel room, or directly from your person. Though I’ve yet to hear
of a photographer being robbed at gunpoint in the U.S. (I have heard of
it occuring in South America), for those photographers carrying around
several thousands of dollars worth of equipment it’s worthwhile to both
obtain insurance for the equipment and to inquire as to whether theft
is included in the coverage of the policy. If it isn’t, you might
consider changing insurance companies (mine covers theft, so it’s not
impossible to procure such coverage).
Theft from your (unattended) car or hotel is another
possibility
that you need to very seriously consider. Many hotel rooms
nowadays include in-room safes. Of course, when you’re out in the
field you’ll likely have all your cameras and lenses with you, unless
you’ve brought backups (which I highly recommend, if you have them) on
the trip. Unfortunately, in-room safes are typically small, so
they’re more useful for laptop computers and hard drives than telephoto
lenses. Some hotels have a larger safe on site that you can use,
though typically for a fee. Depending on the price of the lens
and the coverage provided by your insurance, such a fee may be
justifiable. For rooms without an in-room safe, I usually request
at the front desk that no housekeeping services be rendered in my room,
just in case any of the housekeeping staff are less than trustworthy.
Storing expensive photographic gear in your car is
enormously risky. There are several things you can do to reduce
this risk somewhat. First, make sure that nothing is visible from
outside the car. This includes not only the equipment itself, but
any possible indicators that expensive equipment may be hidden
within. Anything that may advertise that the owner of a car is a
photographer can be a detriment. Second, store things only in
your trunk, if you have one. Hatchbacks and SUV’s lack true
trunks, because the cargo area is physically accessible from within the
vehicle’s cabin, which can of course be accessed simply by shattering
some glass. Even cars with true trunks aren’t completely safe,
however. Many cars have a trunk-release lever within the cabin
that will give thieves access to the trunk once they’ve shattered some
glass to access the cabin. On some cars you can lock the trunk
separately, so that the in-cabin trunk release will no longer function,
and this is obviously useful (as long as you don’t forget to lock the
trunk separately). Also, on many cars today you can access the
trunk from within the cabin by collapsing the rear seats; this
obviously reduces the security of your trunk.
Keep in mind that any gear that isn’t stolen from
your car may still be damaged by heat in the summer months.
Trunks tend to stay cooler than a windowed cabin, but can still become
extremely hot in the summer. Be sure also to adequately pad any
gear that you’re storing in the trunk, since things tend to shift
around while you’re driving. Whenever feasible, it may be safer
to carry back-up lenses on your person, though these are obviously not
immune to accidental damage as you move about the shoot site.
Walking through a dense forest with extra lenses hung from every
extremity can be frustrating in the extreme, as branches probe delicate
surfaces of expensive pieces of equipment. For tripod-mounted
rigs, be careful when walking through forest settings that the legs
don’t catch on any branches and jar the lens from its balanced perch on
your shoulder. And once you’ve reached the destination of your
hike and your lens is safely supported by its tripod, be careful not to
stray more than a few feet from the rig, in case anything—whether wind
or an energetic child or dog—chances to push the structure past its
tipping point.
Finally, in the
case of inclement weather, we’ve already noted the use of garbage bags
for protecting large lenses from rain during the hasty walk back toward
the car. Ziplock sandwich bags (of any brand) are also extremely
useful for protecting the smaller pieces of equipment such as
teleconverters, extra flash units, and memory cards, not to mention
cell phones and even wallets and passports.
8.8.9
Field Techniques
Though we’ve already covered general field techniques in Chapter 8,
there are a few suggestions that bear repeating in the context of the
remote photo shoot. First, if you’re a fan of baiting birds with
food (whether traditional birdseed for songbirds or the meatier variety
for carnivores such as herons, egrets, and terns), then you’ll want to
plan ahead by finding out where you can obtain your bait and when the
shop opens for the day. Since many bait shops open rather late in
the morning, you may want to stock up the night before. This will
of course require a means of overnight storage, which might be a
problem if your hotel room doesn’t feature a refrigerator. A
large cooler and a bag of ice may suffice, however. As always, be
sure to obey any local or federal laws governing the feeding of birds
at your shoot site. I’ve only used seafood to bait carnivorous
birds twice, and it was only moderately effective both times, but other
photographers swear by this method and insist it’s no different from
putting a seed feeder and birdbath in your yard at home.
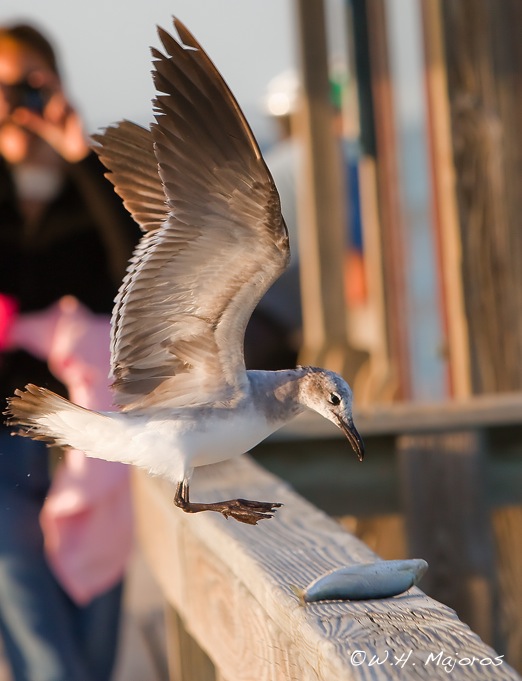
Fig. 8.8.9: If
you plan to use bait in the field, you’ll need to figure
out where and when you can buy it, and how you’ll thaw it out and/or
keep it fresh over night. And find out if it’s even permitted!
Once you’ve got a bird to shoot (whether you brought
it in with bait, with recorded song, or with your natural good looks),
there are a number of things to keep in mind. First, always
respect the bird. No matter how important it may be to you to
obtain the perfect photo of the bird, it’s incomparably more important
to the bird that he or she not be harassed or unduly
inconvenienced. Remember that at prime birding sites the birds
will often be exposed to tens or even hundreds of viewers each day—you
are only one of many. If every photographer who encounters this
bird harasses it with pre-recorded songs or even just pishing, the bird may decide to
find a more private place to forage, leaving you (and the other
photographers there that day) with one fewer photographic
subject. And if the bird has no other place to forage, the
accumulated effects of so much intrusive human contact may result in
undue stress on the individual. That is to be avoided at all cost.
Second, once you’ve found a good bird in a good
setting, to the extent that you’re not harassing the bird in any way
it’s often a good idea to work the same subject for as long as it
allows you to do so. Unless the site offers nearly unlimited
numbers of accessible subjects, it’s often most productive to keep
working a subject once you’ve got your exposure fine-tuned for the
subject and its background. Though you may be delighted at the
first few images you see on your camera’s LCD, you may be glad later
that you continued to take additional photos of the same bird, either
because the first few images ended up not looking quite as impressive
when viewed on the computer, or because the bird ended up providing
some even better poses later in the session. I like to invoke
what I call the bird-in-the-hand
principle: once I’ve got a subject that I’m successfully working, it’s
usually better to continue working this subject than to move on and try
to find another subject. As with any rule of thumb, this can
sometimes backfire, but as a general strategy I’ve found it to be
highly useful.
Finally, when on a serious birding trip (i.e., one
involving a nontrivial expenditure of money or time), it’s highly
advisable to be very careful about protecting your images and making
backups of them as soon as possible. For example, to make sure
that I don’t accidentally overwrite a card I’ve already filled, I
observe a strict discipline regarding the placement of cards in my vest
pockets: empties are always stored in my left front pocket, and full
cards in my right front pocket. I also make sure to keep all full
cards stored in a ziplock bag, in case of rain. On remote shoots
I also make sure to always download all my cards every evening, and to
back up all files onto three different drives once a day.
8.8.10
A Trip Checklist
If you’re at all like me, you never embark on any serious endeavor
without an exhaustive checklist. The sample checklist below may
help you by serving as a starting point in itemizing a list for your
next birding trip:
- sunscreen
- insect repellent
- extra memory cards
- redundant card readers
- laptop and hard drives
- photo vest
- business cards
- ziplock bags (both freezer size
and sandwich size)
- power strip (Sentry Powersquid or
similar)
- AA batteries and chargers
- bucket or cooler for thawing out
frozen bait
- caffeine (soda or coffee thermos)
- backup cameras and lenses (older
models you’ve
upgraded from)
- flash units and flash extenders
(beamers)
- duct tape
- mini bungee cords
- umbrella
- cheap, flexible clothes
- bag/backpack for carrying
extra equipment in the field
- padded case and anti-static bags
for hard drives
- laundry detergent
- extra camera straps
- lens cleaning materials (blower,
brush,
fluid, microfiber cloth)
- first aid supplies
- field guides
- hip waders
- knee pads
- wide-brimmed hat
Obviously, you’ll want to expand this list based
on your personal needs and the dictates of the site.
8.8.11
Mitigating Expenses
Birding trips don’t have to be astronomically expensive. There
are a number of things you can do to reduce the costs of your next
trip. First, if feasible, consider driving instead of
flying. The advantage of driving is that you can take as much
equipment as will fit in your vehicle, and you don’t have to rent a car
when you get to your destination. The disadvantages are the time
it takes to drive there, the implicit cost of additional mileage on
your personal vehicle, and the risk involved in driving long distances
(i.e., due to the potential for traffic accidents, which may involve
damage to your equipment or even personal injury to yourself or others).
Second, consider staying in the cheapest
hotels/motels. If the primary purpose of your trip is to
photograph birds, then you’ll be using the hotel room primarily as just
a place to sleep. When I go on birding trips, the only thing I
make sure of is that the hotel accepts dogs. Otherwise, I view my
hotel room as nothing more than a bed and an electrical outlet (for my
laptop and battery chargers).
Finally, consider taking a large cooler along and
buying food at the local grocery store rather than eating all of your
meals in restaraunts. The cost of eating out can add up to a
considerable amount over a week or two, and of course eating out takes
time (unless you’re into fast food). Making your own sandwiches
and/or salads can also be more healthy in some cases than eating at the
local fast food joints. If your hotel room has a fridge and a
microwave, eating cheaper and healthier becomes a bit easier.
8.8.12
Clothing
There are a number of important considerations regarding how you dress
in the field, especially for extended shoots in a remote
location. First is the issue of water. In many environments
clothes have ample opportunity for becoming wet in the field, whether
by rain or by immersion in lakes or rivers. Not only will you
want to wear clothes that you don’t mind getting wet, but you’ll want
to take along enough clothing to allow a dry change of clothes each
day, if necessary. Even if your hotel provides laundry services,
consider whether you’ll have time to do laundry during your trip, or
whether you have room in your car to bring enough fresh changes of
clothing for the entire trip. Also, if you wade or kneel in
water, make sure that any pockets that might be even partially
submerged don’t contain anything sensitive to water (like memory cards,
your cell phone, or even your passport for international trips).
As mentioned previously, it’s a good idea to make liberal use of
ziplock plastic bags to protect all of your water-sensitive belongings,
especially those you’ll be keeping on your person.
The sun is another important hazard that you need to
consider. If you get easily sunburned, you already know the
importance of wearing a wide-brimmed hat on sunny days (and even on
slightly cloudy days). The problem that many photographers have
is that their on-shoe flash unit is positioned in the way of their
hat’s brim, so that every time they put their eye up to the viewfinder,
their hat pushes against the flash unit. Many photographers solve
this problem by wearing baseball hats that can be quickly reversed (so
that the brim points backward instead of foreward) when switching
between hiking and actually using the camera. I personally like
to wear an Indiana-Jones-type
hat in the field, to provide visual protection from sun glare even from
the sides, so this solution doesn’t work for me. Instead, I wear
a hat with a loose under-chin strap, so that when I start shooting I
can simply flip my hat over my back and the strap will keep it
accessible for when I need it. The downside is that the strap
sometimes tightens around my neck when I swing my rig over my shoulder,
and this is obviously uncomfortable. An alternative is to use a
wide-brimmed hat having a brim that can be flipped up by hand when you
need to use the viewfinder.
An important aspect of any photographic clothing is
the presence of pockets—especially pockets that are large and
numerous. I always wear a photographer’s vest that has many
pockets in front, plus several in back and a few inside. These
are useful for storing teleconverters, extension tubes, memory cards
(both fresh and used—in different pockets, of course), lens-cleaning
supplies, large trash bags (in case of rain), air blowers, a lens
brush, my wallet, and my cell phone. Anything water-sensitive
should go in a ziplock bag before being put into any pocket. It
may also be wise to put the more water-sensitive items in higher
pockets if you think you might end up doing any wading.

Fig. 8.8.10:
Wise choices for field clothing are important. This image of
the author shooting birds in Florida illustrates several points.
A vest
with many pockets is highly desirable. Knee-pads can be very
useful as
well. A belt that can be used to hang lens cases from may be
valuable.
Long-sleeved shirts and full-length pants provide protection from the
sun
and abrasive vegetation.
(Many thanks to Brian and Judy Hermann for the photo!)
Obviously, clothing that you wear in the field can
get dirty. In certain environments—such as in wetlands or coastal
habitats—it may be wise to specifically plan on getting very dirty. For waterbirds
and shorebirds it’s often best to lie on your belly with your camera,
so that you can get eye-level shots of the birds with maximally blurred
backgrounds. So if you think that wearing your favorite safari
outfit in the field might make you pause when faced with the prospect
of lying in thick, black mud in order to get a good angle, then you may
want to opt for something less fashionable when you dress in the
morning.
Finally, keep in mind that photography can be
physically taxing, and that clothes that are loose and flexible may
better promote all-day comfort than clothes that are tight and
restrictive. I typically wear sweatpants (with pockets), hiking
boots, a loose T-shirt, and a cheap dress shirt over top (to protect my
arms from sun, abrasive foliage, and biting insects, and to ward
against the wind and drops in temperature at dusk). The sweapants
are a godsend for when I need to contort my body into unpleasant
postures in order to very rapidly get a good angle on a bird.
Wearing sweats in extremely hot temperatures can be unpleasant, though
if they’re loose enough, the coating of sweat that you form underneath
can actually help to keep you relatively cool. If you opt to wear
shorts, then I strongly encourage wearing knee pads in case you need to
kneel on any hard surface. Even with full-length pants, the
knee-pads are still extremely useful. I bought my knee pads in
the gardening department at Wal-Mart.
8.8.13
Other Issues
There are just a few other miscellaneous issues that you might want to
consider when planning for your trip. First, if your destination
is a zoo or other privately owned property, you should definitely
research beforehand whether the owners permit photography and whether
they place any legal limitations on your use of photos taken on their
premises. Many commercial sites, such as the San Diego Zoo and Seaworld, stipulate that any photos
you take within their parks cannot be used for commercial
purposes. This would presumably apply to photos you intend to
publish in birding magazines or to sell as prints.
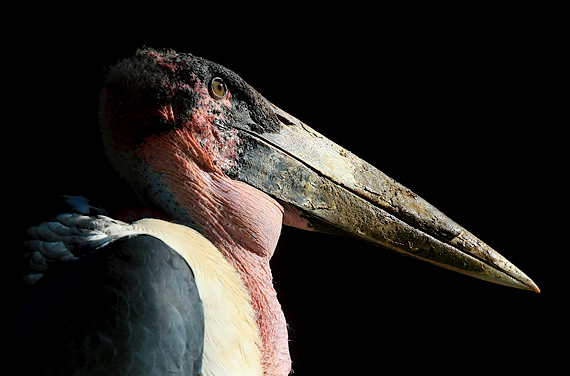
Fig. 8.8.11:
One of my favorite early photos. Unfortunately,
because it was taken in a high-profile zoo, my ability to publish it
in various venues is limited by the zoo’s restrictive photo policy.
Finally, whenever I leave for a long birding trip I
always try to ensure that I do two things. First, I try to make
sure that I do whatever it takes to get at least a few novel photos
that I couldn’t have (and haven’t previously) gotten anywhere else,
without inconveniencing the animals or other visitors (and without
breaking any laws or park rules). This is often useful for me to
contemplate in the early mornings when I’m still feeling sleepy and
lazy, and when a bit of extra motivation may be necessary before
dropping myself onto an open mud flat, or before wading through a
smelly pool of stagnant water.
Second, I always try to remind myself that the other
goal of bird photography in the field—beyond that of getting some great
photos—is to enjoy
myself. Whether you get a great photo or not, try to always enjoy
the moment: spending time in the company of wild birds is an experience
to be cherished. Remember that above all else.
|