|
2.7 Bells and
Whistles
While image quality and
autofocus capabilities largely determine the desirability of a given
camera model for bird photography, there are a number of other features
that are also desirable, though not all of equal importance. In
this section we will consider many of these other features and explain
how
they might affect your ability to capture pleasing images of birds.
2.7.1 Drive
Speed and Buffer Size
For capturing sharp images of
birds in action—i.e., flying, fighting, hunting, mating, running,
etc.—a fast drive speed can
be very, very useful. This is the frames per second or “fps” rating
that you’ll see in the camera’s specs on the manufacturer’s web
site. When the camera is in continuous
drive mode, holding down the shutter-release button causes the
camera to take a series of photos in rapid succession. Precisely how rapid is dictated by the
camera’s maximum drive speed, or burst
rate. Most consumer-grade and pro-sumer models these days
offer 3 to 5 frames per second (fps), while pro bodies are typically in
the 8 to 10 fps range.
Shooting action scenes by holding down the button in
continuous drive mode is sometimes called spray-and-pray—in analogy to a
gunman spraying bullets at the enemy and praying that at least some of
the bullets strike their target. (In fact, it’s often remarked
that Canon’s current pro model, the 1D Mark III, sounds like a machine
gun when
it’s operated at 10 fps in spray-and-pray mode). By following a
bird in flight while continuously shooting (with the autofocus engaged
throughout), the hope is that at least one of the resulting images
will, by sheer luck, capture the bird in an ideal pose—e.g., with the
wings well separated from the body, the bird’s eye visible, the head
pointed more-or-less toward the camera, no distracting shadows covering
large portions of the bird’s body, etc.
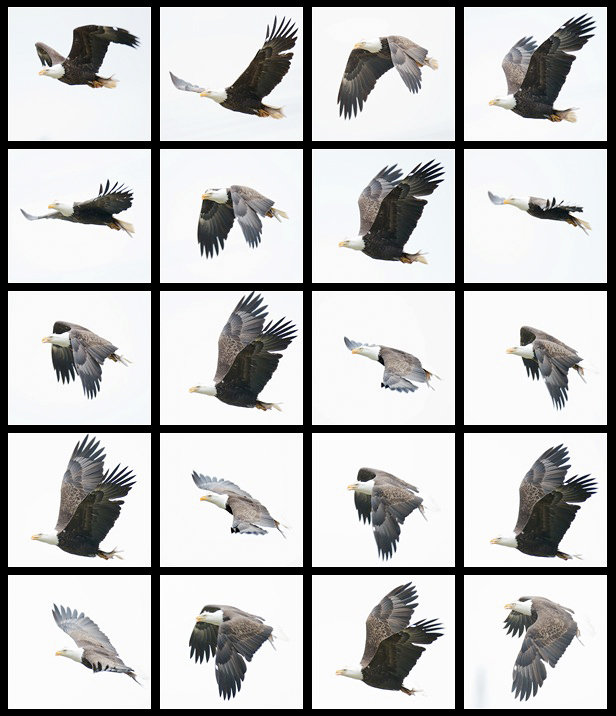
Fig. 2.7.1: A
series of eagle photos taken at a high frame rate.
Many consumer and pro-sumer cameras would not be able
to take this many RAW images in rapid succession before filling
up the buffer, resulting in lost shots. Thus, buffer size can be
as
important as the frame rate.
For intense action scenes, getting the “ideal” shot
by sniping—i.e., taking one
shot at a time by deliberately pushing the shutter-release button once
for each shot—can require either super-human hand-eye coordination,
extraordinary luck, or both. By employing the spray-and-pray
technique, you can substantially increase your luck by giving yourself
more chances to get the shot right, and also compensate for a lack of
fast-paced timing skills. Or at least, that’s the theory.
In practice, much is required of both the camera and
its user in order to make spray-and-pray
work effectively.
Obviously, the camera’s autofocus system needs to be fast and accurate
enough to keep the bird in perfect focus throughout its entire
flight. For birds flying directly toward the camera, this can be
especially
difficult, since the lens’ focusing element needs to move
very quickly to keep the
bird in focus. In spray-and-pray mode, this task is made
significantly more difficult for the camera, because during every shot
the main mirror is raised during the exposure, thereby blinding the AF
system during the shot. When the mirror is again lowered after
the shot, the AF system has to quickly re-aquire the subject and resume
tracking in time for the next shot. When shooting at 10 frames
per second, the camera has less than a tenth of a second to re-aquire
the subject and establish accurate focus tracking before the next
shot. If it fails to re-aquire the subject, the next shot will
obviously be out-of-focus (OOF), and once that happens, it can be
extremely difficult for the AF system to get back on track, so most or
all of the subsequent shots will probably be out-of-focus as
well.
In controlled tests by sports photographers using “fast” (f/2.8)
lenses and
large subjects (humans) running toward them, even modern pro bodies
rarely get 100% of the shots in focus at 10 fps. For bodies with
lower frame rates, the camera should have more time to re-establish
focus tracking after each shot, so that the keeper rate (percentage of in-focus
images within each series) may be higher, though for non-pro bodies the
use of a less sophisticated AF system in these bodies may negate any
such advantage. Some pro bodies do allow the fps to be reduced via a custom
function in the camera’s menu.
A fair amount of skill is still required on the part
of the user even when using the spray-and-pray technique.
Obviously, you need to keep the bird in frame during the entire
flight. This can be more difficult than many beginners realize
(techniques for tracking birds in flight are discussed in Chapter
8). Just as with the AF system, the raising of the mirror
during exposure creates some difficulty by blackening out the
viewfinder at regular intervals. If the AF system does lose focus
due to the operation of the mirror (or for any other reason), keeping
the bird in frame can become extremely difficult or even impossible,
since the bird may become so out-of-focus that it’s no longer visible
through the viewfinder (even if the camera is still pointed directly at
it).
Depending on which AF points you’ve enabled, and on
the size of the bird and its distance from the camera, it may not be
enough just to keep the bird in-frame. For single-AF-point
focusing, you’ll need to ensure that the selected AF point remains
positioned on the bird in the viewfinder at all times; if the AF point
drifts off of the bird, depending on the sophistication of the camera’s
AF system (and on any special settings you’ve registered in the
camera—see section 2.6.3), the camera may
quickly re-focus onto some
other object in the background, and after that it may be very difficult
for you to force the camera to re-aquire focus on the bird. For
this reason, many shooters enable all
AF points when tracking birds in
flight, so that the AF system can keep tracking the bird even if it
drifts from one AF point to another in the viewfinder.
Having a fast drive speed isn’t very useful if the
camera doesn’t also have a large buffer.
Recall that the writing of images to the memory card tends to be slower
than the actual image capture process, so that the camera needs to have
a special memory buffer to keep images that haven’t yet been written to
the card, while newer images are in the process of being captured by
the imaging sensor. For long sequences of spray-and-pray
shooting, that buffer will eventually fill up and then shooting will
become impossible, forcing you to wait until some of the images in the
buffer have been fully transferred to the memory card. During
this
time, you may very well be losing opportunities for potentially great
shots. For this reason, it’s good to have either a very fast
memory card, or a camera with a very large buffer (or both).
Many DLSRs today have buffer capacities of 10 to 20
RAW images; pro bodies usually have larger buffers, with capacities
around 30 RAW images. Although I strongly recommend shooting only
in RAW mode, if you shoot JPEGs instead of RAW images you can
typically fit many more images in your buffer. As an example, the
Canon 50D, a 15-Megapixel pro-sumer DSLR,
can shoot a continuous
sequence of up to 16 RAW images or 60 JPEG images with standard memory
cards. In contrast, Canon’s newest consumer-grade DSLR (the T1i)
can shoot 9 RAW or 170 JPEGs, while Canon’s current pro body (the 1D Mark III)
can shoot 30 RAW or 110 JPEGs under ideal conditions. Note that
certain settings in the camera can cause the buffer size to be
effectively reduced. Common settings that typically reduce buffer
sizes are noise reduction
processing, the use of high ISO settings, and
so-called highlight tone priority,
or HTP (a feature in some
Canon DSLRs that reduces the incidence of clipped
highlights—see section 2.7.10, below, for
a discussion of
HTP). When
examining the buffer size of a prospective camera body, be sure to find
out how severely the buffer is affected by any special menu settings
you’re likely to use (especially higher ISO's).
2.7.2 A/D
Converter Bit Depth
Since this is a book about digital bird photography, a brief
discussion of digital representation of image data will, unfortunately,
be necessary. (We’ll try to keep this as painless as
possible.)
The smallest piece of digital information is the bit, or binary digit. A bit can be
either 0 or 1. We can string these values (0’s and 1’s) together
into longer binary numbers, like 10111, in which case each successive
bit, from right to left, is worth twice as much as the previous
bit. Thus, in 10111 the rightmost bit is worth 1, the bit to its
left is worth 2, the next bit is worth 4, the next bit is worth 8, and
the far left bit is worth 16. In this case, the fourth digit
(which would have been worth 8 if it had been a 1) is a 0 bit, so we
don’t count that. Thus, 10111 in binary equals 1+2+4+16 = 23 in decimal. Had
the number instead been 11111, the value would have
been 1+2+4+8+16 = 31. That’s the largest number we can represent
in five bits. If we want to represent larger numbers, we’ll have
to use more bits.
It turns out that the largest number that can be
represented in N bits is 2N-1. So, counting
zero as a valid number, the number of numbers (!) that can be
represented by an N-bit
number is 2N. Since we’re interested in
understanding how binary numbers represent colors and images, we’ll
belabor the point just a bit with a pertinent analogy. If we
assign a
particular hue (color) to each binary number, then with N bits we can represent (or address) at most 2N different colors. In other
words, if every pixel in an image is represented by an N-bit binary number, then the gamut—or maximum range of colors
that can appear in that image—has a “width” of 2N. If you remember the
earliest personal computers with color monitors, many of those had
8-bit color, so that only 256 (=28) different colors were
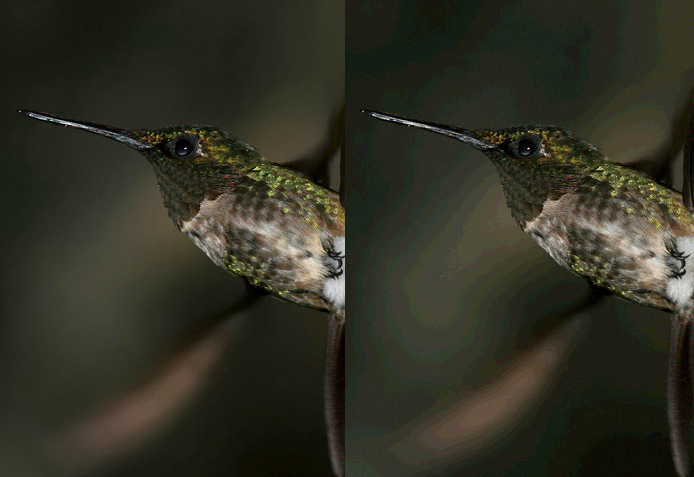
available for graphics. In Figure 2.7.2 (below) we show the
difference between a 24-bit image and an 8-bit image, just to crudely
illustrate the importance of bit
depth.
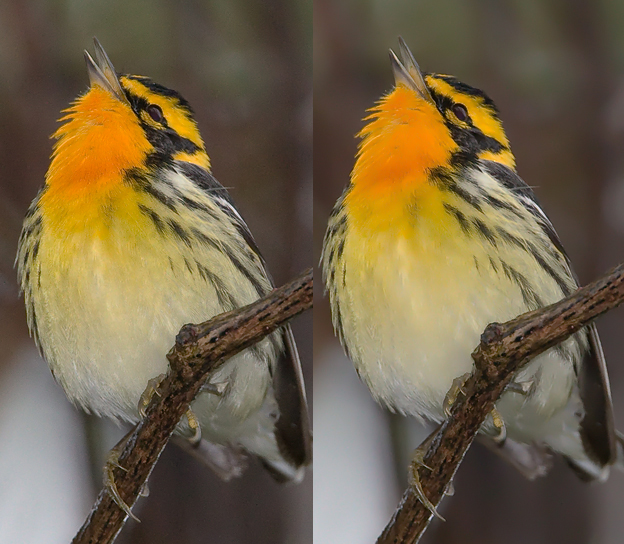
Fig. 2.7.2: The
effect of bit depth. Left: a 24-bit JPEG image (8 bits per
channel, or roughly
16 million colors total). Right: the same photo as an 8-bit JPEG
image (256 colors total).
Notice that the background is no longer as smooth, due to increased
banding (posterization)
resulting from the reduction in the number of hues available for making
smooth
gradients.
As you can see, the photo on the right shows distracting bands of
homogenous color in the background, whereas the background in the
original JPEG image (left) consists of fairly smooth color
gradients. Even in the JPEG image you can see (if you look
closely enough) slight posterization
(banding) in the background, due to the fact that the JPEG image
allocates only 8 bits per channel (i.e., 8 bits for the red channel, 8
bits for the green channel,
and 8 bits for the blue
channel); the
original 36-bit RAW image (12 bits per channel) exhibited even smoother
gradations, which were lost upon convertion to JPEG, due to a
combination of reduced bit depth and lossy
compression (see section 5.4.4).
In this example, the
8-bit
image is utilizing an indexed
color space, which was optimized by Photoshop so as to
retain the maximal amount of image detail; a more uniform 256-hue color
space would surely result in a far worse-looking image than that shown
above.
The example above was intended only to crudely
illustrate
the effect of bit depth on
image quality. While larger Megapixel ratings aren’t always good
for image quality (due to the increased potential for noise from
smaller or more densely-packed photosites), larger bit depths typically
are better.
More bits means more colors—colors that can be used to encode more
(sometimes subtle) subject detail, especially in less well-lit areas of
the bird. Of course, more bits per pixel also results in larger
file sizes for your images, though as memory cards and hard drives
continue to get larger and cheaper, file size is arguably an irrelevant
issue. As some would say, hard drives are cheap, but
photographic moments are priceless.
In terms of choosing a camera, the issue of bit
depth comes into play when considering the analog-to-digital (A/D) converter used by
a camera’s electronics when encoding image
information from the sensor. Recall that photons striking the
silicon matrix of the sensor liberate electrons that then flow across
an electric field and into a capacitor for later measuring by the
imaging electronics. The quantity of electrons measured, which
should be directly proportional to the number of photons received by
the photosite, has to be converted into a digital quantity—a binary number—before a digital
image can be formed in the camera from the agglomeration of all the
pixel values. The number of bits making up these individual
binary numbers from the photosites is the bit depth of the A/D converter
which converts the electron count (an analog signal, as measured by
electrical current) into a digital quantity (a binary number).
The A/D converters used in today’s DLSRs are a mix
of 12-bit and 14-bit converters, with the newer 14-bit units rapidly
replacing the older 12-bit ones. (That’s 12 or 14 bits per channel, mind you). There
are even whispers now of 16-bit A/D converters possibly being
introduced in the near future; keep in mind that most of today’s pro Photoshop work is done in 16-bit
mode (in software), so that even 14-bit cameras aren’t fully utilizing
the color space(s) available in the postprocessing software.
(Unfortunately, this is due primarily to limits on dynamic range imposed by today’s
imaging sensor technologies, rather than being simply an arbitrary
limitation imposed by the A/D converter—dynamic
range is discussed in section 6.9).
Now, in Figure 2.7.2 we showed that there is a stark
difference between 8-bit and 24-bit images. The important
question then is: how much of a difference is there between a 36-bit
(12-bits per channel) image and a 42-bit (14-bits per channel)
image? The consensus among armchair imaging “experts” on the
internet is that the difference is so negligible as to be virtually
imperceptible. At least one photographer has shown [Johnson,
2008],
however, that for underexposed images, the extra 2 bits provided by the
14-bit A/D converter can result in significantly more detail in shadow
areas than a comparable 12-bit converter. More generally, there
is (very plausible) speculation that the greater bit depth permits more
postprocessing to be performed on images (on average) before
posterization/banding becomes noticeable. Die-hard skeptics
insist, however, that 14-bit A/D is no more than a marketing ploy
designed to liberate you of your hard-earned cash. My own
experience has been that my 14-bit camera has noticeably better color
than my older, 12-bit body, though other differences in the imaging
sensors for these two bodies may very well explain much of the
difference without
invoking the issue of bit depths.
As a final note about bit depths, we’ll see in
section 6.2 that the number of bits used for
encoding each pixel
(actually, each photosite,
but we’ll gloss over that technical detail here) in the RAW file
produced by the camera depends on the pixel’s intensity value: brighter
pixels are allocated more bits than darker pixels, on average.
This means that lighter areas of an image will tend to show more
details than dark, shadowy areas. For properly exposed images
this is a reasonable strategy for maximizing the amount of encoded
detail in the areas of the image where it most matters, but for
underexposed images, it creates problems when you try to increase the
exposure later in postprocessing, because the dark areas will show
fewer details and have more noise. Having an overall greater bit
depth (e.g., 14-bit versus 12-bit) means that more bits can be
allocated across the entire spectrum, including (especially) the dark
end of the
spectrum, so that dark areas in underexposed images should retain more
detail. (See the reference at the bottom of this page for some
evidence that this is indeed what is seen in practice).
2.7.3 AF
Microadjust
As we noted in the previous
section, today’s autofocus systems are highly complex and require
precise calibration during manufacturing in order to work
properly. As many DSLR owners have discovered, this calibration
is not always performed properly at the factory before the product is
shipped. Furthermore, lenses and teleconverters also require
precise calibration, and can sometimes go out of calibration by being
bumped or dropped, or perhaps even through normal use over extended
periods of time.
In the past, re-calibration of cameras and lenses
could only be performed at the factory, so that photographers had to
send their equipment in to the manufacturer’s service center and wait a
week (or more) for the equipment to be returned. This service is
often not free (except during the warranty period) and is sometimes
done incorrectly, so that the equipment, upon being returned to the
owner, may actually be worse
than it was before being serviced (as has happened to me in the past).
Fortunately, many of today’s newest cameras provide
an AF microadjust feature,
which allows the owner to correct minor mis-calibration issues at
home.
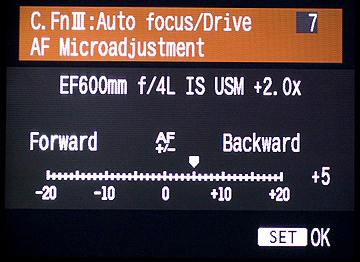
It is typically buried in the camera’s menu as a so-called custom function. As an
example, on Canon’s 1D Mark III camera, AF microadjust is accessed via custom function III-7
(see the figure below). When you select this menu option the
camera then allows you to dial in a “microadjustment” amount, from -20 to
+20.
Fig. 2.7.3: AF microadjust on the Canon 1D Mark III.
If the camera or lens has a calibration issue causing it to
consistently front-focus or back-focus, AF microadjust
can be used to compensate. This camera allows a
different setting to be used for each lens.
The value that you dial in is then used to adjust the camera’s
expectations about the separation distance for the twin images on the
AF sub-sensors during image
registration (see section 2.6.1
for a
description of image registration in phase-based
autofocus
systems). This results in the camera focusing slightly in front
of or behind (depending on whether you dialed in a positive or negative
number) where it normally would. Thus, if the camera or lens has
been consistently front-focusing, you can dial in a positive number to
force the camera to deliberately focus slightly backward from where it
normally would, to compensate for the front-focusing problem.
Similarly, if the camera or lens has been consistently back-focusing,
you can dial in a negative number to force the camera to focus slightly
forward from where it normally would.
The trick with AF microadjust is to figure out
exactly how much compensation
is required; in section 3.11 we discus
methods for doing this. For the purposes of choosing a camera for
bird photography, we highly recommend choosing a model that features AF
microadjust. Note however that AF microadjust addresses only one
type of autofocusing problem: consistent
front/back focusing. If
your camera sometimes front-focuses and sometimes back-focuses (not due
to user error, such as
incorrectly positioning the active AF point on a tree branch or the
background), then AF microadjust won’t help, and you’ll need to send in
the camera for repair by the manufacturer.
Note that on some cameras you can dial in a differet
AF microadjust setting for each lens, and even (in some cases) for each
lens/teleconverter
combination. Thus, in the figure above, you
can see that an adjustment of +5 has been set for my 600mm f/4 lens when it is
used with a 2x teleconverter, though when I use just the 600mm lens
without any teleconverter the microadjust setting is +0 (not shown in
the figure). These settings are stored in the camera, so you only
have to program them once. On Canon’s current camera models, the
camera
can’t distinguish between two different lenses of exactly the same type
(i.e., both 600mm f/4 Canon
lenses) or between two different
teleconverters (such as, for example, the defective 1.4x teleconverter
I used to have, versus its replacement). I haven’t yet found this
to be an impediment.
2.7.4
Histograms and Highlight
Alerts
One of the most important features
of a DSLR is its histogram
and associated functions such as highlight
alerts. We’ve already seen examples of histograms in
section 2.6.1. The exposure
histogram is a graph showing how many
pixels of each intensity value are present in the captured image.
Figure 2.7.4 shows some more examples of histograms, taken from the LCD
of a DSLR camera.
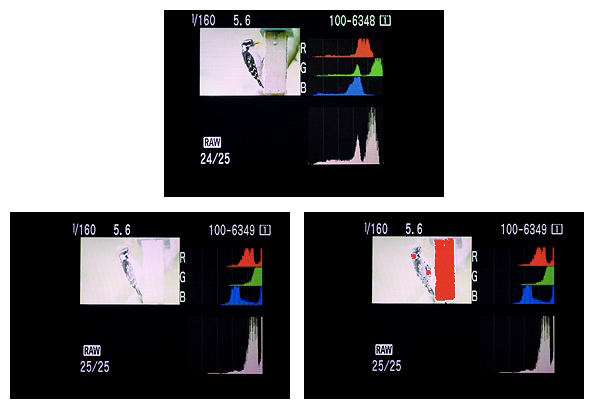
Fig. 2.7.4:
Histograms and highlight alerts. Top: the overall histogram
is not clipped, but the green channel is, slightly. Bottom left:
now all
channels are clipped. Bottom right: highlight alerts (blinking
red) show
the regions where detail is lost, due to clipped highlights.
In the first screenshot (top), you can see the image that has been
captured (a Downy Woodpecker, Picoides
pubescens) along with several histograms to the
right of the woodpecker image. The top three graphs (red, green,
and blue) are the per-channel histograms, while the white graph below
these is the overall histogram, which is just the sum of the individual
channels (red, green, blue). For the top woodpecker image, you
can see that the overall histogram has most of its mass toward the right end of the
x-axis (the horizontal axis). That means that
the image is very bright.
Indeed, looking at the actual woodpecker
image, it does appear to be a very bright image—perhaps too
bright (though that’s a matter of personal taste in
this particular case). The brightness can, of course, be reduced
later in
Photoshop, but it’s important to make sure that we’re not shooting so
bright that all the details in the brightest regions of the image are
lost. According to the overall histogram, we haven’t blown the
highlights, because the intensity curve in the histogram goes down to
zero before reaching the right edge of the little histogram
window. The histogram has two strong peaks, and neither of them
have been chopped off at either the left or right extreme. Now
look at the individual color channels. The red and blue channels
also look fine, but the green channel looks like it’s slightly clipped:
as the
green curve comes down from its peak, it suddenly comes to a vertical
cliff. Cliffs in histograms are to be avoided at all cost.
In this case we’ve only clipped one channel (green).
The next two screenshots (bottom) are for a
different image, which is obviously overexposed. You can see that
for this image all of the histograms, including the individual
channels,
are clipped, because the curves come to a vertical cliff at the right
edge of the histogram window. In the image on the right, you can
see that parts of the image are blinking
(rendered as solid red in the
figure) on the LCD display. This blinking is the highlight alert,
which tells you immediately that you’ve clipped the highlights and need
to turn down the exposure before taking any more shots of this
scene. I have my camera set up to show the image at full size (so
it takes up the entire LCD screen) with highlight alerts enabled, but
with the histograms not visible, because I try to shoot as bright as
possible without clipping the highlights. However, as shown in
the first screenshot (top), it is possible for the highlights to be
clipped in one channel (green in this case) without setting off the
highlight alerts. Just keep that in mind, if you decide to rely
on the highlight alerts alone, without viewing the individual
histograms.
So, what exactly are clipped highlights? If you
think of a white bird, when seen close up the bird may have lots of
details visible on it: feather shafts, scutes and scales on the legs or
in the sclerotic ring around
the eye, the outline of the pupil in the bird’s
eye, etc. But since it’s a white bird, if you overexpose the
image, all you’ll see is a big white blob the same shape as the bird,
with no detail within that field of white. The problem is that
subtle details in the white regions of the bird often consist,
visually, of slightly different shades of white. When the
exposure of the
image is increased beyond the clipping point, all of those different
shades of white get increased in brightness until they’re all just pure
white, with no differences between them. At that point,
all
of the subtle shading differences are
lost, and can’t be recovered even with the most potent Photoshop
magic. That’s why clipped highlights are to be avoided at all
costs—most especially when the clipping occurs in the bird itself
(rather than in the background portions of the scene).
Just about all DSLRs today provide a histogram
function, though not all provide a histogram for each of the three
color channels, and not all of them will show highlight alerts (i.e.,
blinking) when the image is shown at full size. Being able to
view highlight alerts on the full-sized image is very useful, because
it allows you to instantly check for both exposure problems and focus
problems in the shot you just took. Also note that the sensitivity of the
highlight detection function may differ between
cameras. I’ve found that on my Canon 1D Mark III, the highlight
alerts are slightly less sensitive than those in Photoshop’s RAW
converter, so that I may think (when I’m in the field) that a photo is
perfectly exposed, but then find when I get it onto the computer that
Photoshop’s highlight alerts are indicating some slight clipping.
However, in these cases I usually find that these “clipped” highlights
can be recovered during the RAW conversion process, so in fact my
camera’s highlight alerts appear to have just the right sensitivity for
helping me avoid irrecoverable clipping. Other cameras may have
higher or lower sensitivity in their highlight alerts, which could make
it harder to expose properly without clipping.
For bird photography, I find the histograms to be
relatively unimportant in the field. The problem is that the
histogram shown
on the camera’s LCD is for the entire
scene, whereas in challenging
lighting conditions I’m often forced to overexpose the background in
order to properly expose the bird. Thus, I often only care about
the highlight alerts that show up in the bird itself, and largely
ignore those in the background of the scene (especially since I
typically try to get the background to be as out-of-focus as possible,
so as to make the bird stand out more). Because different birds
at different distances will occupy different amounts of space in the
image, it’s simply impractical to use the histogram to judge the
exposure of the bird, since the histogram may be strongly affected by
the background
around the bird. The highlight alerts, on the other hand, give
instant notification of any overexposure affecting the bird
itself. The only problem with this is the possibility for
clipping in individual channels, which many cameras won’t show in their
highlight alerts. Hopefully, manufacturers will fix this
shortcoming in future bodies.
2.7.5
Weatherproofing
Most nature photography is, of
course, done outside. And outside things have the potential to
get wet. That’s not good for electronic devices, since water
conducts electricity and can therefore cause short-circuiting that can
fry electronic components. Pro-grade camera bodies have long been
known to better resist the damaging effects of rain and snow than
non-pro bodies, and that remains largely true today, despite claims by
some manufacturers that they have improved the weatherproofing on their
newer pro-sumer bodies.
Weather-proofing a camera consists of installing
rubber seals and gaskets around all openings and moving parts, such as
around the edges of the door to the battery compartment, or around
buttons and dials. These rubber gaskets keep out the stray water
droplets that may fall on the camera, but they have little or no
capacity (even on the pro bodies) to resist actual water pressure.
That means that they can withstand light rain, but if
you drop the unit into a lake or river, the water pressure will almost
certainly overcome the resistance of the sealings and cause water to
reach the innards of your camera/lens and cause damage.
Exactly how much damage can result from being
submerged in
water can depend on the depth of the water, how much of the unit was
submerged, whether the unit had any weather sealing at all, and whether
the power was turned on at the time. The following are some
anecdotal stories related to the issue of water damage. I once
had a cheap, 300mm zoom lens roll into a pond while I was shooting some
ducks with a different lens attached to my camera. Because no
camera was attached to the lens that rolled into the water, there was
no electricity, and hence no possibility
for frying of electrical circuits. The lens at first failed to
autofocus after I had dried off the outside of the lens and attached it
to my camera (a very foolish thing to do, by the way), but after a week
or so the insides had apparently dried off as well, and it then
continued to work fine, taking sharp images just as before. It’s
possible that over time it may eventually stop working due to rusting
of internal components. I have heard of birders dropping their
huge, 500mm or 600mm lenses into a lake and finding that even the
manufacturer was unable to repair them—a total loss. During a
recent trip to Florida, as I was photographing herons while lying on on
my belly on the beach, I accidentally let my 600mm lens and pro-model
camera flop over into about three inches of water. I quickly
retrieved the rig and dried it off, and it has continued to work just
fine ever since.
In terms
of precipitation, I’ve used my pro body in light rain with no problems,
and I’ve heard of people using them in a torrential downpour with no
problems, though I personally always use an umbrella for anything more
than a fine
mist or drizzle. Note that some manufacturers, like Canon, only
claim their pro bodies to be fully “weatherproof” (not waterproof) when
used with a pro lens, since the rubber gasket protecting the lens mount
is located on the lens rather than the camera (in the case of Canon's
pro lenses).
2.7.6
Viewfinder Features
In addition to the AF points and
the framed scene you’re photographing, most DLSRs also display some
digital information within the viewfinder, which can be useful during
intense shooting, for rapid adjustment of camera settings without
having to take your eye away from the viewfinder. For novices,
this isn’t as much of a concern as for more advanced bird
photographers, but it is worth noting that some cameras provide more
information in the viewfinder than others. Being able to see the
ISO, shutter speed, and aperture all in the viewfinder, all at the same
time, is definitely
very helpful. Also useful are the exposure meter and exposure
compensation setting, which are illustrated in Figure 2.7.5 and
discussed in Chapter 6. Other information, such as whether
you’re shooting in RAW vs. JPEG, or whether the external flash unit is
turned on, can very rarely be useful for tipping you off that you’ve
somehow messed up some major setting on your camera, but these are in
my opinion not essential.
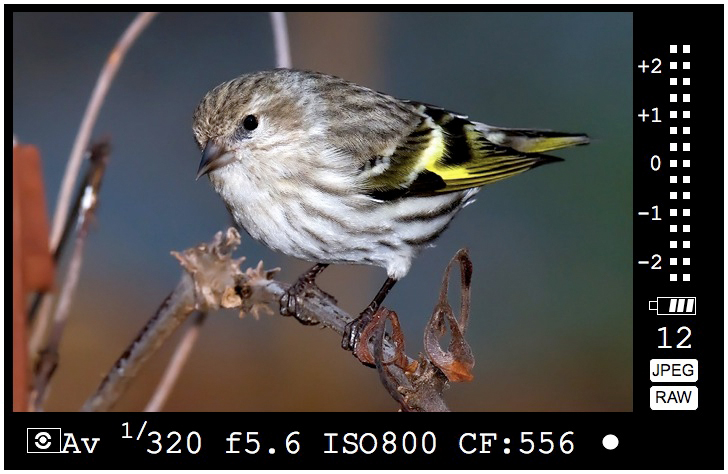
Fig.
2.7.5: A typical DSLR viewfinder. Bottom (left-to-right): metering
mode, exposure mode (Av), shutter speed (1/320 sec), aperture (f/5.6),
ISO (800), shots remaining (556), focus confirmation circle.
Right (top-
to-bottom): meter / exposure compensation, battery, buffer, JPEG/RAW.
Another potential difference
between viewfinders is the fraction of the
image frame that is actually visible. In most pro-sumer bodies,
the image that you see through the viewfinder is only a
portion—perhaps 80% or so—of the image that will be captured by the
camera’s sensor. This is more of a concern for landscape
photographers than bird photographers, since in most situations the
bird only takes up a small portion of the image frame.
2.7.7 Memory
Cards
Photos obviously need to be
written onto some type of removable media in order for you to most
conveniently get the photos out of the camera, and to make room for
more images after you’ve filled up the current “roll”. Although a
number of different types of memory card are in use today, most DSLRs
use either Compact Flash (CF)
or Secure Digital (SD).
Some even
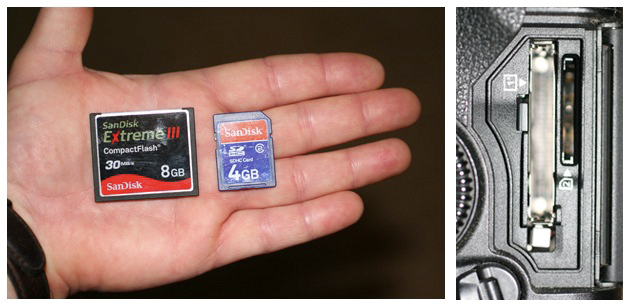
use both. In Figure 2.7.6 (below) you can see that the CF cards
(left) are much larger than the SD cards (right). At the far
right, you can see the
card slots on the Canon 1D Mark III camera, which supports both CF and
SD.
Fig.
2.7.6: The two most popular types of memory card for
DSLRs: Compact flash (left card and left slot) and
Secure Digital (right card and right slot).
In
this particular camera model you can use either memory card or both
simultaneously. The camera can be configured to first write all
images
to the one card and then to switch to the other card when the first
card is full (“switchover” mode). Or it can be
configured to write all images to both
cards simultaneously, so that one card acts as a backup for the
other.
Or you can even set it up to write RAW images to one card and JPEG’s to
the other. Non-pro bodies typically don’t offer so many options,
and
in fact most don’t have dual card slots like the pro bodies. Dual
slots definitely offer greater flexibility, as well as increased memory
capacity (when used in the “switchover” mode described above).
There is little agreement among users, however, on whether it’s best to
have a dual
configuration with two different
types of cards (i.e., CF and SD) or to
have a dual configuration featuring two of the same type of card.
In terms of CF versus SD, there is little agreement
among users as to which is fundamentally better. I like CF
because it seems more durable to me than the “flimsy” SD cards, though
I like the mechanical write-protect switch that most SD cards
have. While some CF cards are faster than some SD cards (in terms
of how fast the camera can write images onto the card, thereby clearing
the buffer to accept more shots), there are also some SD cards that are
faster than some CF cards. More expensive cards of either type
are typically (though not always) faster than cheaper cards of the same
type, though some cards rely on special data transfer protocols, such
as UDMA, for their speed, and
not all cameras can take advantage of that speed, either because the
camera doesn’t support the required protocol, or because the camera’s
processor is slower than the card’s write speed. Due to the
variety of different CF and SD cards available (i.e., different
capacities and different high-speed protocols), it’s best to find out
for certain which capacities and transfer protocols are supported by
your camera before buying an expensive card, and likewise it’s worth
looking into these issues when choosing a camera model.
2.7.8 Built-in
Flash
Most consumer and pro-sumer camera
models have a built-in flash, while also accepting an optional external
flash unit. For bird photography I’ve virtually never used the
built-in flash on my Canon 30D’s and 40D’s, due to their lack of power,
and indeed, Canon’s pro bodies don’t even have a built-in flash.
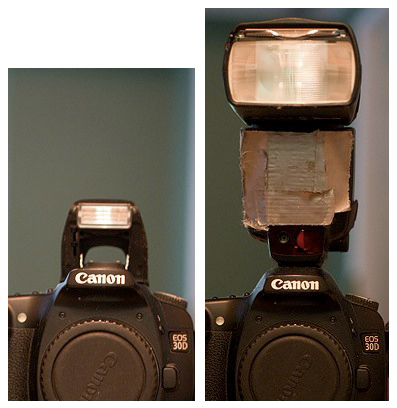
In Figure 2.7.7 you can see the difference between the built-in flash
unit on the 30D and the external Speedlight 580EX II flash unit
attached to the same camera.
Fig.
2.7.7: Built-in flash (left) versus external flash (right).
The external flash is much larger
and bulkier, but it provides much more power, and I consider it
essential for most forms of bird photography (except for birds further
away than about 200 feet). As we’ll discuss in section 4.3.2,
even these
external flash units don’t provide enough flash power in many
situations, necessitating the use of a fresnel flash extender to
magnify the light from the flash.
2.7.9 Flash
Sync Speed
Although we won’t be discussing
the details of how flash works until Chapter 7, it may be important
when shopping for a birding camera to take into consideration a
prospective camera’s flash sync speed,
or maximum sync speed.
This is the fastest shutter speed that the camera can use when the
flash unit is enabled (unless high-speed
sync is being used—we’ll discuss high-speed sync in section 7.3). Most cameras have a
maximum sync speed of 1/200 sec to
1/300 sec. Obviously, since birds tend to move fast, the faster
shutter speeds are generally better for freezing motion.
Unfortunately, even 1/300 sec is typically too slow for shooting birds
in flight, and for this reason I either use high-speed sync, which gets
around the maximum sync speed limitation of the camera but
unfortunately reduces
flash power, or I turn off the flash altogether when shooting very fast
motion. (One exception to the latter rule is when shooting hummingbirds, in
which case a slow shutter speed with a fast flash and
a dark background can tyipcally freeze the bird better than even
shutter speeds of 1/1000 sec or 1/4000 sec or more—hummingbird
photography is discussed in section 7.6).
Thus, while a max sync
speed of 1/300 sec is preferable to 1/200 sec, in my opinion this isn’t
the most important aspect to look at when choosing a camera.
2.7.10
In-camera Processing
In their never-ending quest to
increase sales and beat the competition, camera manufacturers have
begun adding various image-processing capabilities to their
cameras. In my opinion, these are largely useless for serious
bird photography, and I never use any of them. However, if you
don’t have time to postprocess your images on the computer, you might
possibly benefit from some in-camera processing. Just don’t
expect the automatic in-camera processing to come anywhere near to what
can be done
manually in Photoshop.
The most tempting of the in-camera processing
options I’ve seen, for bird photography, are noise reduction, highlight
tone priority, and red-eye
removal. I’ve never tried red-eye
removal in-camera, though I doubt it works well, with any consistency,
for birds. The noise reduction
option is potentially useful if you’re shooting at high ISO settings,
though as discussed in section 2.5, aggressive
noise reduction is
likely to remove some detail when it reduces the noise. Some of
the more recent models allow you to specify different levels of “aggressiveness” for the noise reduction
function.
Fig.
2.7.8: In-camera noise reduction is a bad idea: it reduces noise
while also reducing detail. Left: before noise reduction.
Notice that
the subject has a lot of feather detail. Right: after noise
reduction.
Much of the feather detail has been obliterated. Instead of
reducing
noise in-camera, if you do it in Photoshop you can make sure noise
is removed from the background while details are retained in the
subject.
Finally,
Canon’s “highlight tone priority” (other manufacturers may offer a
similar function under a different name) is a “trick” whereby the
camera shoots at a lower ISO setting than the one you’ve requested, and
then increases the brightness post-capture to simulate the brightness
that you would have got with your requested ISO setting, but with an
added filter that detects blown highlights and tries to recover them
during the artificial brightening process. Another popular type
of in-camera processing is white
balance adjustment, which is targeted
largely at those who shoot indoors, in artificial light, though this
could conceivably be useful during early morning or late afternoon
shooting outdoors to reduce the yellow cast produced by low-angle
sunlight.
Just to reiterate, my recommendation is to turn off
all such in-camera image-processing functions, since the same
processing can be done later in Photoshop, where you’ll have far more
control over the final result. Also, some of these in-camera
processing functions reduce the camera’s frame-capture rate or
effective buffer size, so that for continuous
shooting (“spray-and-pray”)
of intense action scenes, enabling the in-camera processing can result
in missed shots as you wait for the buffer to clear.
2.7.11
Integrated Sensor Cleaning
One type of “noise” that we didn’t
talk about in earlier sections is the type that results from particles
of dirt that have become stuck to your imaging sensor. These
particles show up as large black spots in your image. In
the next section we’ll discuss methods for removing dirt from the sesor
using air or chemicals. Many of today’s DSLRs now incorporate a
mechanism which tries to remove the dirt automatically, so that you
don’t have to use the chemicals as often. These “integrated
sensor cleaning” functions generally work by
vibrating the imaging
sensor while electrically charging a dust collector inside the
mirror box. The vibrations in the sensor are intended to jar the
particles free, while the charged collector is intended to attract
those particles away from the sensor.
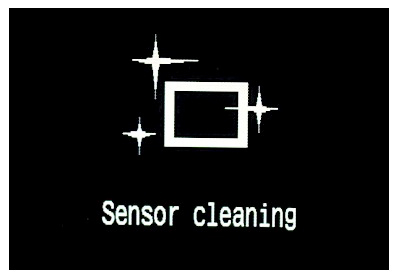
Fig.
2.7.9: Sensor-cleaning indicator screen on the Canon
40D. The automatic sensor cleaning is invoked every time
the camera is turned on or off.
Different
models appear to differ in their ability to remove sensor dust in this
way, and manual cleaning (i.e., using blown air or wiping with
chemicals) seems to still be necessary from time to time for the
current generation of DSLR’s. As manufacturers continue
to
innovate,
these automatic dust-removal systems may continue to improve. The
newest designs employ special materials in the manufacture of the
sensor’s protective screen (the anti-aliasing
filter—see section 11.3)
that reportedly attract less dust due to their reduced potential for
holding minute eletrical charges. Only time will tell how well
these
various attempts fare.
2.7.12
Plastic Versus Metal
Though it’s not one of the most
important issues when choosing a camera, the ruggedness of the external
body can be an issue if you shoot in sandy conditions, such as when
shooting shorebirds at eye-level—i.e., lying on your belly in the
sand. In these situations, sand abrasion can cause significant
damage to your camera. Whereas consumer and pro-sumer bodies are
typically made of plastic, the pro models are often made of metal,
which resists abrasion much better. I’ve also heard of plastic
camera bodies getting melted when sunlight inadvertently passes through
a fresnel flash extender and is focused to a point on the camera
body. I’ve actually seen this happen (sunlight getting focused to
a point on my camera by the flash extender) though since the camera I
was using had a metal exterior, no damage was done. However, my
flash unit, which is made of plastic, has sustained damage from focused
sunlight in this way.
2.7.13
Expanded ISO
Just like highlight tone priority,
expanded ISO is
another “software trick” used by the camera to simulate
ISO settings not natively supported by the camera’s imaging
circuitry. These expanded ISO settings are usually below 100 or
above 1600. In these cases, the camera uses a native ISO setting
close to the one you’ve requested, and then artificially increases or
decreases the brightness of the image, via in-camera software, to
simulate the expected exposure from the requested ISO. Recall,
however, that even “native” ISO amplification is itself
somewhat of a “trick” (as we described in section 2.5),
in that it involves the
boosting, via hardware circuitry, of the signal and any attendant
noise,
after the image has been captured by the actual photosites on the
sensor (i.e., it doesn’t actually change the sensitivity of silicon
atoms to light, despite popular belief). Thus, the artificial
nature of “expanded
ISO” is less of a concern than the
much bigger problem of high-ISO
noise that results from using extreme ISO settings like 6400 or
higher. I’ve yet to see a pleasing bird image taken at such
extreme ISO settings.
References for this page
Johnson, B. (2008) Are 14-bit Raw
Images Really Any Better Than 12-bit Raw? Earthbound
Light. [URL:
http://www.earthboundlight.com/phototips/nikon-d300-d3-14-bit-versus-12-bit.html]
|
|
|