|
12.5 Separation
of Subject
As has been noted numerous times
in this text, the ability to separate the subject from its background
before applying digital enhancements to an image is probably the most
powerful “darkroom” technique available to today’s
wildlife photographers. In Photoshop, this can be accomplished
very easily in many cases via the use of the Quick Selection tool. In
section 10.6 we outlined a number of
techniques for precisely selecting
the bird using the powerful tools provided by Photoshop. For some
bird photos, selecting the subject can still be quite difficult,
however, particularly if there are branches or leaves partially
occluding the bird; legs and beaks and tails often complicate matters a
bit as well, since they’re usually thinner and of a different color
than the rest of the bird. Nevertheless, even in difficult
situations it’s often worthwhile to put in the effort to separate the
bird from its background, so that the subject can be processed
separately from the rest of the scene.
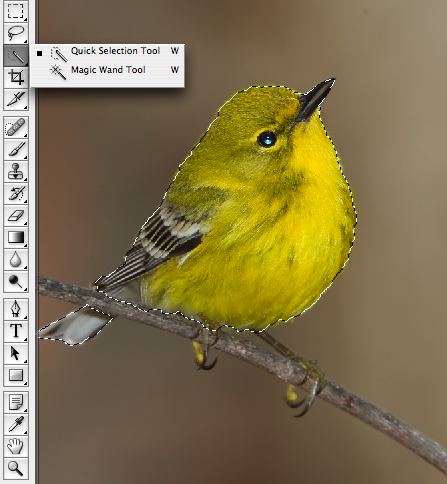
Fig. 12.5.1:
Separating the subject from the background is one
of the first tasks to be performed in my own workflow. This allows
me to adjust the brightness, sharpness, and saturation of the
bird differently from the background. This can be useful not
only for correcting visual defects in the subject, but also for
making the bird stand out more (or perhaps less).
As we described in section 10.6,
simply selecting the bird via one of Photoshop’s standard selection
tools may not be sufficient for the types of subtle processing that
you’d like to apply. In particular, it’s often a good idea to feather the selection via the Select > Modify > Feather
menu option, so that the selection has a soft edge. When the
selection is given a soft edge in this way, any processing that is
applied to the selection will gradually fall off in intensity around
the borders of the selection; this can help to reduce unnatural
boundary effects, especially for filters involving brightness or
blurring. Prior to feathering you’ll often want to contract the
selection via the Select > Modify
> Contract menu option. The figure below illustrates
the related task of expanding the selection.
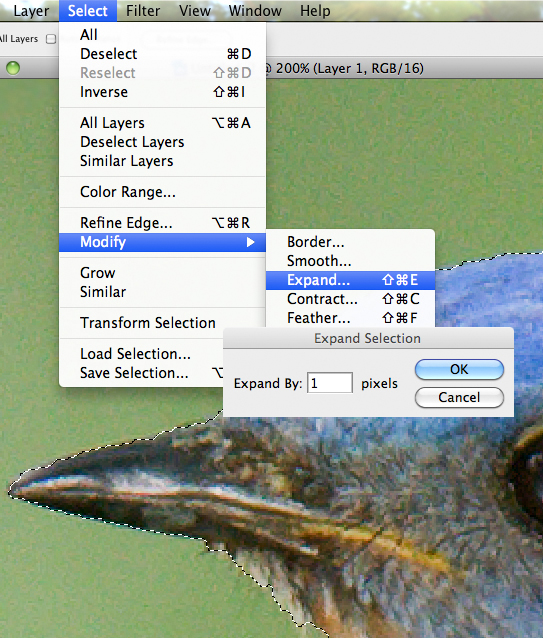
Fig. 12.5.2:
Depending on what kind of processing you’re about
to apply to the bird, you may want to expand or contract the selection
by a few pixels, and to apply some feathering, to supress any edge
artifacts that may occur as a result of further processing.
Once you’ve got
the bird selected, the next thing you should do is save the selection
to a named channel, via the Select > Save Selection menu
option. Saved selections are saved in the PSD file when you save
your work, so they’ll be available during subsequent post-processing
sessions on the same image. You’ll typically want to first save a
non-feathered version of the selection, since you can always re-load
the selection from memory and feather it as needed, whereas
un-feathering a saved, feathered selection is rather more
difficult. You can, of course, save multiple versions of a
selection (such as a feathered and a non-feather version, or versions
feathered at different radii) by simply creating different channel
names when saving the selection.
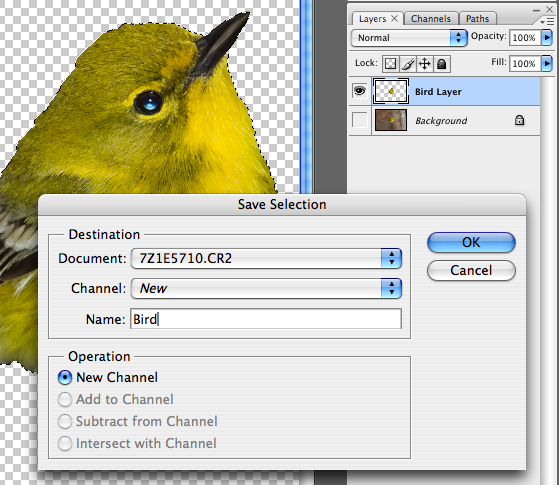
Fig. 12.5.3:
You should always save any nontrivial selection
into a new channel, so you can recall it later. Once you’ve
saved the selection, you can then either apply processing
directly to the selected area, or first copy the selected area
to a new layer.
After saving the selection of the
bird, you can then either apply processing filters directly to the
selection, or duplicate the selection into its own, separate layer (by
pressing Cmd-J / Ctrl-J).
There are many advantages to creating a separate layer for the bird;
just about the only disadvantage is the increased memory space required
to do so, though on most computer systems this won’t be a practical
limitation (though your file sizes will also increase, and this may be
more of a limitation for you if your hard drive is almost full).
Once you’ve separated the bird and its background
into different layers, you’re then free to process those layers
differently by simply clicking on a given layer before invoking any
image processing filters or painting tools. Once you’ve got a
part of the image separated into its own layer, you can then select
parts of that layer (with the standard selection tools) and copy those
parts to layers of their own, if desired. For example, once
you’ve got the bird on its own layer, you can then separate out the
face, the chest, the wings, and the tail all onto their own, separate
layers, and then process those layers differently. One reason for
doing so is to be able to correct local lighting deficiencies that
affect specific parts of the bird. For example, when using flash
to illuminate warblers, I often find that the highly reflective flight
feathers often result in feather glare that I then need to fix in
postprocess. I do this by selecting just the part of the bird
exhibiting the glare and then applying the Highlights tool to reduce the
glare. Conversely, some parts of the bird typically end up less
well lit than others, and for these parts I like to apply the Shadows or Levels tool to dispel the shadows
and create the impression of more even lighting. Though these
operations don’t always require that parts of the bird be selected
before applying the adjustment, doing so often provides for greater
control and reduces unintended side effects on other parts of the image.
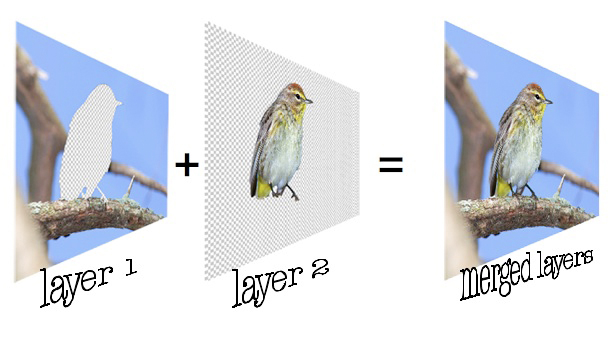
Fig. 12.5.4:
Once you’ve separated the bird and the background
into different layers, you can apply different processing to them,
allowing you to adjust how strongly the bird stands out. The use
of layers requires more memory, but affords enormous flexibility.
Keep in mind that while we talk
about “separation of the subject”, what we really mean in many
cases is separation of the foreground
from the background, where
the foreground will typically include not only the bird but also its
perching substrate. The perching substrate will, of course,
typically be in focus just as well as the bird, so attempts to
de-emphasize that substrate (by processing it the same as the
background) may result in an unnatural effect that is apparent to the
viewer. However, because the perching substrate will almost
always have a different texture and color than the bird itself, it’s
typically worthwhile to separate the substrate from the bird, so that
you’ll generatelly want to parse the image into three parts: the bird,
the in-focus portion of the perching substrate, and the out-of-focus
background.
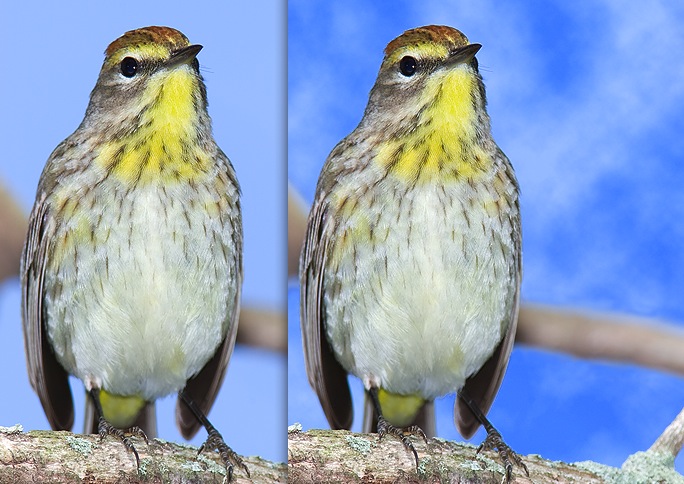
Fig. 12.5.5: An
example of differential processing of foreground
and background. Left: the original image. Right: after
rendering
clouds into the background. The sky was selected via Color Range
and then duplicated twice; one copy was brightened and the other
darkened. Render > Clouds was then applied to a layer mask on
the top layer, allowing the brighter lower layer to show through
as clouds. The whole process took about two minutes.
Note that for
many purposes (especially when preparing images to be posted on the
internet in low-resolution), you won’t necessarily need to separate the
subject from the background with exacting precision; we already alluded
to this in some sense when discussing the issue of feathering.
Since birds are three dimensional and the imaging plane is
two-dimensional, the borders of the bird will often look acceptable if
they’re less distinct than the main part of the bird (especially when
the depth-of-field is razor thin). For this reason, it’s often
possible to get away with a selection boundary that only roughly
follows the precise outline of the actual bird. For some
applications, you’ll want that selection boundary to fall completely
within the bird, while for others you’ll want the boundary to
completely contain the bird.
As noted earlier, it’s often desirable to create
multiple versions of the bird’s selection, to use for different
purposes. These different versions can often be obtained from a
single initial selection, via some combination of Contract, Expand, and Feather operations applied to the
original selection. You can also use the Select > Inverse operation to
obtain a selection of everything except
the bird. Note also that feathering can be performed by going
into Quick Mask mode (by
pressing the Q key) and using
a soft-edged brush with reduced opacity to paint a gradient around the
boundary of the selected region; this technique can be more difficult
to use effectively, however.
If you’re going to be creating a new layer from the
selection, it’s sometimes best to err on the side of including too much
of the subject in the new layer—i.e., using a hard boundary rather
than feathering it. Once you’ve got the subject on its own layer
and have applied some adjustments to it (e.g., color, brightness,
sharpness, etc.), you can then use a layer
mask (see chapter 13) or the Eraser
tool to soften the edges of the layer (using a soft edge and
reduced opacity in both cases). Blending the modified subject
back into the scene in this way requires more work, but has the
advantage that you get instant visual feedback and can adjust your
handling of the tool accordingly. By contrast, the use of Select > Feather would normally
be applied prior to any qualitative adjustments to the subject, so you
won’t know until later whether you’ve chosen an appropriate feathering
radius. An added advantage of using a layer mask to do the
blending is that it can always be adjusted again later if you apply
additional processing to either the subject or the background
(obviously, either could affect the blending of the bird into the
scene).
|
|
|
